6
DE
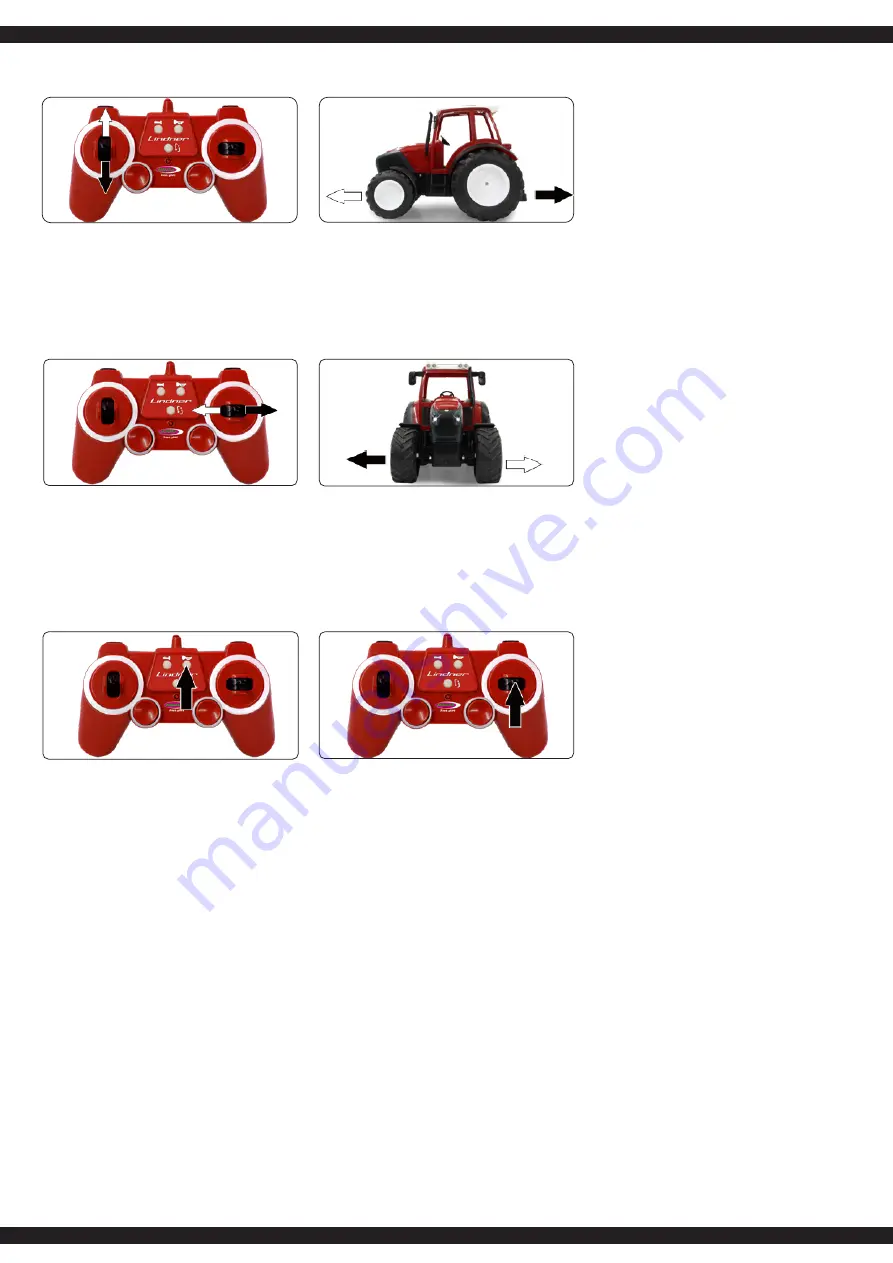
2. Vorwärts/rückwärts
Drücken Sie den Gashebel nach vorne oder
zurück, wird das Modell vorwärts bzw.
rückwärts fahren.
GB
2. Left or right turn
Push the throttle stick forward or backward,
the model will drive forward or backward.
FR
2. Marche avant/arriére
Poussez le levier du gaz vers l‘avant ou
vers l’arrière et le modèle fera une marche
avant ou une marche arriére.
IT
2. Avanti/indietro
Spingere l‘acceleratore in avanti o indietro e
il modello andrà avanti o indietro, mentre
questo manovra i fari sono accesi.
ES
2. Adelante/Atás
Primer la palanca de gas hacia adelante o
hacia atrás, el modelo seguirá adelante o
hacia atrás y los faros brillan.
CZ
2. Vpřed/zpět
Zatlačte páku plynu dopředu nebo dozadu,
model se bude pohybovat dopředu nebo
dozadu.
PL
2. Do przodu/do tyłu
Naciśnięcie dźwigni gazu do przodu lub do
tyłu spowoduje, że model poruszy się do
przodu lub do tyłu.
NL
2. Vooruit / achteruit
Zet het gashendel naar voren of naar
achteren, het model zal vooruit of achteruit
rijden.
2
DE
3. Links bzw. Rechts lenken
Drücken Sie den Richtungshebel nach links
oder rechts, lenkt das Modell nach links oder
rechts.
GB
3. Left or right turn
If you push the direction stick to the left or
right, the model will drive to the left or right.
FR
3. Tourner à droite ou à gauche
Poussez le levier de direction vers la droite
ou vers la gauche. Le véhicule va prendre
la direction commandée.
IT
3. Girare a sinistra o destra
Se si tiene premuto la leva di direzione a
sinistra o a destra, il modello gira a destra o
sinistra.
ES
3. Giro a la izquierda o derecha
Primer la palanca de dirección hacia
izquierda o derecha, el modelo se gira hacia
izquierda o drecha
.
CZ
3. Zatáčení doleva nebo doprava
Pro zatočení doleva nebo doprava posuňte
na dálkovém ovladači směrovou páčku
vlevo nebo vpravo. Model vozidla zatočí
doleva nebo doprava.
PL
3. Skręt w prawo lub w lewo
Podczas przesunięcia dźwigni zmiany
kierunku w lewo lub w prawo, pojazd będzie
jechał odpowiednio w lewo lub w prawo.
NL
3. Links of rechts draaien
Als u de richtingsstick naar links of rechts
duwt, rijdt het voertuig naar links of rechts.
3
4
5
DE
- Bedienung
GB
- Operation
FR
- Fonctionnement
IT
- Funzionamento
ES
- Funcionamiento
CZ
- Obsluha
PL
- Obsługa
NL
- Bewerking
DE
4. Hupe/Sound abschalten
Durch drücken der Hupe ertönt ein Hup-
Ton. Durch längeres drücken der Hupe wird
der Ton abgeschaltet.
5. Demo-Taste
Die Demo-Taste lässt das Modell automa-
tisch Manöver durchfüren.
6. Motor aus
Wenn dem Modell länger als 50 Sek. keine
Befehle gesendet werden, schaltet sich das
Modell automatisch aus und muss neu
gestartet werden.
GB
4. Horn/Sound off
By holding down the horn-button the sound
will be switched off. By pressing the button
a horn sound will be heard.
5. Demo button
The demo button allows the model to
automatically perform manoeuvres.
6. Engine off
If the model does not get any input within
50 sec., the model turns off automatically
and must be restarted.
FR
4. Klaxon/Éteindre le klaxon
Si vous appuyez longtemps sur le klaxon, le
son en est coupé. En appuyant sur le
klaxon, vous entendrez le son d’un klaxon.
5. Touche démo
Le bouton de démonstration permet au
modèle d‘effectuer des manoeuvres
automatiquement.
6. Moteur coupé
Si vous n’envoyez plus d’ordre pendant
plus de 50 secondes, le véhicule s’éteint
automatiquement et il faudra le redémarrer.
IT
4. Clacson/Spegnim. suono
Premendo per un tempo prolungato il
clacson si spegne il suono. Premendo il
clacson, si sente un suono di clacson.
5. Funzione Demo
Il pulsante demo permette al modello di
eseguire automaticamente delle manovre.
6. Spegnimento motore
Se il motore non riceve comandi per più di
50 secondi, si spegne automaticamente e
deve essere riavviato.
ES
4. Claxon/Apagar el sonido
A través de primer más el claxon se apaga
el tono. Al pulsar el claxon suena un
sonido.
5. Botón-Demo
El botón permite que el modelo realliza
automáticamente las maniobras.
6. Motor apagado
Si no le vas a dar mas de 50 segundos
nigun comandos, el modelo se apaga en
automáticamente y se debe reiniciar.
CZ
4. Houkačka | Vypnutí zvuku
Stlačením houkačky zazní realistický zvuk
houkačky. Delším podržením houkačky se
zvuk vypne.
5. Demo-tlačítko
Demo-tlačítko umožňuje modelu provést
automatický manévr.
6. Vypnutí motoru
Pokud se modelu déle jak 50 sekund
nevyšle žádný příkaz, model se
automaticky vypne a musí se znovu
nastartovat.
PL
5. Klakson | Wyłączanie dźwięków
Po wciśnięciu klaksonu zabrzmi realistczny
dźwięk klaksonu ciężarówki. Dłuższe
wciśnięcie klaksonu spowoduje wyłączenie
dźwięku.
5. Przycisk funkcji demo
Po wciśnięciu przycisku funkcji demo model
automatycznie wykona zapisany manewr.
6. Wyłączanie silnika
Jeżeli przez okres dłuższy niż 50 sek.
model nie otrzyma żadnych poleceń, wtedy
wyłączy się automatycznie i musi zostać
uruchomiony ponownie.
NL
5. Geluidssignaal/geluid uitzetten
Door het indrukken van geluidssignaal
weerklinkt een realistisch geluid. Door op
het geluidssignaal lang te drukken, wordt
het geluid uitgeschakeld.
5. Demo-toets
Met de demo-knop voert hetmodel automa
tisch manoeuvres uit.
6. De motor uitzetten
Als het model opdrachten gedurende
50 sec. niet ontvangt, zal dan automatisch
uitgeschakeld worden en moet opnieuw
worden gestart.


