background image

2-3

Mounting the Traffic Engineering II Radar

Once a site has been selected, the Traffic Engineering II Radar can be 
easily mounted using the installation kit.

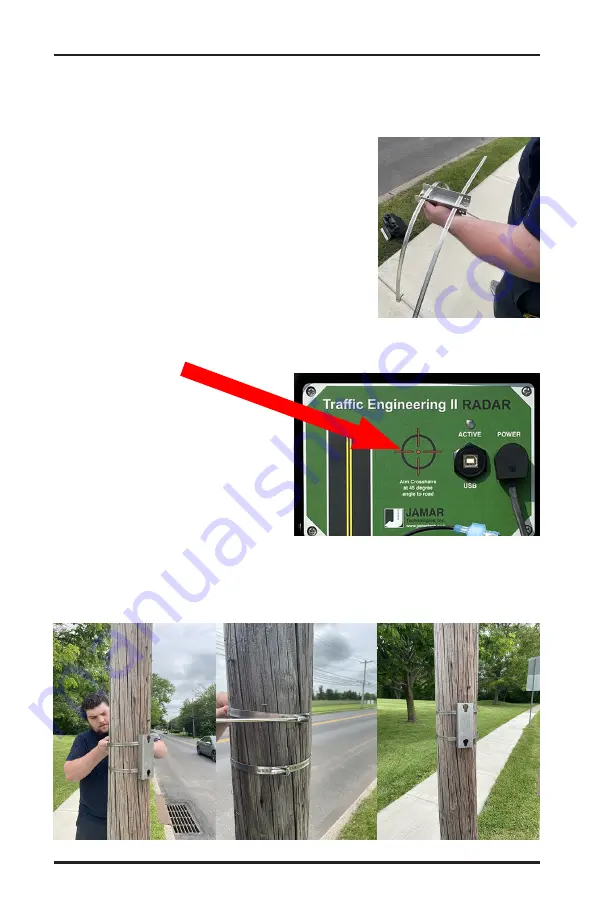
Step #1

 - Thread the SnapLock clamp bands 

through the openings on the pole bracket.

Step #2

 - For the most accurate results, the 

bracket should be installed so the Traffic Engi-
neering II Radar is facing traffic on a 45 degree 
angle. 

IMPORTANT: 

The area of the Traffic Engi-

neering II Radar that you are aiming toward the road on a 45 degree 
angle is the crosshairs on the front of the Radar head, as shown in 
the picture here.

Once you have determined the 45 
degree angle for the bracket, wrap 
the bands around the pole and 
place the bracket.

Step #3


- Snap down the screws on the clamp bands and tighten the 

clamp with a flat-head screwdriver or 5/16 inch nut driver.

Chapter 2 — Site Installation

Summary of Contents for Traffic Engineering II

Page 1: ...i Traffic Engineering II Radar User s Manual JAMAR Technologies Inc...

Page 2: ...Traffic Engineering II Radar User s Manual ii...

Page 3: ...ranty does not extend to products which have been repaired or altered outside our factory or authorized service agent There is a 90 day warranty on the rechargeable battery of the Traffic Engineering...

Page 4: ...t you cannot find answers for in this manual there are several ways to get ad ditional information On the Hardware Support section of our web site at www jamartech com Contact us by e mail at sales ja...

Page 5: ...ecting a Site 2 2 Mounting the Traffic Engineering II Radar 2 3 Chapter 3 Programming the Radar Head 3 1 Connecting to the TE II Radar USB 3 2 Connecting to the TE II Radar Wireless Bluetooth 3 6 Sett...

Page 6: ...t a 45 degree angle to the flow of traffic Where the far side lane is no greater than 50 feet away Where traffic is free flowing The unit should not be installed At an intersection Near where vehicles...

Page 7: ...1 1 Chapter 1 Introduction Chapter 1 Introduction...

Page 8: ...es How is the Traffic Engineering II Radar Powered The Traffic Engineering II Radar is powered by a 12 Volt rechargeable battery The standard battery used with the device is a 12V 12A lithium battery...

Page 9: ...th both the operation of the Traffic Engineering II Radar and the software that is used with it by reading all the documentation that came with the equipment Whenever possible we recommend that you pe...

Page 10: ...Traffic Engineering II Radar User s Manual 1 4...

Page 11: ...2 1 Chapter 2 Site Installation Chapter 2 Site Installation...

Page 12: ...When choosing a location to install the Traffic Engineering II Radar keep in mind that it will need to be mounted to a pole typically a utility pole or tree so the site will need to have one of these...

Page 13: ...ic Engi neering II Radar is facing traffic on a 45 degree angle IMPORTANT The area of the Traffic Engi neering II Radar that you are aiming toward the road on a 45 degree angle is the crosshairs on th...

Page 14: ...Traffic Engineering II Ra dar s mounting bracket into the large holes of the pole mounting bracket and slide the Traffic Engineering II Radar down to secure it in place Note that it is the front of t...

Page 15: ...to the next chapter close and lock the lid If you wish to add further security to the installation the chain that was provided with the recorder can be used We recommend wrapping the chain around the...

Page 16: ...lt the unit so it is facing down into the traffic lane This is done by adjusting the bracket on the back of the Radar Loosen the top bolt on the bracket there is one on each side using the provided he...

Page 17: ...3 1 Programming the Radar Head Chapter 3 Chapter 3 Programming the Radar Head...

Page 18: ...open the case of the Traffic Engineering II Radar and connect your computer to the USB port of the Traffic Engineering II Radar Head unit When you plug in the USB cable for the first time you should...

Page 19: ...then see a screen showing the different devices for setup Select TE II Radar at the bottom left On the Setup screen make sure the radio button for Com Port is selected and that the correct COM port nu...

Page 20: ...Traffic Engineering II Radar User s Manual 3 4 STARnext will attempt to connect to the Traffic Engineering II Radar and if successful show the current status of the unit...

Page 21: ...cally start a count if power is disconnected and reconnected Date Time this is the date time current programmed in the unit You will be shown a warning that the date and time are not correct if they a...

Page 22: ...y search for and display any units it find powered on within its range Note that there is no need to go though the Pairing process as was common with units that used a Classic Bluetooth connection On...

Page 23: ...3 7...

Page 24: ...Traffic Engineering II Radar User s Manual 3 8 Setting Up a Study To setup a study click the Edit Setup LiveView button on the Radar Setup screen...

Page 25: ...tails of the lane closest to the Radar These include whether the vehicles are approaching or receding from the radar and the distance to the center of the near lane The Near Lane fields can be used to...

Page 26: ...it is recorded including vehicle length and speed IMPORTANT We highly recommend that you use the LiveView to verify that the Traffic Engineering II Radar is correctly recording ve hicles before you le...

Page 27: ...4 1 Downloading Data Chapter 4 Chapter 4 Downloading Data...

Page 28: ...the Radar Recorder using your computer and the STARnext software To do this you will need to connect the Radar to the STARnext software using one of the methods found in Chapter 3 of this manual Howe...

Page 29: ...ext will then attempt to connect to the TE II Radar If the connection is successful once the download is complete you ll see the list of files available to download from the TE II Select the file s yo...

Page 30: ...ce the download is completed you will be prompted to assign a file name to your file Click Save once this is done and your data will appear From this point refer to the STARnext manual for information...

Page 31: ...5 1 Chapter 5 Battery Care Chapter 5 Battery Care...

Page 32: ...ms of a damaged battery are 1 The battery will not charge to its full capacity of 13 4 volts or higher 2 The battery will only hold a charge for a short time under load conditions 3 The battery will d...

Page 33: ...terminals of the battery CAUTION Never plug a charger into a battery unless you are absolutely sure of the voltage output and polarity The charger has four 4 Charge LEDs 25 50 75 and 100 These Charge...

Page 34: ...evere dam age to the battery It is normal for a battery to become warm to the touch during charg ing It is normal for a battery to self discharge during prolonged stor age Always fully charge a batter...

Page 35: ...6 1 Chapter 6 Troubleshooting Chapter 6 Troubleshooting...

Page 36: ...rrect area of the Traffic En gineering II Radar toward the road You should be aiming the crosshairs printed on the radar head as shown in the picture here at a 45 degree angle toward the road you want...

Page 37: ...A 1 Appendix Appendix...

Page 38: ...lled 12 lbs Power Rechargeable 12V lithium battery Approx Accuracy Near Lane 98 Far Lane 96 Battery Charge Life 14 Days Operating Temperature Minus 40 F 40 C to 158 F 70 C Data Interface Hard Wire USB...

Page 39: ...s undergone extensive testing to verify the accuracy of its operations and each unit is tested before it leaves our facility However just like other complex electronic devices problems can occur We al...

Page 40: ...Traffic Engineering II Radar User s Manual A 4...

Reviews: