background image

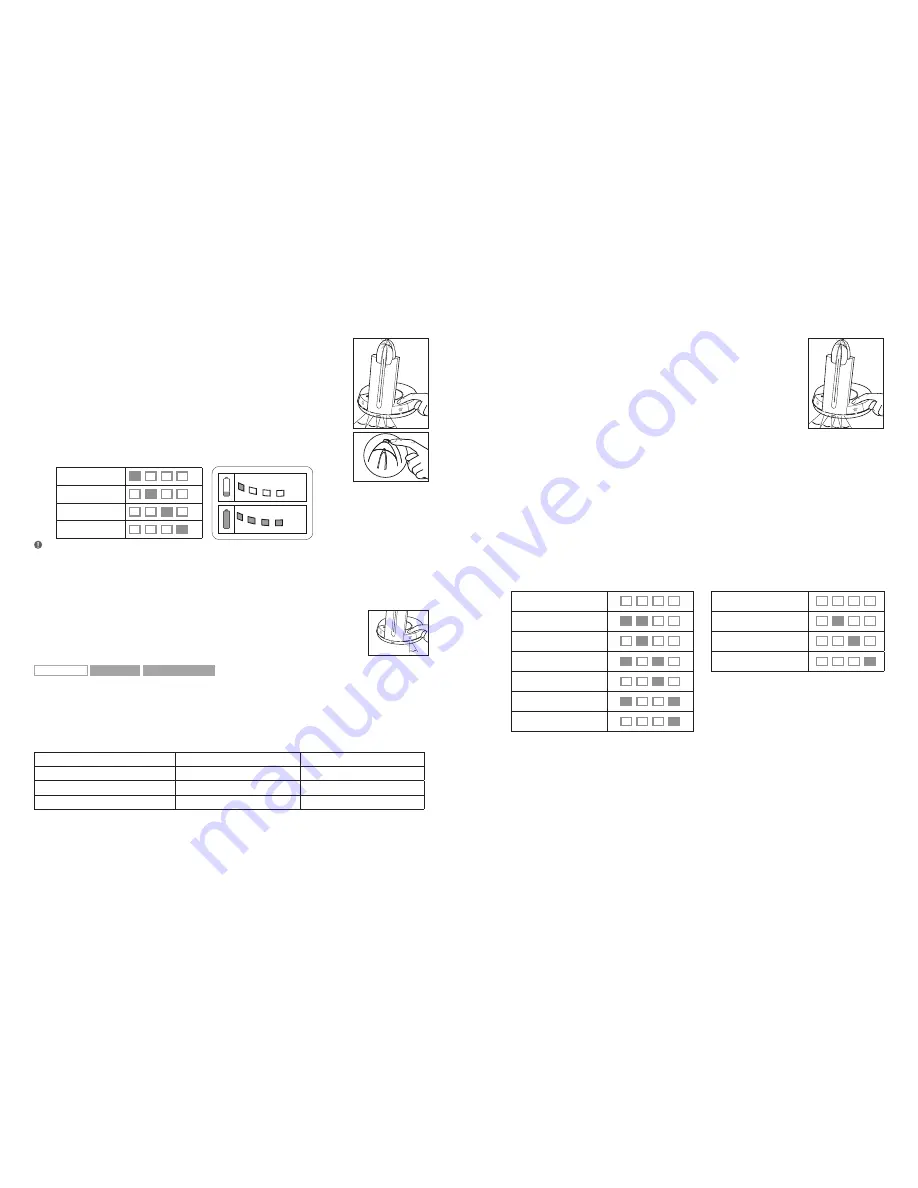
To select the appropriate interface:
1.  Place the headset in the base with its indicators facing you. 

2.   Press the Telephone button on the Base for 6 seconds while the 

headset is in the base until the headset’s blue LED is flashing rapidly

3.   Use the volume up/down button to shiftbetween the different EHS 

settings – see table below.

The base unit’s 4 battery indicators show which EHS mode  
the GN9330e is in.

GN RHL (Default)

DHSG

AEI

MSH


Note:

 If more than 15 seconds elapses without pressing the  or volume – button, the last selected interface will 

be activated.

4.   To set the EHS mode, press the Telephone button on the Base for 6 seconds until the 4 battery 

indicators flashes once. Now wait 5 seconds and the headset is initialized.

2.4.7 Change default phone type

You can chose to have either PC or Telephone as the default phone type 
(Telephone is factory default). To change setting, press and hold the phone 
type button on the base until the blue LED below the button is solid blue.

GN9330e USB

GN9330e

GN9350e

2.4.8 Audio Mode/Radio Power

Your headset offers 3 range/power modes (Normal, Low and Very Low). The Normal mode
is ideal for most users. However, if you experience interference from other communication
devices during your calls, you may want to switch to the Low or Very Low modes. Changing to
Low or Very Low power modes will reduce the range of your headset.

Power mode

Range* DECT 

Range* US DECT 

Normal (Default)

Up to 120 m 

Up to 400 ft 

Low 

Up to 60 m 

Up to 200 ft 

Very Low (V. low) 

Up to 25 m 

Up to 80 ft 

* In typical office environment 

Note: 

The Normal power mode is the default setting.

25 %

100 %


It is possible to force the headset and base into either narrowband or  
wideband (9330e USB only). By forcing the headset into narrowband you 
are less likely to experience interference from other communications 
devices at the cost of a slightly reduced audio quality.


Opening range and sound mode selection

Opening hook mode or power/bandwidth mode succeeds as follows:
1.   Press the base station USB button (9330e USB) or telephone button 

(9330) for at least 6 seconds.

2.   The blue LED on the base station and the blue LED on the headset both flash rapidly and 

continuously when programming mode is initiated.


Displaying Audio Mode/Power Settings

1.   The first short press on the base station USB or telephone button shows the current setting 

and enables mode selection. 


Setting Power and Audio Mode

1.   A short press on base station USB or telephone button toggles this setting
2.  The current setting is indicated with the four green charge-state LED’s as follows 

The base unit’s 4 battery indicators show which Audiomode \ PowerLevel the device is in.


GN9330e - USB 

GN9330e

Audiomode \ PowerLevel

Audiomode

WideBand \ Normal 

NarrowBand \ Normal 

NarrowBand \ Normal 

NarrowBand \ Low 

WideBand \ Low 

NarrowBand \ Very Low

NarrowBand \ Low 

WideBand \ Very Low

NarrowBand \ Very Low


Closing Settings Mode

Closing Settings Mode succeeds in one of two ways:
1.   Press the base station USB button (9330 USB) or telephone button (9330) for at least 6 seconds
2.   Do not press any buttons for 15 seconds
 

 When Settings Mode is terminated, the blue LED stops flashing and the headset/base 
returns to normal operation.

10

11

Summary of Contents for GN9330e - USB - Headset

Page 1: ...Jabra GN9300e www jabra com User manual ...

Page 2: ...99 USA 1 800 826 4656 ASIA Australia 1 800 636 086 local distributor China 86 21 5836 5067 Hong Kong 800 968 265 Toll free India 000 800 852 1185 Toll free Indonesia 001 803 852 7664 Japan 81 3 5297 7976 Malaysia 1800 812 160 Toll free New Zealand 0800 447 982 Toll free Philippines 63 2 2424806 Singapore 800 860 0019 Toll free Taiwan 0080 186 3013 Toll free India 000 800 852 1185 Toll free Philipp...

Page 3: ...81 02622 Rev F Guide for additional functions ENG 1 Anleitung für zusätzliche Funktionen DE 22 Guide des fonctions additionnelles FR 44 Guía de funciones adicionales ES 66 ...

Page 4: ...GN9330e USB to which products they concern When the feature does not apply it will simply haveawire frameboxandnogreyfill i e GN9350e GN9330e GN9330e USB 1 Product information 3 2 Setting up 4 2 1 Headset port 4 2 2 Default Outbound Call mode 4 2 3 Connecting to the GN1000 RHL Remote Handset Lifter GN accessory 4 2 4 LCD display 5 2 4 1Transmit volume 5 2 4 2 Hookswitch selection 6 2 4 3 Range pow...

Page 5: ...ully wireless robust headset solutions They all share hands free working efficiency wireless mobility useful features and many customizing and accessory options Below is an overview of the primary features and functions offered within each model number Comparison of features by model type Features GN9350e GN9330e GN9330e USB Desk telephone connectivity VoIP USB connectivity GN1000 RHL enabled Elec...

Page 6: ...50e GN9330e GN9330e USB 2 4 LCD display Your base unit has a LCD display and display control with which you control 5 settings Transmit volume setting Hookswitch selection Range power selection Sound mode selection Protection level selection IntelliTone Navigation and markers Navigate through the LCD display s 5 menus horizontally using the display control s34arrows Within each of the 5 menus navi...

Page 7: ...he Normal power mode is the default setting To change the range power mode 1 Use 3 4to locate the range power mode menu on base display 2 Use 56to select one of the 3 modes from the menu 3 Press OK to confirm the new mode 2 4 4 Sound mode selection This menu is split into two sections Treble Normal Bass and Fixed Switch These two sections are separated by a blank line It is possible to choose one ...

Page 8: ...ours on telephone day Level 4 TT4 Recommended Australian protection level Telstra Compliant with Directive 2003 10 EC of the European Parliament and Council of 6 February 2003 To change the protection level 1 Use 3 4to locate the protection level menu on base display 2 Use 56to select one of the 5 modes from the menu 3 Press OK to confirm the new mode Automatic volume adjustment and noise reductio...

Page 9: ...w Up to 25 m Up to 80 ft In typical office environment Note The Normal power mode is the default setting 25 100 It is possible to force the headset and base into either narrowband or wideband 9330e USB only By forcing the headset into narrowband you are less likely to experience interference from other communications devices at the cost of a slightly reduced audio quality Opening range and sound m...

Page 10: ...reased by pressing the volume control up To change the headset s volume control button orientation 1 Make sure there is no link between the headset and the base indicator on headset is not flashing 2 Press the headset s mute button for 10 seconds The headset s link indicator will light 3 Determine how you prefer to increase volume pushing the control either up or down 4 Press the volume control ei...

Page 11: ...et must confirm permit other members to join a conference Ending conference calls for a secondary headset only 1 Place secondary headset in its own base or press its talk button This participant is now terminated from the conference call GN9350e GN9330e GN9330e USB 4 4 Emergency calling viaVoIP Your headset supports quicker emergency calling viaVoIP applications softphone If the headset is connect...

Page 12: ...hen ending the conference call just single tap the headset s talk button to close the Clean Audio Mode Note that you have to set the Audio Preference in the Windows operation system to the GN9330e or GN9350e Also in the conference call application e g Windows Live Meeting you have to set the Audio preferences to the GN9330e or GN9350e 5 Use with DECT cordless telephones GN9350e GN9330e GN9330e USB...

Page 13: ... talk time left GN9350e GN9330e GN9330e USB 6 2 Replacing the battery pack The headset s battery pack can be changed when required To replace the battery pack on a wearing style 1 Unclip the wearing style from the battery pack 2 Slide the backside of the headset speaker housing downwards 3 Slide the new battery pack from the extra battery charging facility onto the headset The headset s link indic...

Page 14: ...g Q I have heard there is a GN wireless headset which has no need for a GN1000 RHL to answer calls remotely A Yes this is known as the EHS electronic hookswitch feature on the GN9350e which some telephone systems support Check with your supplier for compatibility with your phone and or consult our support site at www jabra com Q Ihavemoveddesksatwork Isitpossibletoputmyheadsetontoanotherbase A Yes...

Page 15: ...29 2 4 6 Fern Rufannahme ohne LCD 30 2 4 7 Standard Telefontyp ändern 31 2 4 8 Relevant für die Modelle GN 9330e und GN 9330e USB 31 3 Tragemöglichkeiten 33 3 1 Tragemöglichkeiten für den Überkopfbügel 33 3 2 Tragemöglichkeiten für den Nackenbügel 33 3 3 Tragemöglichkeiten für den Ohrhaken 33 3 4 Tragemöglichkeiten ändern 33 3 5 Die Taste für die Empfangslautstärke neu ausrichten 34 4 Das Headset ...

Page 16: ...n Sie das Handapparatkabel im Telefon lassen Verbinden Sie die Headsetbuchse des Telefons mit der Telefonbuchse an der Basisstation Auf diese Weise können Sie die Anruftaste des Telefons verwenden soweit vorhanden und die Anzahl der von der Basisstation abgehenden Kabel reduzieren Wichtig Der Umschalter für ein klares Freizeichen muss korrekt eingestellt sein Siehe Abschnitt Klares Freizeichen ein...

Page 17: ... Drücken Sie auf OK um die neue Einstellung zu speichern Nach dem Anpassen der anderen Einstellungen über das Display wird wieder das Menü für die Übertragungslautstärke als Ausgangsposition angezeigt Wichtig Bei Verwendung einer USB Anwendung sind die Sendereinstellungen fest und müssen nicht angepasst werden 2 4 2 Fern Rufannahme DasGN9350eermöglichtIhnen mitdemGN1000RHLoderdenintegriertenEHS Mo...

Page 18: ...he Sendeverstärkung von 6 dB Höhere Übertragungslautstärke So ändern Sie den Klangmodus 1 NavigierenSiemitHilfevon34zumMenüfürdenKlangmodus imDisplayderBasisstation 2 Wählen Sie mit Hilfe von 56 einen der drei Modi im Menü aus und wählen Sie Fixed oder Switch im Menü aus 3 Drücken Sie auf OK um die Einstellung zu speichern 2 4 5 Auswahl der Gehörschutzebene Das Headset bietet vier Schutzebenen plu...

Page 19: ...enung des Headset beim Annehmen und Beenden von Gesprächen am Telefon wie im Handbuch zur grundlegenden Konfiguration und Verwendung des Geräts beschrieben So wählen Sie die geeignete Schnittstelle aus 1 Platzieren Sie das Headset so in der Basisstation dass die Anzeigeelemente in Ihre Richtung weisen 2 DrückenSiesechsSekundenlangdieTelefontasteanderBasisstation währendsichdasHeadsetinderBasisstat...

Page 20: ...zwei Möglichkeiten den Einstellungsmodus zu verlassen 1 Drücken Sie die USB Taste Modell 9330 USB oder die Telefontaste Modell 9330 für mindestens 6 Sekunden 2 Drücken Sie mindestens 15 Sekunden keine Taste Bei Verlassen des Einstellungsmodus hört die blaue LED auf zu blinken und Headset und Basisstation kehren in den normalen Betriebsmodus zurück 3 Tragemöglichkeiten DasHeadsetbietetverschiedeneT...

Page 21: ...on klingelt 2 Entnehmen Sie das Headset aus der Basisstation und drücken Sie die Gesprächstaste des Headsets oder drücken Sie die Telefontaste der Basisstation Der Anruf wird durchgestellt der Handapparat wird abgehoben die Telefonverbindung wird hergestellt Wichtig Bei einem eingehenden Anruf wird die Basisstation Ihres GN9350e automatisch in den benötigten Modus wechseln wenn die Aktivierung dur...

Page 22: ...acht drücken Sie nicht die Sprechtaste am Headset oder die Telefonmodustaste an der Basisstation da dadurch der Anruf beendet wird Wird der Akku des Headsets leer bleibt die Verbindung zwischen Headset und Basisstation noch zwei Minuten lang bestehen damit der Akku gewechselt werden kann GN9350e GN9330e GN9330e USB 4 6 Vom Handapparat des Tischtelefons auf das Headset umschalten Während eines Anru...

Page 23: ...s So fügen Sie das zusätzliche Ladegerät hinzu 1 SchiebenSiedieSchutzabdeckungausderBasisstationnachoben 2 Schieben Sie das zusätzliche Ladegerät in die Basisladestation bis es hörbar einrastet Der zusätzliche Akku kann im Empfänger auf der Rückseite der Ladestation geladen werden Wenn der Akku richtig platziert ist und geladen wird leuchtet ein Signal Indikator Die Signal Indikator erlischt wenn ...

Page 24: ...r beim GN Zubehör Aktueller Ladezustand wird an den grünen Dioden angezeigt 8 Fehlersuche GN9350e GN9330e GN9330e USB F Wie kann ich die Einstellungen zurücksetzen A 1 Setzen Sie das Headset in die Basisstation ein Trennen Sie anschließend das Netzkabel von der Basisstation 2 Entnehmen Sie das Headset aus der Basisstation 3 Entnehmen Sie den Akku indem Sie die Rückseite des Lautsprechergehäuses am...

Page 25: ...nleitungbeschriebenist F MeinTelefonsolltesichmitderEHS VersionvonGNbetreibenlassen aberesgelingtmirnicht A Rufen Sie www jabra com auf um weitere Informationen zu erhalten Dazu gehören InformationenzurKompatibilitätsowiedieEinstellungdesUmschaltersfüreinklaresFreizeichen 9 Wartung Sicherheit und Entsorgung Wartung Überkopfbügel MikrofonarmundOhrhakenkönnenmiteinemtrockenenoderleichtangefeuchteten...

Page 26: ...ur 49 2 4 3 Sélection de la puissance portée 59 2 4 4 Sélection du mode sonore 50 2 4 5 Sélection du niveau de protection 51 2 4 6 Sélection de l interrupteur de prise de ligne sans LCD 52 2 4 7 Modifier le type de téléphone par défaut 53 2 4 8 Applicable au GN 9330e et au GN 9330e USB 53 3 Comment porter le micro casque 55 3 1 Serre tête 55 3 2 Contour de nuque 55 3 3 Contour d oreille 55 3 4 Cha...

Page 27: ... d installation et d utilisation abrégé GN9350e GN9330e GN9330e USB 2 1 Connecteur micro casque Si votre téléphone possède un connecteur micro casque il est conseillé de pas débrancher le fil du combiné Reliez le connecteur micro casque du téléphone au connecteur téléphone de la base Ceci vous permettra d utiliser la touche d appel de votre téléphone le cas échéant et de limiter le nombre de fils ...

Page 28: ...l afficheur celui ci revient ensuite au menu Réglage du volume de transmission Important si vous utilisez une application USB le paramétrage du volume de transmission est fixe et ne nécessite aucun réglage 2 4 2 Sélection du mode de décroché à distance LeGN9350evouspermetdeprendrelesappelsetderaccrocheràdistanceàl aideduGN1000RHL oudesmodesEHS crochetcommutateurélectronique intégrés Toutefois l EH...

Page 29: ...icheur de la base 2 Sélectionnez l un des 3 modes du menu à l aide des flèches 56et choisissez Fixe ou Auto dans le menu 3 Appuyez sur OK pour confirmer le réglage 2 4 5 Sélection du niveau de protection Votremicro casqueoffre4niveauxdeprotectiondifférents enplusdesaprotectiondebase Vouspouvezainsivousprotégercontrelesbrusquescrêtessonoresduréseautéléphonique notammentlessignauxstridentsdestélécop...

Page 30: ...9330e est configuré pour utiliser le levier de décroché à distance ce qui correspond au paramétrage adéquat pour une utilisation manuelle et pour le processus de décroché raccroché décrit dans le manuel de base de configuration et d utilisation Pour sélectionner l interface appropriée 1 Placez l oreillette sur son socle les voyants lumineux en face de vous 2 Avec l oreillette sur le socle appuyez ...

Page 31: ... quitter le mode de sélection il existe deux méthodes 1 Appuyez sur le bouton de la station d accueil USB 9330 USB ou le bouton du téléphone 9330 pendant au moins six secondes 2 N appuyez sur aucun bouton pendant 15 secondes Une fois que vous avez quitté le mode de sélection le voyant bleu arrête de clignoter et l oreillette la station d accueil reprennent leur fonctionnement normal 3 Comment port...

Page 32: ... Vousobtenezlacommunication lecombinésesoulève lalignetéléphoniques établit Important lors d un appel entrant la base GN9350e passe automatiquement au mode requis lorsqu elle est activée par un logiciel de téléphonie le détecteur de sonnerie du GN1000 ou via l adaptateur EHS Selon que l appel provienne du téléphone de bureau ou qu il s agisse d un appel VoIP USB Après l appel la base revient autom...

Page 33: ...ans le socle de charge appuyer sur la touche conver sation du micro casque ni appuyer sur la touche mode Téléphone de la base car la communication serait coupée Silabatteriedumicro casqueestdéchargée laliaisonmicro casque baseresteactive2minutes pourvouspermettredelaremplacer GN9350e GN9330e GN9330e USB 4 6 Basculer un appel du combiné téléphonique vers le micro casque Pour basculer un appel en co...

Page 34: ...i Vous pouvez maintenant utiliser votre micro casque avec le téléphone sans fil Pour plus de détails sur le fonctionnement du micro casque avec votre téléphone sans fil consultez le guide d utilisation du téléphone 3 Veuillez noter que l oreillette doit être ré appairée à la base du GN9350 pour reprendre le fonctionnement normal 6 Remplacement de la batterie accessoire GN GN9350e GN9330e GN9330e U...

Page 35: ...e GN9330e USB 7 3 Voyants de la base Evénement base Signal visuel Voyant de la touche mode Téléphone Touche Conversation de la base Allumé en mode Téléphone et clignotant quand la liaison est établie Voyant de la touche mode USB Touche Conversation de la base Allumé en mode USB et clignotant si liaison USB établie Voyant Secret rouge Allumé si la fonction Secret est activée Voyant de batterie 4 di...

Page 36: ...ns téléphoniques Contactez votre fournisseur pour savoir s il est utilisable avec votre téléphone et ou consultez notre site de support www jabra com Q J ai changé de bureau Est il possible d utiliser mon micro casque avec une autre base R Oui c est possible Il suffit de coupler votre micro casque sur la nouvelle base Pour cela procédez comme indiqué à la section 4 7 de ce guide Q Mon téléphone de...

Page 37: ...2 4 4 Selección del modo de sonido 72 2 4 5 Selección del nivel de protección 73 2 4 6 Selección de conmutador de gancho sin LCD 74 2 4 7 Cambiar el tipo de teléfono predeterminado 75 2 4 8 Información relevante para GN 9330e y GN 9330e USB 75 3 Formas de sujeción 77 3 1 Sujeción en la cabeza 77 3 2 Sujeción en la nuca 77 3 3 Sujeción en el oído 77 3 4 Cambio de forma de sujeción 77 3 5 Reorientac...

Page 38: ...ón básicas GN9350e GN9330e GN9330e USB 2 1 Puerto del microcasco Si el teléfono dispone de un puerto para los microcascos se recomienda dejar el cable del auricular en el teléfono Conecte el puerto del microcasco del teléfono al puerto del teléfono de la base De esta forma podrá utilizar el botón de llamada del teléfono si existe y limitará el número de cables que salgan de la base Importante El c...

Page 39: ... LCD Después de ajustar las otras opciones desde la pantalla se volverá a la posición de menú de volumen de transmisión Importante Si utiliza una aplicación USB las opciones de TX son fijas y no requieren ningún ajuste 2 4 2 Selección de conmutador de descuelgue La unidad GN9350e le permite responder y finalizar llamadas de forma remota mediante el uso de GN1000 RHL o sus modos de conmutador de de...

Page 40: ... el modo de sonido 1 Utilicelasflechas3 4paralocalizarelmenúdelmododesonido enlapantalladelabase 2 Utilice las flechas 56 para seleccionar uno de los 3 modos del menú y elija entre las opciones de fijado conmutado del menú 3 Pulse OK Aceptar para confirmar la nueva opción 2 4 5 Selección del nivel de protección El microcasco ofrece una opción con 4 niveles de protección además del nivel de protecc...

Page 41: ...mplo con teléfonos de escritorio Alcatel Nota De manera predeterminada el GN9330e está configurado con la interfaz RHL que además es la configuración adecuada si utiliza su teléfono de forma manual para responder finalizar llamadas según se describe en la Guía básica de configuración y uso Para seleccionar la interfaz adecuada 1 Coloqueelauricularenlabaseconlosindicadoresmirandohaciausted 2 Pulse ...

Page 42: ...estrecha Bajo Banda ancha Muy bajo Banda estrecha Muy bajo Cierre del modo de configuración Puede cerrar el modo de configuración de dos formas 1 Presione el botón USB de la estación base 9330 USB o el botón de teléfono 9330 al menos durante 6 segundos 2 No presione ningún botón durante 15 segundos Una vez terminado el Modo de configuración el indicador LED azul deja de parpadear y el auricular y ...

Page 43: ... auricular de la base pulse el botón de conversación del auricular o pulse el botón del teléfono situado en la base La llamada se conectará el microteléfono se descuelga se abre la conexión de la línea telefónica Importante Durante una llamada entrante la base GN9350e cambiará automáticamente al modo necesario cuando se active a través de un softphone el sensor de llamada del GN1000 o un adaptador...

Page 44: ...de su teléfono no coloque el microcasco en el soporte de carga ni pulse el botón de conversación o el de modo teléfono de la base porque desconectaría la llamada Si el microcasco se queda sin batería la conexión entre éste y la base permanecerá activa durante 2 minutos aproximadamente para que tenga tiempo de cambiar la batería GN9350e GN9330e GN9330e USB 4 6 Cómo transferir una llamada del microt...

Page 45: ...sto para utilizarse con el teléfono inalámbrico Consulte el manual del usuario de su teléfono inalámbrico para obtener las instrucciones de uso con el microcasco 3 Tenga en cuenta que el auricular debe sincronizarse de nuevo con la base GN9350 para volver al funcionamiento normal 6 Sustitución de la batería accesorio de GN GN9350e GN9330e GN9330e USB 6 1 Instalación de la utilidad de carga de la b...

Page 46: ... GN9350e GN9330e GN9330e USB 7 3 Indicadores visuales de la base Acción en la base Indicación visual Indicador del botón de modo telefónico Botón de conversación de la base Se ilumina en el modo telefónico y parpadea cuando está conectado Indicador del botón de modo USB Botón de conversación de la base Se ilumina en el modo USB y parpadea cuando está conectado al puerto USB Indicador de la funcion...

Page 47: ...con su teléfono y o póngase en contacto con nuestro centro de asistencia en el sitioWeb www jabra com P He cambiado de mesa en el trabajo Puedo poner el microcasco en otra base R Sí sí que puede Tan sólo deberá emparejar el microcasco con la nueva base Siga los procedimientos que se describen en la sección 4 7 de esta guía P Mi teléfono debería funcionar con la versión EHS de GN pero no logro que ...

Reviews: