24
6X-1050a
3960 CAMERA
INSTALLATION AND OPERATION
4.4 POLE MOUNT INSTALLATION
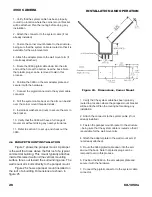
Figure 5 shows the pole mount bracket.
This mounting arrangement provides a pole
mount bracket to which the wall mount arm
attaches. The bracket attaches to the pole
using stainless steel straps. A tensioning tool
will be required to secure the stainless steel
straps to the pole (Cohu tool, part number
7411411-001). See item 8 in table 4
Provisions must be made for routing the
system cable up to the 3960 location on the
pole. Cables often route up through the pole
and exit at an access port near where the pole
mount bracket will attach. Provisions may have
to be made to support the cable inside the pole
so that the full cable weight is not supported
solely at the top.
A pole mount installation is similar to the
wall mount installation except that the arm
fastens to a pole mount bracket instead of
directly to a wall.
4. Install a weather tight gasket between the arm and
the surface of the wall (if this is required).
5. Route the 3960 pigtail cable down into the arm
and out the back. Note that plastic plugs can be
removed to aid in this process.
6. Position the 3960 on the arm adapter plate and
secure it with the hardware.
7. Connect the pigtail connector to the system cable
connector.
8. Pull the system cable back into place so the are
can be positioned to the wall.
9. Bolt the Arm to the wall.
10. Verify that the 3960 will have a full range of
movement without striking any nearby structures.
11. Refer to section 3 to set up and check out the
3960.
Figure 22. Dimensions, Wall Mount Arm


