


Page 25
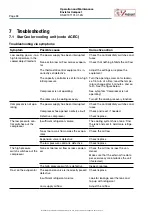
Operation and Maintenance
Envistar Compact
DSEC191101.01.EN
Continuous product development may give rise to specification changes without notice.
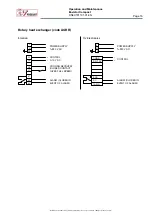
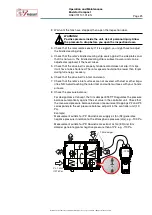
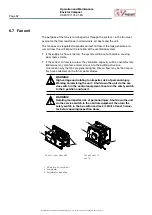
2. Wait until the fans have stopped, then open the inspection door.
WARNING!
Positive pressure inside the unit, risk of personal injury. Allow
the pressure to drop before you open the inspection doors.
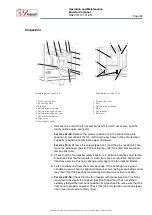
3. Check that the rotor rotates easily. If it is sluggish, you might have to adjust
the bristled sealing strip.
4. Check that the rotor’s bristled sealing strip seals against the side plates and
that it is not worn. The bristled sealing strip is subject to wear and can be
adjusted or replaced if the need arises.
5. Check that the drive belt is properly tensioned and does not slip. If it slips,
it will have to be shortened. The rotor speed should not be lower than 8 rpm
during full energy recovery.
6. Check that the drive belt is intact and clean.
7. Check that the rotor’s inlet surfaces are not covered with dust or other impu-
rities. NB: Avoid touching the rotor inlet and outlet surfaces with your hands
or tools.
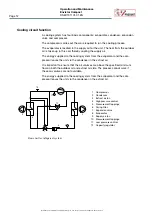
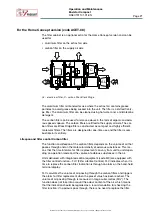
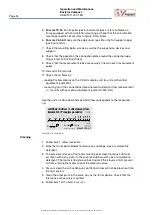
8. Check the pressure balance:
For design Home Concept, the trim damper ETET/TR regulates the pressure
balance automatically against the set value in the controller unit. Check that
the measured pressure balance between measurement tappings P2 and P3
corresponds to the set pressure balance setpoint in the controller unit (-10
Pa).
Example:
Measurement outlets for P2: Downstream supply air fan (SF) generates
negative pressure in relation to the atmospheric pressure (atm), e.g. -100 Pa
Measurement outlets for P3: Downstream extract air fan (EF) and trim
damper generate greater negative pressure than at P2, e.g. -110 Pa.
+
-
P1
P4
P3
P2
–
+
-10 Pa
P
≈
1 atm
(101 kPa)
Trim damper


