
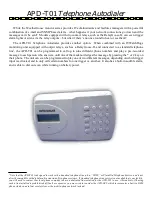


APD-T01 Telephone Autodialer
Your APD-T01 Telephone Autodialer should have come with the following items included in the box:
Ÿ
(1) APD-T01 Autodialer
Ÿ
(1) Telephone cable, 15 ft.
Ÿ
(1) 12Vdc power supply
Ÿ
(2) drywall anchors and matching screws.
In addition to the items in the kit, to install the APD-T01, you will need (at minimum):
Ÿ
a 9V alkaline battery to install in the backup-battery compartment
Ÿ
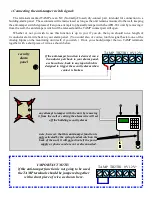
at least one length of 2-conductor alarm wire, to connect the APD-T01 to the dry-contact relay terminals on
the RelayGoose-II.
Ÿ
appropriate tools (Philips and flat-head screwdrivers, drill, ruler, stud finder, etc.) to mount the unit on the
wall and to connect the wires to the terminal block
Before you proceed, make sure you’ve chosen an appropriate spot to mount the autodialer; ideally, it should
be located near both a phone-line socket and an AC power socket, high enough on the wall to be easily operated.
Don’t worry too much about the distance between the autodialer and the monitoring unit(s); since the trigger is
just a dry-contact relay signal, the trigger signal is essentially immune to interference from induced EM or RF
noise, so the wiring between the autodialer and the monitoring unit can be dozens, or even hundreds of feet if
necessary. (Just make sure the wiring is routed such that no one can trip over it, and that it can’t get crushed or
damaged by equipment rolling over it!)
When choosing a spot for mounting, make sure that there is no electrical wiring or plumbing running behind
the wall in the spot where you intend to drill holes for the drywall anchors.
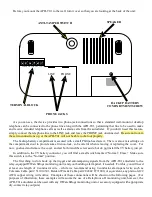
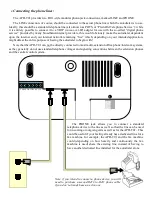
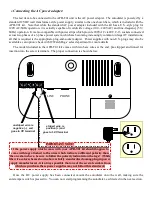
160mm
An example of mounting the APD-T01 Telephone Autodialer
unit to the wall is shown here. The mounting holes should be
drilled 160mm apart, using a drill bit just slightly smaller than
the diameter of the drywall anchors; push the anchors into the
holes, then use a philips-head screwdriver to screw the included
fixing screws into the anchors. Make sure you leave about
2~3mm of the screw body protruding from the anchor, so that
the APD-T01 can be hung onto the screw heads.
Also, be sure to make all of the necessary electrical connections
and insert the 9V backup battery, as shown on the following
pages, before hanging the unit on the wall.


