AF (6-36) IOM
27
Make sure the cap screws fastening the bearing
housing to the elbow,
Type 1
, or the casing to the
elbow,
Type 2
, are tight, so an accurate measurement
of the impeller clearances can be made prior to
adjustment.
Mark each blade 1, 2, 3 and 4 and then align the
impeller blades with the adjusting lugs on the stuffing
box cover (approx. 2, 4, 8, and 10 o’clock)
Type 1
, or
elbow (approx. 4, 8 o’clock)
Type 2
Rotate the shaft and measure the gap between each
blade and the casing at all four clock positions
indicated on the worksheet. The value of interest is
the largest value of feeler gage thickness that will slide
easily the whole length of the vane tip.
Add the measurements for all positions together and
divide by the number of measurements. This will give
the average measurement.
Divide the average measurement by 2. This will give
the minimum clearance.
If any blade has a clearance in any position smaller
than the calculated minimum clearance the prop is not
sufficiently centered and should be adjusted.
Impeller Alignment – (Type 1)
1. Loosen the bolts that attach the bearing housing to
the elbow.
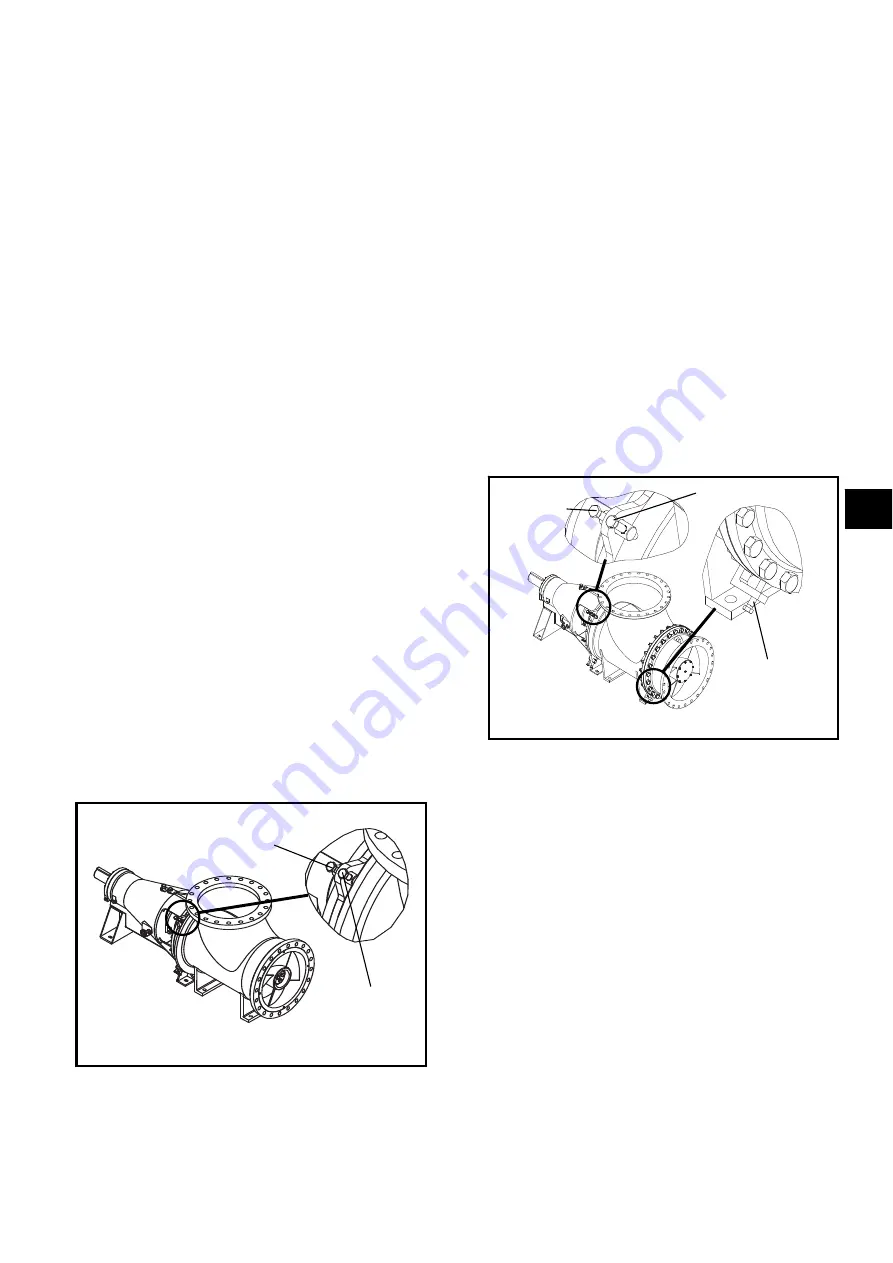
2. Use the adjusting bolts closest to the elbow to
adjust the impeller clearance, see Fig. 22. The (2)
upper adjusting bolts are used to raise and lower
the impeller. The upper and lower adjusting bolts
on either side are used to center the impeller left
to right in the elbow.
3. Move the back pullout relative to the elbow until
the impeller is centered. At this point it is
recommended that the Impeller Alignment
Worksheet (on the following page) be filled out
and filed with the pump maintenance records for
future reference.
4. Tighten the bolts between the bearing housing and
elbow and re-check the clearance to be sure the
adjustments have centered the impeller. If the
impeller is centered the bearing housing may be
taper pinned to the elbow to maintain alignment.
Impeller Alignment – (Type 2)
1. Loosen the bolts that attach the casing to the
elbow.
2. Use the adjusting bolts attached to the elbow to
adjust the impeller clearance, see Fig. 23. The (2)
adjusting bolts are used to raise and lower the
casing and shift the casing left to right relative to
the impeller.
3. Move the casing relative to the impeller until the
impeller is centered. At this point it is
recommended that the Impeller Alignment
Worksheet (on the following page) be filled out
and filed with the pump maintenance records for
future reference.
4. Tighten the bolts between the casing and the
elbow and re-check the clearance to be sure the
adjustments have centered the impeller. If the
impeller is centered the casing may be taper
pinned to the elbow to maintain alignment.
Fig. 22
Type 1
Adjustment
Box
Alignment
Impeller
Alignment
Fig. 23
Type 2
Adjustment
Impeller
Alignment
Not Used
Box
Alignment
3
Summary of Contents for Goulds Pumps AF
Page 1: ...Installation Operation and Maintenance Instructions Model AF 6 36 MXR Bearings ...
Page 3: ...AF 6 36 IOM 6 THIS PAGE INTENTIONALLY LEFT BLANK ...
Page 5: ...AF 6 36 IOM 8 THIS PAGE INTENTIONALLY LEFT BLANK ...
Page 14: ...10 AF 6 36 IOM THIS PAGE INTENTIONALLY LEFT BLANK ...
Page 32: ...28 AF 6 36 IOM ...
Page 34: ...30 AF 6 36 IOM THIS PAGE INTENTIONALLY LEFT BLANK ...
Page 48: ...44 AF 6 36 IOM THIS PAGE INTENTIONALLY LEFT BLANK ...
Page 66: ...62 AF 6 36 IOM AF SECTIONAL shown with optional restrictor bushing adapter Fig 77 ...
Page 68: ...64 AF 6 36 IOM AF OPTIONS Fig 78 351 370F 126 ...
Page 69: ...AF 6 36 IOM 65 MXR BEARING CONFIGURATIONS 1MXR 3MXR 4MXR 6MXR Fig 79 540C 6 ...
Page 72: ...68 AF 6 36 IOM THIS PAGE INTENTIONALLY LEFT BLANK ...


