background image

#7

www.istorage-uk.com

iStorage datAshur

®

 Pro Manual – v 1.6

Instructions 

LED

LED State

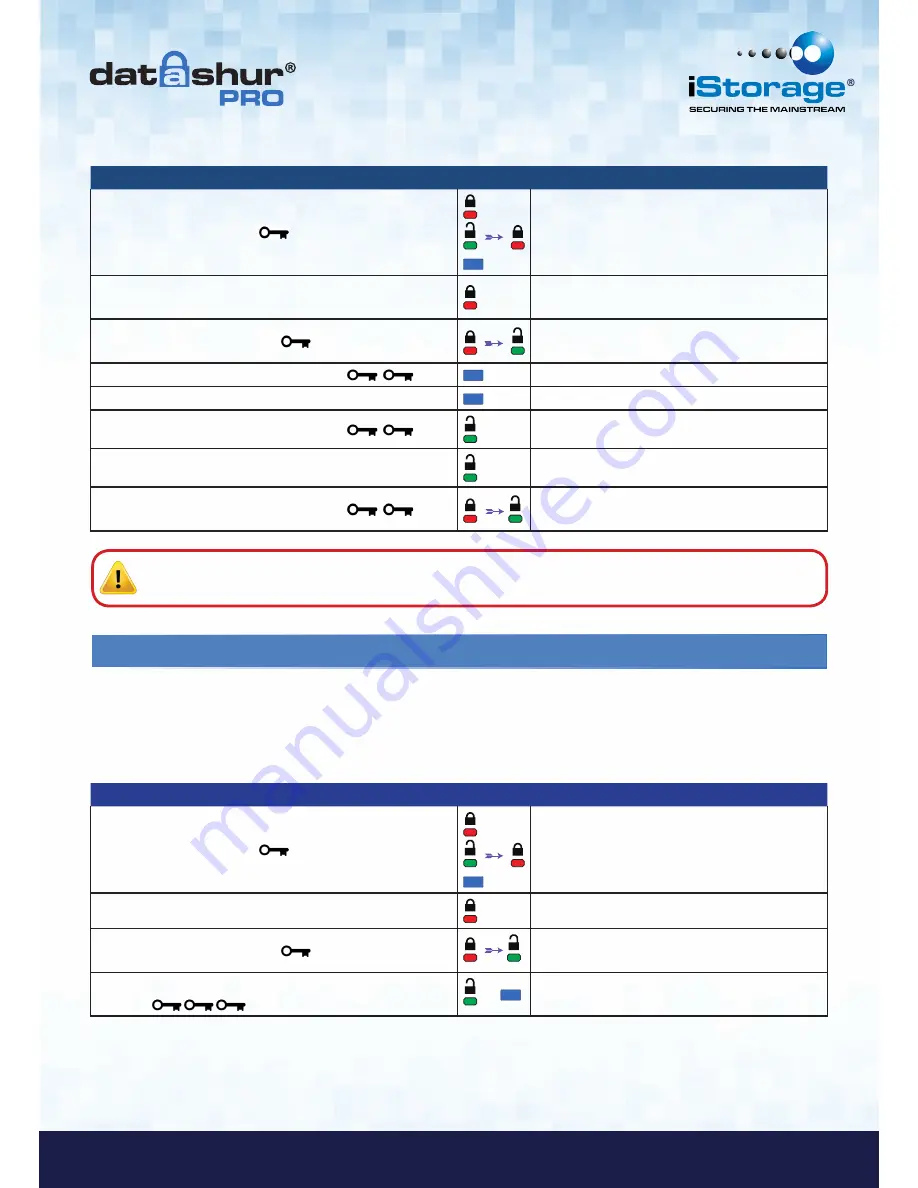
1.  Press KEY button once  


Red, 

Green


&


Blue


LED’s will flash together once


and then the

 Red

 LED will continue to blink  

(if 

Blue

 LED also blinks this indicates an Admin 

PIN has been set up)  

2.  Within 10 seconds begin to enter the User PIN  

     (default User PIN 11223344)

Red

 LED will continue to blink

3.  Press the KEY button once  


Red

 solid LED changing to 

Green

 solid LED 

indicating successful User PIN entry

4.  Press KEY button twice (double-click)  


Blue

 LED blinks

5.  Within 10 seconds begin to enter New User PIN

Blue

 LED continues to blink

6.  Press KEY button twice (double-click)  


Green

 LED blinks

7.  Within 10 seconds begin to re-enter New User PIN

Green

 LED continues to blink

8.  Press KEY button twice (double-click)  


Red

 solid LED changing to 

Green

 solid LED 

indicating User PIN change successful

Note:

 If a mistake was made while defining a new PIN or the procedure was not completed, the drive will retain

the old PIN.

 5.   How to enable Options as User

Instructions

LED

LED State

1.  Press KEY button once  


Red, 

Green


&


Blue


LED’s will flash together once


and then the

 Red

 LED will continue to blink  

(if 

Blue

 LED also blinks this indicates an Admin 

PIN has been set up)  

2.  Within 10 seconds begin to enter your User PIN

Red

 LED will continue to blink

3.  Press the KEY button once  


Red

 solid LED changing to 

Green

 solid LED 

indicating successful User PIN entry

4.  Press the KEY button 3 times - treble 

     click  


&  

Green

 and 

Blue

 LED’s blinking together  

awaiting new instructions in OPTIONS mode.

The Options mode will allow the User to perform different functions such as enabling and disabling the datAshur Pro as 

‘Read-Only’, setting a ‘Timeout’ automatic lock and determining the version of the device.

The table below illustrates how to access the Options mode, sections 6 - 9 describe how to perform the various functions. 

Summary of Contents for datAshur Pro

Page 1: ...ember to save your PIN in a safe place If lost or forgotten there is no way to access the datAshur Pro If you are having difficulty please refer to this complete user manual loaded on your datAshur Pr...

Page 2: ...PLIED CONDITIONS REPRESENTATIONS AND WARRANTIES INCLUDING ANY IMPLIED WARRANTY OF MERCHANTABILITY FITNESS FOR A PARTICULAR PURPOSE OR NON INFRINGEMENT ARE DISCLAIMED EXCEPT TO THE EXTENT THAT SUCH DIS...

Page 3: ...dmin PIN 10 12 How to unlock the datAshur Pro as Admin 11 13 How to create a New User PIN in Admin mode 11 14 How to change the Admin PIN 12 15 How to verify whether an Admin User PIN has been set up...

Page 4: ...an be configured with both a User and Admin PIN making it perfect for corporate and government deployment As the datAshur Pro is unlocked via the onboard keypad and not a host computer it is not vulne...

Page 5: ...dmin PIN entry Green Solid datAshur Pro is unlocked in User mode Green and Blue blinking together User Options mode Green blinking When connected to a USB port if Green Led blinks every 2 seconds this...

Page 6: ...inue to blink 2 Within 10 seconds begin to enter User PIN default 11223344 to unlock datAshur Pro Red LED will continue to blink 3 Press KEY button once Red solid LED changing to Green solid LED indic...

Page 7: ...ating User PIN change successful Note If a mistake was made while defining a new PIN or the procedure was not completed the drive will retain the old PIN 5 How to enable Options as User Instructions L...

Page 8: ...convention to make it easy for the User to remember the keystrokes for each optional setting In the table above we have used numbers that represent the first letters of the optional feature name For e...

Page 9: ...nd Blue LED s continue to blink together 4 Press KEY button once Blinking Green LED 5 Within 10 seconds begin enter the length of User Timeout in 2 digits 00 0 minutes default 01 1 minute 99 99 minute...

Page 10: ...id LED indicating successful User PIN entry 2 Enable Options by pressing the KEY button 3 times treble click Green and Blue LED s blinking together awaiting new instructions in OPTIONS mode 3 Within 1...

Page 11: ...and hold down the number 1 button and press the KEY button once 1 Red and Green LED s flicker together 2 Within 10 seconds begin to enter your Admin PIN Red and Green LED s continue to flicker togethe...

Page 12: ...ED LED State 1 Unlock the datAshur Pro with existing Admin PIN Red solid LED followed by a flickering Green LED indicating successful Admin PIN entry 2 Press and hold down the number 1 button and pres...

Page 13: ...eps below Admin can override User set Read Only by enabling Read Write on the datAshur Pro using the Admin PIN To set the datAshur Pro to Read Write please follow the steps below 15 How to verify whet...

Page 14: ...LED will blink eight 8 times Once the sequence has ended the Red Green Blue LED s will blink together once and then to flickering Green LED Instructions LED LED State 1 Unlock the datAshur Pro with A...

Page 15: ...0 minutes default 01 1 minute 99 99 minutes etc Green LED continues to blink 6 Press the Key button once Flickering Green LED Admin can override USER Lock Timeout To protect against unauthorised acces...

Page 16: ...r Pro but all data will be deleted and cannot be retrieved and the datAshur Pro will have to be reformatted see section 24 or 25 Caution Entering the Admin PIN to access a locked drive will clear the...

Page 17: ...INs the encryption key and all data will be deleted and lost forever User PIN Only User PIN The datAshur Pro s brute force mechanism will trigger and the User PIN the encryption key along with all dat...

Page 18: ...r Pro by entering the New User PIN and connect to a computer s USB port Instructions LED LED State 1 Press and hold down number 7 seven button and then press the KEY button and release buttons 7 Red a...

Page 19: ...E LED becomes solid and your datAshur Pro is ready for use Warning This procedure will erase ALL data on the drive In case that the formatting wizard does not appear please follow the procedure below...

Page 20: ...OK 5 Click OK on the Format warning window to continue with formatting the drive Warning This procedure will erase ALL data on the drive 6 The procedure will finish formatting and return to the Disk...

Page 21: ...o format your datAshur Pro on Mac OS computers do the following 1 Create a New User PIN see section 4 2 Unlock the datAshur Pro by entering the New User PIN and connect to a Mac computer s USB port 3...

Page 22: ...RE EQUIVALENT TO NEW IN PERFORMANCE ALL EXCHANGED PARTS AND PRODUCTS REPLACED UNDER THIS WARRANTY WILL BECOME THE PROPERTY OF ISTORAGE THIS WARRANTY DOES NOT EXTEND TO ANY PRODUCT NOT PURCHASED DIRECT...

Page 23: ...Manual v 1 6 Copyright 2015 iStorage Limited All rights reserved iStorage Limited iStorage House 13 Alperton Lane Perivale Middlesex UB6 8DH England Tel 44 0 20 8991 6260 Fax 44 0 20 8991 6277 e mail...

Reviews: