background image

3 Operation 

17


3.5


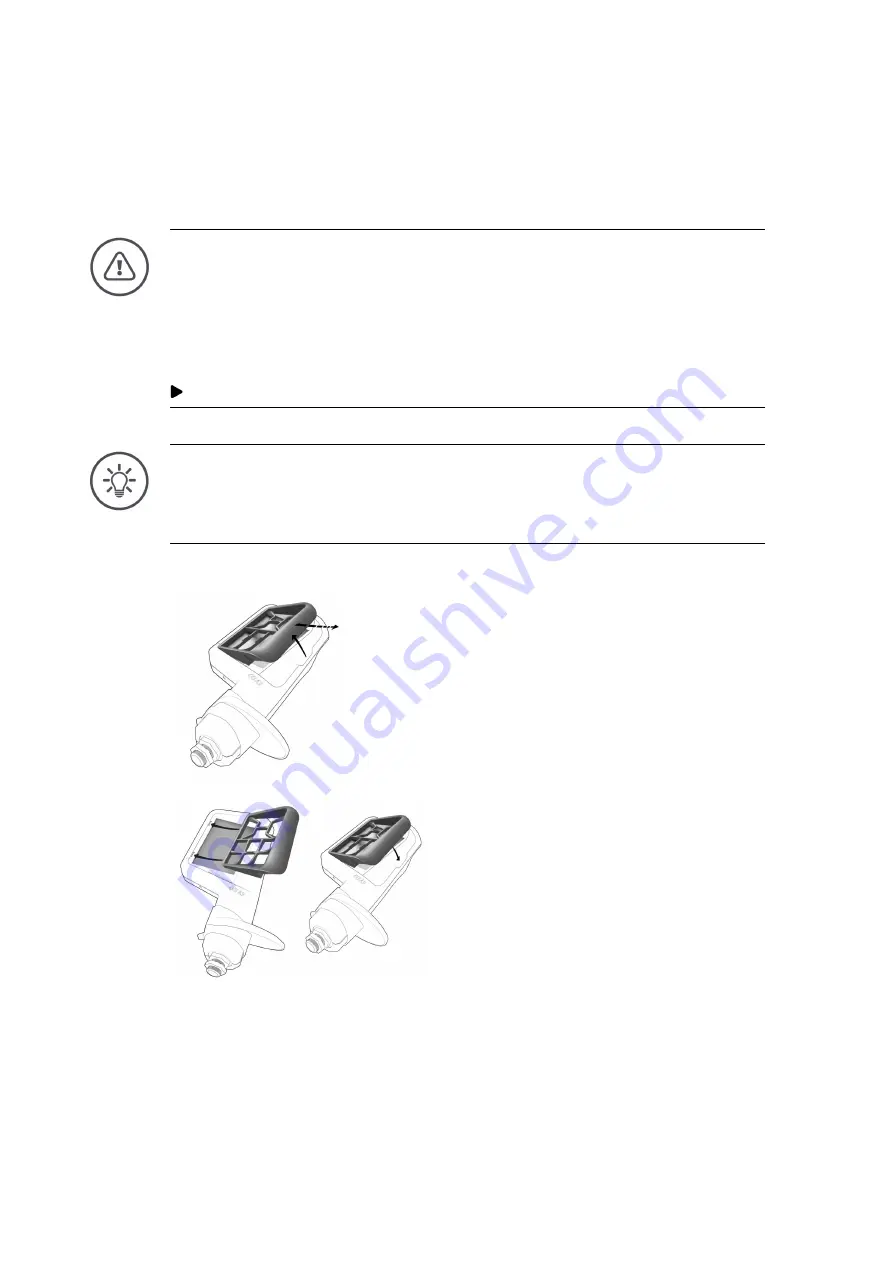
Changing the grid 

If you want to change the number and arrangement of the buttons, insert the 

appropriate grid. 


WARNING - GENERAL HAZARDS! 

Do not change the grid during running. 

During changeover of the grid, the CCI A3 logs off the ISOBUS and the con-

nection to the 

implement

 is interrupted. 


Implement functions are no longer assigned to the buttons. 


You can no longer operate the 

implement

 with the CCI A3. 


Insert the grid, before you connect the 

implement

. 


NOTE 

Grids are not implement-dependent. 

Grids and implements can be freely combined. 


1.  Pull up the grid at the right and pull 

out. 

2.  Select another grid. 


3.  Insert the two pegs on the grid into the 

grooves in the casing of the CCI A3. 

4.  Fold the grid down. 


The CCI A3 logs into the ISOBUS 

again. 


Summary of Contents for CCI A3

Page 1: ...CCI A3 ISOBUS AUX control Operating instructions...

Page 2: ......

Page 3: ...ng 12 2 3 Inserting the grid 12 2 4 Connecting 13 2 5 Switching on 14 2 6 Setting 14 3 Operation 15 3 1 Switching on and off 15 3 2 Displaying device data 15 3 3 Implement operation 16 3 4 Changing th...

Page 4: ...for operation Operation Troubleshooting To ensure fault free operation of your CCI A3 please read through the oper ating instructions carefully Keep the operating instructions for future refer ence Th...

Page 5: ...d or attached implement An implement with which a task can be executed Implement specific pic togram Some implements replace the labelling F1 F10 of the buttons with the pictogram of the implement fun...

Page 6: ...unctions and adjust the AUX control UT The Universal Terminal is the human machine interface HMI of ISOBUS This is the display and operating device Each implement connected to the ISOBUS logs on to th...

Page 7: ...utton by vibrating and output ting a touch sound The vibration intensity and the volume of the touch sound can be adjusted Chapter 3 6 The CCI A3 has three operating levels and up to 10 buttons One bu...

Page 8: ...nameplate The name plate is attached to the cable 1 Manufacturer 2 Serial number 3 Manufacturer s article number 4 Production date week year 5 Hardware version NOTE The layout and content of the namep...

Page 9: ...al Terminal So that with an ISOBUS terminal the buttons of the CCI A3 can be assigned implement functions Auxiliary Control new For the handling of frequently used implement functions with the CCI A3...

Page 10: ...ns in the operating instructions The warning notes in these operating instructions are specially identified WARNING GENERAL HAZARDS This warning symbol identifies general warning notes the non ob serv...

Page 11: ...y recog nised safety industrial medical and traffic laws must be observed Unauthori sed modifications to the device exclude the manufacturer s liability 1 3 Safety notes WARNING GENERAL HAZARDS Please...

Page 12: ...ement o during maintenance on the tractor or on a towed implement o when a charger is connected to the battery of the tractor Learn how to use the CCI A3 in accordance with regulations Keep the CCI A3...

Page 13: ...you start setting up for op eration AUX control 3 grids Terminating resistor Quick guide Protective film for the display Assembly kit NOTE The device purchased by you may include other accessories Th...

Page 14: ...correctly installed Install the CCI A3 so that it o Is easy to read and operate and o Does not impede access to the tractor controls 2 3 Inserting the grid 1 Insert the two pegs on the grid into the...

Page 15: ...the in cab panel connector and starts automatically You can connect an extra ISOBUS participant to the plug of the in cab cable e g an ISOBUS terminal 1 Remove the terminating resistor from the in cab...

Page 16: ...in any order A green tick is displayed on the but tons Operating level 1 is displayed after you have pressed all 3 buttons 2 6 Setting Ex works the vibration feedback and touch sounds are set to the m...

Page 17: ...e Plug the in cab coupling of the cable into the in cab panel connector of the tractor The CCI A3 is supplied with power via the in cab panel connector and starts automatically Switch the CCI A3 off a...

Page 18: ...tes and outputs a touch sound The implement function is performed 3 4 Changing the operating level One button can be assigned one implement function in each operating level Switch to the next operatin...

Page 19: ...e implement is interrupted Implement functions are no longer assigned to the buttons You can no longer operate the implement with the CCI A3 Insert the grid before you connect the implement NOTE Grids...

Page 20: ...eached Reducing the vibration feedback Press the Reduce feedback button Each press on the button reduces the vibration feedback until no vi bration feedback is felt Increasing the vibration feedback P...

Page 21: ...ertent triggering 1 Press the System button The System operating screen is displayed 2 Press the button Critical Control Critical Control is activated You can only activate level 3 implement functions...

Page 22: ...t be performed for each grid If you perform an AUX assignment and then change the grid the AUX assignment must be repeated NOTE An AUX control requires a UT number 1 The AUX control only connects to a...

Page 23: ...n is reduced 3 8 Displaying the AUX assignment NOTE You can display the AUX assignment on the terminal You can display which implement functions are assigned to the CCI A3 but tons 1 Open the CCI A3 o...

Page 24: ...ment function is ensured If the implement does not display any implement function pictograms on the CCI A3 the buttons of the CCI A3 are labelled F1 F2 etc Use the generic pictograms provided by the C...

Page 25: ...d a Button on the CCI A3 b Assign button c Assigned implement function d Implement e Back button f Up button g Down button 3 Navigate to the operating element using the Down Up buttons and press the A...

Page 26: ...tograms on the termi nal 1 Open the operating screen of the CCI A3 on the terminal The AUX assignment of the ac tive operating level is dis played 2 Press the Settings button The Pictogram Assignment...

Page 27: ...gram and confirm b the entry The Pictogram Assignment operating screen is displayed The new pictogram is displayed on the CCI A3 5 To change more pictograms repeat steps 3 and 4 6 End the process with...

Page 28: ...ion in this chapter of the operating instructions 3 Contact your dealer if the problem persists In the event of a fault the CCI A3 may no longer respond to user inputs 1 Unplug the in cab coupling of...

Page 29: ...ave UT number 1 The in cab plug on the fixed cable is open Plug in the terminating resistor included in the scope of delivery The operating elements of the CCI A3 are not dis played on the terminal Th...

Page 30: ...terminal did not log on to the ISOBUS with UT number 1 Switch the ISOBUS terminal on On the ISOBUS terminal set the UT number to 1 The buttons of operating level 3 have a blue frame and cannot be use...

Page 31: ...service CCI A3 environmentally and taking into consideration the local regulations Dispose of plastics with normal domestic waste Enter metal into a metal recycling chain Deliver the PCBs of the CCI A...

Page 32: ...Copyright 2021 Competence Center ISOBUS e V Albert Einstein Str 1 D 49076 Osnabr ck Document number 20210630...

Reviews: