background image

DOC. MIE91093                    Rev. 1.34


Page 116 of 145 

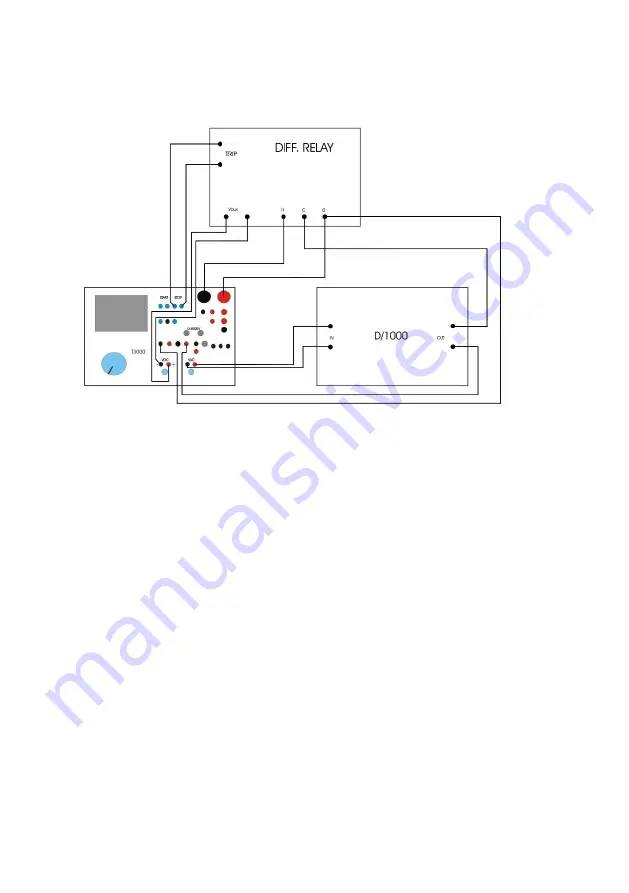
relay, while we apply the differential current only to one side. 
The connection scheme is the following. 


The following is the D1000 front panel. There are two pairs of 
sockets:  IN  and  OUT.  IN  is  to  be  connected  to  the  VCAUX 
output  of  T1000  PLUS;  D1000  converts  the  voltage  into 
current,  and  generates  the  differential  current,  that  is 
measured  prior  to  connection  to  the  relay.  So,  when  we  say 
that  the  differential  current  is  to  be  adjusted,  this  means 
adjusting the auxiliary voltage. 

Summary of Contents for T1000 PLUS

Page 1: ...DATE 06 09 2011 DOC MIE91093 REV 1 34 T1000 PLUS APPLICATION GUIDE ...

Page 2: ...10 2008 Issued Lodi 1 28 11 13 15 2 02 2010 Added test header Lodi 1 28 1 100 111 1 10 2010 Differential relay test with TD1000 Lodi 1 30 75 83 21 3 2011 Modified the recloser test Lodi 1 34 71 83 131 134 6 9 2011 Minor changes to the recloser test added the CT saturation test Lodi ...

Page 3: ...hree phase voltage relay25 1 2 7 Hint vector group test for a PT transformer 26 1 3 DC VOLTAGE RELAY TESTING 28 1 3 1 Introduction 28 1 3 2 Connection to voltage output 28 1 3 3 V Threshold and drop off 30 1 3 4 Trip and drop off timing 31 1 4 REVERSE POWER RELAY TESTING 32 1 4 1 Introduction 32 1 4 2 Connection of the relay 33 1 4 3 P Threshold and drop off 37 1 4 4 Threshold and drop off of othe...

Page 4: ...shold and drop off 63 1 8 4 Angle threshold 64 1 8 5 Frequency threshold 64 1 9 TIMER TEST 68 1 10 LOSS OF FIELD RELAY TESTING 69 1 11 AUTOMATIC RECLOSER TESTING 73 1 11 1 Introduction 73 1 11 2 Normal Recloser test 76 1 11 3 Normal recloser test programming 80 1 11 4 Pole mounted CB test 82 1 11 5 Pole mounted CB test programming 85 1 12 DISTANCE RELAY TESTING 87 1 12 1 Introduction 87 1 12 2 Def...

Page 5: ...PRIMARY END TO END TEST 125 1 16 1 Test setup 127 1 16 2 Use of SWT3 129 1 16 3 T1000 PLUS setup for End to End test 130 1 16 4 Line differential tests 131 1 17 THERMAL RELAY TESTING 132 1 18 LOW VOLTAGE AND MEDIUM VOLTAGE CIRCUIT BREAKER TESTS133 1 18 1 Introduction 133 1 18 2 Connection to current outputs 134 1 18 3 I Threshold 135 1 18 4 Intervention curve 136 1 19 CT SATURATION KNEE TEST 136 1...

Page 6: ...hanges in the product s and or the program s described in this document without notice and shall not be responsible for any damages including but not limited to consequential damages caused by reliance on the material presented including but not limited to typographical errors Copies reprints or other reproductions of the content or of parts of this publication shall only be permitted with our pri...

Page 7: ...it So either the manual is actually of help or I ignore it This is why I decided to split the T1000 PLUS manual in three specification with all performance details application manual with instructions about how to use it one its operation is understood introductory guide with the device description and basic information The idea is that you may read once the introductory guide or the specification...

Page 8: ...dition of other features not available in the first release The Seller declines any difficulties arising from unknown technical problems The Seller declines also any responsibility in case of modification of the Product or of any intervention not authorized by the Seller in writing The warranty includes the repair time and the materials necessary to restore the complete efficiency of the Product s...

Page 9: ...l to the unadvertised user Besides in order to avoid any danger in case of fault inside the Product the device under test should have the following characteristics Connection cables must use safety banana sockets Connection sockets must be not accessible Input circuits must have an isolation degree at least equal to the one of the product DO NOT OPERATE THE PRODUCT IF NOT CONNECTED TO GROUND BECAU...

Page 10: ...AVAILABLE AT THE MAINS SUPPLY CONNECT THE TEST SET TO GROUND USING THE DEDICATED SOCKET In case of doubt please contact your Seller The Seller and Manufacturer declines any and all responsibility due to improper usage or any usage outside the specified limits ...

Page 11: ...eld 40 1 10 Reverse phase current 46 1 4 Instantaneous overcurrent 50 1 1 Ground fault 50N 1 1 Timed overcurrent 51 1 1 Power factor 55 1 4 Directional overcurrent 67 1 5 Directional ground fault 67N 1 5 Automatic reclose 79 1 11 DC voltage 80 1 3 Frequency 81 1 6 Frequency rate of change 81 1 7 Motor protection 86 1 1 Differential 87 1 1 Directional voltage 91 1 5 Tripping relay 94 1 9 Voltage re...

Page 12: ...These results can be recorded displayed and analyzed by the powerful TDMS software which operates with all WINDOWS versions and allows creating a data base of all tests in the plant The basic T1000 PLUS function is to generate current and voltages and to stop generation as the relay trips Test results are kept in memory and can be transferred to a PC at a later time along with settings The ease of...

Page 13: ...is reduced by a factor of 4 4 the adjustment span on the knob is increased accordingly Additional features are Two meters current and voltage with independent inputs allow measuring T1000 PLUS outputs or any other source Two auxiliary contacts that switch at test start and reset with STOP input allows simulating the circuit breaker A set of resistors allows easing output adjustment The instrument ...

Page 14: ...the relevant one The first general comment is that when you save the result following data are always saved Main current or main AC voltage or main DC voltage according to the selection performed with the push button 57 Auxiliary AC voltage Auxiliary DC voltage Timing If other measurements are selected by the menu they will also be saved along with these data As a consequence there will be test re...

Page 15: ... will scroll through Plant name Operator Serial number Model manuf Feeder Once you have reached the desired description select it and press the description goes in reverse and you can edit it The editor is performed as follows If you turn the knob it will reach a number of selections in the bottom and then the line with the alphabet letters at the end of this there is a double arrow that if presse...

Page 16: ...with two tests with a value the relay trips with a slightly different value the relay does not trip This is to be selected when you are looking for the no trip limit of a threshold Once results are saved it is possible to review or to delete them with the command Results Show results The display shows the list of the relay serial numbers followed by the number of tests performed with the same head...

Page 17: ...meters For the test of undercurrent relays the following notes are to be used the other way round the drop off test becomes the threshold test the threshold test becomes the drop off test The following is the connection schematic 1 1 2 Connection to current outputs Power on T1000 PLUS acting on switch 2 the internal light turns on Set the current adjustment knob 6 completely counter clockwise ...

Page 18: ...do not select the output socket the test displays false current or voltage values Select ON and check if you can easily adjust the desired current acting on knob 6 If the current is reached with a rotation less than one fifth of the total this means that the burden is very low In this instance reduce the output power with the following menu commands Test control Test power 60 VA ESC The 60 VA LED ...

Page 19: ...hold I Select ON slowly increase the current As the relay trips pressing the multi function knob tripping values can be saved The TRIP LED 43 turns on for 5 seconds during 5 seconds parameters at trip are displayed then the standard measurement is restored Confirm save results pressing the multi function knob and proceed NOTE stored value is the current as the relay trips This corresponds to the r...

Page 20: ...e have shown as t for currents less than I and t for currents more than I There are many ways to perform the test we suggest taking advantage of the Timed generation option as follows Start from a current more than I select ON TIME and check for time response Take note of the timing t Compute tmax as 80 of t Set the Timed test as follows Test control Fault injection Timed tmax RET Select ON TIME a...

Page 21: ...Clean Voltage NO NC ESC Now press ON and pre adjust the first test current as the relay trips don t save test result go OFF Select ON TIME as the relay trips test goes OFF pressing the multi function knob tripping values can be saved The TRIP LED 43 turns on and parameters at trip are displayed until ON or ON TIME are selected Confirm save results pressing the multi function knob and proceed with ...

Page 22: ...the connection schematic 1 2 2 Connection to voltage output Power on T1000 PLUS acting on switch 2 the internal light turns on Press the button 70 to have the AC voltage available If you wish to use the DC voltage output to supply the relay under test press the button 69 then use knob 20 to adjust the voltage value that is displayed on the LCD display 23 Connect the DC supply input of the relay to...

Page 23: ...s generated prior to all tests Select ON as the test is started the voltage goes to the fault value that is adjusted by the knob 20 Pre adjust the fault value at the same value as the pre fault Connect the TRIP output to the STOP input Next steps depend upon the type of relay and upon the type of test you want to perform The following example applies to an overvoltage and undervoltage relay with o...

Page 24: ...he drop off threshold for V From the voltage above slowly decrease the voltage as the relay resets pressing the multi function knob tripping values can be saved The TRIP LED 43 turns on for 5 seconds during 5 seconds parameters at reset are displayed then the standard measurement is restored NOTE stored value is the voltage as the relay resets This corresponds to the relay drop off only if the cur...

Page 25: ...ints to be tested are measured Now we can measure the drop off timing First thing select the NO or NC level for the relay reset contact Timer start stop STOP EXT Clean Voltage NC NO ESC Now press ON and pre adjust the voltage at a value where the relay trips Select OFF TIME as the relay resets pressing the multi function knob drop off values can be saved Confirm save results pressing the multi fun...

Page 26: ... amplitude equal to the phase to phase voltage the connections is shown here below With this connection the VN socket of the relay is not connected the VN point will be created by the relay input transformers 1 2 7 Hint vector group test for a PT transformer V MAIN V AUX VN ...

Page 27: ...e on both generators Adjust 240 for Vaux with respect to the mains Connect the measuring input Ext V the 600 V or the 10 V input as a function of the transformer ratio to LV side terminals 1 and 2 Select the measurement of the ExtV Vmain phase angle This way we are generating a three phase voltage on HV side all voltages with 120 phase shift But since phase angle of V12is 0 the phase shift measure...

Page 28: ...rform the test using the main DC voltage output because the auxiliary DC voltage is continuously generated and cannot be used for trip timing tests The following is the connection schematic 1 3 2 Connection to voltage output Power on T1000 PLUS acting on switch 2 the internal light turns on Set the current adjustment knob 6 completely counter clockwise ...

Page 29: ...sing the push button 57 the LED turns on WARNING if you do not select the output socket the test displays false voltage values Connect the TRIP output to the STOP input The following example applies to an undervoltage relay with one or more time independent threshold Of this relay we want to find and save trip and drop off thresholds ...

Page 30: ...n knob and proceed NOTE stored value is the voltage as relay trips This corresponds to the relay threshold only if the current did not change very much while the relay timing elapsed If threshold measurement was not good because you were moving too fast do not confirm test results and repeat the test Next we find the drop off threshold for V From the voltage above slowly increase the voltage as th...

Page 31: ... LED 43 turns on and parameters at trip are displayed until ON or ON TIME are selected Confirm save results pressing the multi function knob and proceed with other test voltage until all points to be tested are measured Now we can measure the drop off timing First thing select the NO or NC level for the relay reset contact Timer start stop STOP EXT Clean Voltage NC NO ESC Now press ON TIME as the ...

Page 32: ...om the network to the generator it means that the generator works as a motor that s the reason why sometimes these protective relays are called anti motoring relays This may cause serious problems because the generator receive power from either turbine and network Therefore this power will be transformed in Kinetic energy the generator accelerates Thermal energy the temperature increases GENERATOR...

Page 33: ...nt generator and the auxiliary voltage generator at different phase shifts Parameters involved are three voltage current phase shift so in the following the test is performed at nominal voltage selecting the phase angle and changing the current to find the threshold at the selected angle As the setting is in percent of the nominal power it is possible to use the power measurement that is available...

Page 34: ... to use the DC voltage output to supply the relay under test press the button 69 then use knob 20 to adjust the voltage value that is displayed on the LCD display 23 Connect the DC supply input of the relay to sockets 63 First select the auxiliary AC voltage range as follows AUX VAC VDC Aux VAC control Range ESC The range should be the closest one to the high threshold to be generated The fault am...

Page 35: ...not select the output socket the test displays false current or voltage values Select ON and check if you can easily adjust the desired current acting on knob 6 If the current is reached with a rotation less than one fifth of the total this means that the burden is very low In this instance reduce the output power with the following menu commands Test control Test power 60 VA ESC The 60 VA LED tur...

Page 36: ... directions The angle between current and auxiliary voltage is set as follows AUX VAC VDC Aux VAC control Phase Reference Current adjust phase ESC NOTE the adjustment can be performed only after having adjusted the current output The two tests are Forward I IN 0 Press ON TIME the relay should not trip Reverse I IN 180 Press ON TIME the relay should trip Only if the result of the direction test is ...

Page 37: ... restored Confirm save results pressing the multi function knob and proceed the display shows the corresponding single phase power NOTE If the relay is three phase power should be multiplied by 3 This can easily be done after transferring test results to X PRO1000 Next we find the drop off threshold for P From the trip current above slowly decrease the current as the relay resets save test result ...

Page 38: ... can measure trip timing Press ON and pre adjust the test current to more than P as the relay trips don t save test result go OFF Select ON TIME as the relay trips test goes OFF pressing the multi function knob tripping values can be saved The TRIP LED 43 turns on and parameters at trip are displayed until ON or ON TIME are selected Confirm save results pressing the multi function knob Now we can ...

Page 39: ...meters that we will test are The characteristic angle sometimes called MTA max torque angle electromagnetic relays and the Angle sector that is half of the operating angle The pick up of Io The pick up of Vo When testing one parameter we have to set the other two at a value above the pick up Test MTA we keep Vo and Io above the respective pick ups Test the Angle sector we keep Vo and Io above the ...

Page 40: ...ing zone IR 180 towards the operative zone until the relay trips Prior to this we have to make sure that the relay operates Also the earth directional relay shouldn t trip for all values of voltage and current It is widely accepted that a directional relay characteristic can run inside the dotted line area as shown in the figure Operating zone Non Operating zone Characteristic Angle MTA ...

Page 41: ...nt to find this point V1 6 V I1R 1 A and this point Non operating zone Operating zone Next tests serve to find some point of the characteristic curve Note that it is also possible to test the relay with some no trip test inside the non operating zone and some trip test in the operating zone 1 5 2 Connection of the relay The following is the connection schematic ...

Page 42: ...ect the output socket the test displays false current or voltage values Select ON and check if you can easily adjust the desired current acting on knob 6 If the current is reached with a rotation less than one fifth of the total this means that the burden is very low In this instance reduce the output power with the following menu commands Test control Test power 60 VA ESC The 60 VA LED turns on S...

Page 43: ...relay trip contact connections Next step serves to ascertain that the relay is correctly connected to this purpose we perform two tests in opposite directions The angle between auxiliary voltage and current is set as follows AUX VAC VDC Aux VAC control Phase Adjust phase Vaux Imain adjust phase ESC NOTE the adjustment can be performed only after having adjusted the current output If the current is...

Page 44: ...follows Test control Save Confirm at trip ESC Select ON Set I IN V VN MTA 180 the relay does not trip Slowly reduce the phase shift until the relay trips 1 trip is found As the relay trips pressing the multi function knob tripping values can be saved The TRIP LED 43 turns on for 5 seconds during 5 seconds parameters at trip are displayed then the standard measurement is restored Confirm save resul...

Page 45: ...until the relay resets 2 drop off is found As the relay resets pressing the multi function knob drop off values can be saved From these values compute 1 Angle Sector Sec 2 1 2 Half angle sector Hs Sec 2 3 Now before computing the MTA it is necessary to verify if Hs is less or more than 90 a If Hs is 90 then MTA Hs 1 b If Hs is 90 then first compute the 180 complement of Hs Cs 180 Hs next compute M...

Page 46: ...current until the relay trips P1 trip is found As the relay trips pressing the multi function knob tripping values can be saved The TRIP LED 43 turns on for 5 seconds during 5 seconds parameters at trip are displayed then the standard measurement is restored Confirm save results pressing the multi function knob and proceed the display shows the corresponding single phase power From this current va...

Page 47: ...ff timing Now we can measure trip timing Press ON and pre adjust I IN V VN MTA as the relay trips don t save test result go OFF Select ON TIME as the relay trips test goes OFF pressing the multi function knob tripping values can be saved The TRIP LED 43 turns on and parameters at trip are displayed until ON or ON TIME are selected Confirm save results pressing the multi function knob Now we can me...

Page 48: ...g the output frequency We will take advantage of pre fault and fault selection so that Pre fault output is set at nominal voltage and mains frequency Fault output has the same amplitude but frequency is modified according to our test During the test the relay is powered with nominal voltage amplitude as the frequency changes amplitude and phase are not affected Next steps depend upon the type of r...

Page 49: ...C voltage available If you wish to use the DC voltage output to supply the relay under test press the button 69 then use knob 20 to adjust the voltage value that is displayed on the LCD display 23 Connect the DC supply input of the relay to sockets 63 Select the auxiliary voltage range and the pre fault fault mode as follows AUX VAC VDC Aux VAC control Range RET Mode Pre fault fault Pre fault ampl...

Page 50: ...e output sockets 62 Set the Automatic save at trip function as follows Test control Save Automatic at trip ESC NOTE for other selections see the pop up menu chapter Connect the TRIP output to the STOP input Set the timer with the following selections Timer start stop START INT RET STOP EXT Clean Voltage RET Edge ESC NOTE stop clean or voltage according to the relay trip contact connections 1 6 3 F...

Page 51: ...y decrease the auxiliary AC frequency As the relay trips confirm save results pressing the multi function knob and proceed Next we find the drop off threshold for F From the frequency above slowly increase it as the relay resets confirm save results pressing the multi function knob and proceed 1 6 5 F Threshold and drop off The second session is finding threshold F The problem is that the test res...

Page 52: ...hold the timing is short so the measurement is accurate Next we find the drop off threshold for F From the trip frequency above slowly decrease the frequency as the relay resets pressing the multi function knob tripping values can be saved 1 6 6 F Threshold and drop off Now we find the threshold F The procedure is the same as for F measure T1 and T2 then compute tmax 0 8 T1 and set the timed test ...

Page 53: ...for the relay reset contact Timer start stop STOP EXT Clean Voltage NC NO ESC Now press ON and pre adjust the frequency at a value where the relay trips Select OFF TIME as the relay resets pressing the multi function knob drop off values can be saved Confirm save results pressing the multi function knob and proceed ...

Page 54: ...y and the frequency rate of change ROC We will use the pre fault and fault selection so that Pre fault output is set at nominal voltage and mains frequency Fault output has the same amplitude frequency and ROC are modified according to our test Next steps depend upon the type of relay and upon the type of test you want to perform The following example applies to a frequency ROC relay with A freque...

Page 55: ... threshold MXROC else it does not trip The characteristic curve is the following In the dashed area the relay trips only if the ROC is higher than the threshold 1 7 2 Connection to voltage output The following is the connection schematic ...

Page 56: ...e voltage value that is displayed on the LCD display 23 Connect the DC supply input of the relay to sockets 63 Select the auxiliary voltage range and the pre fault fault mode as follows AUX VAC VDC Aux VAC control Range RET Mode Pre fault fault Pre fault amplitude Value ESC The range should be the closest one to the nominal voltage The pre fault amplitude is adjusted by the multi function knob and...

Page 57: ...INT RET STOP EXT Clean Voltage RET Edge ESC NOTE stop clean or voltage according to the relay trip contact connections 1 7 3 MXROC Threshold The first session is finding the MXROC threshold we will start testing the positive ROC The ROC threshold cannot be found as usual modifying the ROC until the relay trips as we do the frequency changes and the relay would trip because of thresholds F or F The...

Page 58: ...ps as it does save test result With this test we also measure the timing T1 Repeat now the test with a starting frequency equal to F and with the same value for ROC but with negative sign 1 7 4 F Threshold and drop off The test procedure is the same as the one for the frequency relay tmax must be set to 0 8 T1 1 7 5 T2 trip and drop off timing The test procedure is the same as the one for the freq...

Page 59: ... Program the starting frequency FNOM and a ROC greater than MXROC say ROC 33 Press ON TIME and check for the trip time Tt This delay is the sum of T1 plus the time it has taken to reach F or F with negative ROC so Compute F Tt T1 ROC FNOM ...

Page 60: ...cted by measuring and comparing V1 from the generator and V2 from the power line we simulate this situation on T1000 PLUS connecting an input to the main AC voltage output and the other one to the auxiliary voltage output We will take advantage of the fact that the auxiliary voltage output can have a different amplitude can be phase shifted and can have a different frequency as compared to the mai...

Page 61: ...t the relay is not tripped looking at light 42 then we slowly modify the parameter until the relay trips It may occur that the relay does not trip even if you have reached the minimum value this is because you moved too fast Normally you should reach the limit VN or 0 or 50 Hz in 20 s or more so in this instance repeat the test more slowly 1 8 2 Connection to voltage outputs The following is the c...

Page 62: ...minal voltage After this adjustment the auxiliary voltage is generated prior to all tests as the unit is OFF and during the test the amplitude is adjusted by the knob 20 Select the main AC voltage output measurement acting on push button 57 so that light 53 turns on Connect the relay input V1 to the main AC voltage output sockets 60 and the relay input V2 to the auxiliary voltage output sockets 62...

Page 63: ...d values are the voltages as relay trips This corresponds to the relay threshold only if the voltage did not change very much while the relay relay timing T1 elapsed soothe voltage should be changed quite slowly If threshold measurement was not good because you were moving too fast do not confirm test results and repeat the test Next we find the drop off threshold for V From the voltage above slow...

Page 64: ...wly reduce the phase angle until the relay trips at this moment confirm save results pressing the multi function knob and proceed the high angle threshold A is found Next we find the drop off threshold for A From the angle above slowly increase it as the relay resets confirm save results pressing the multi function knob and proceed Now repeat the procedure for A The starting angle will be less tha...

Page 65: ...our instance 6 or 6 Start the test with the programmed frequency differential negative differential starting from the negative angle limit The frequency limit is found by a series of tests with different frequencies around the specified limit The test will have a maximum time equal to a multiple of the operating time for instance 2 times However for some relay the enable is given only after a comp...

Page 66: ...of V2 with respect to V1 to the first angle for instance 6 the fault frequency to the first test value AUX VAC VDC Aux VAC control Phase Reference voltage Value RET Frequency Adjust FTEST ESC Now press ON TIME and check if the relay trips The relay trips increase the frequency with FTEST FN by the desired accuracy and repeat until the relay does not trip Program the last frequency when it tripped ...

Page 67: ...DOC MIE91093 Rev 1 34 Page 67 of 145 The test is repeated with FTEST FNOM The procedure gives also trip times ...

Page 68: ...ays The following is the connection schematic Connect the start of the timer to the normally open or normally close contact of sockets 67 depending on the type of timer under test Connect the output of the timer to STOP input sockets 65 Start the test pressing ON TIME the timer will measure the time between the closing of the contact and the intervention of the timer ...

Page 69: ...ing The relay monitors voltage and current outputs of the protected generator and whenever a fault condition is detected the relay will cause the switchgear to trip in order to preserve the generator safety When the generator looses the rotoric magnetic field the working point moves in the plan R X towards the X axis ...

Page 70: ...elay Characteristic Generator Working Point The relay detect the loss of field fault when the working point enters the relay characteristic curve the circle The typical parameters for LOF relays are the following K1 circle diameter expressed in of ZN K2 offsert expressed in of ZN 3 IN VN ZN K2 K1 R X ...

Page 71: ...which one should be changed asks for some more consideration Let s start with the test of point A that means to measure the parameter K2 Finding it means to move from a point having zero impedance and increasing the impedance along the X axis As we have to generate voltage and current at a given phase angle the first step is to convert impedance into these parameters Steps to be followed are Compu...

Page 72: ... per point A we can set the starting current at 5 A but what about the starting voltage As you can see in the diagram you have to start from a voltage VS that must be HIGHER than VS ZB IT 63 6 V Then DECREASE the voltage rather than increasing it until the relay trips In our instance starting from 80 V and decreasing it would do Next we want to test point C how to do it One could compute the corre...

Page 73: ...UTOMATIC RECLOSER TESTING 1 11 1 Introduction The purpose is to test the recloser device that allows to reduce the downtime caused by transient faults The protection device can be overcurrent earth directional distance The recloser operation is to issue a close command some time after the trip command After the first close command the reclose typically checks if a new open command is issued within...

Page 74: ...e test Pre set maximum number N of close commands Verify that if the fault occurs before TD expires there is no Reclose command after N faults The test is performed taking advantage of the features offered by T1000 PLUS Two test sequences are foreseen Normal reclose test Test of a pole mounted CB that includes the reclose device When you select the Reclose mode the following screen is opened Selec...

Page 75: ...DOC MIE91093 Rev 1 34 Page 75 of 145 command falling edge Tof from the Open command leading edge Ton see the following design ...

Page 76: ...ulates the CB position this is often a mandatory input to the Recloser 1 11 2 Normal Recloser test The following is the connection schematic for a normal Recloser test The test is performed on the pair made of the relay and the Recloser All connections from the relay to the Recloser shall be left Nothing changes if the Recloser is inside the relay The relay can be of any type FAULT OPEN CLOS E Tof...

Page 77: ... 69 then use knob 20 to adjust the voltage value that is displayed on the LCD display 23 Connect the DC supply input of the relay and Recloser to sockets 63 The test set measures All trip delays D1 D2 of the sequence All reclose delays R1 R2 of the sequence they are measured from the trip command leading or falling edge according to the selection We don t know the nominal close delays R1 R2 they c...

Page 78: ... as it expires For this reason the reclaim time is tested with two test sequences as follows First test TD is programmed greater than the Recloser s reclaim time TDr for instance TD 1 05 TDr Program the number of tests N foreseen by the Recloser As the fault arrives after the reclaim time is expired the Recloser must always issue the close command also after N 1 faults there is no evolution in the...

Page 79: ...test allows also to verify the reclose timings RX and the number of reclose commands N The first fault starts the sequence The relay trips after D1 the Recloser sends a reclose command after R1 The test set automatically injects fault No 2 after the programmed TD that is less than TDr If N 1 the sequence is completed else tests will continue until fault N 1 is generated followed by open N 1 but no...

Page 80: ...the last reclose that should not arrive that is 10 times the last measured reclose delay This makes the test time rather long if TD is three minutes test duration is more than 30 minutes TEST CONTROL Fault injection Maintained ESC Next select the Recloser test on the main menu as follows TD on the first test 1 05 TDr on the second one 0 95 TDr RECL NUMBER N RECLOSER DELAY MEASURE FROM Tof or Ton a...

Page 81: ...he relay trip For the first test sequence all tests will have two meaningful timings for the second one after the last test the START light will not turn on this confirms that the Recloser has expired all the programmed reclose attempts In all instances as the test is over the ON TIME light turns off the test set goes to OFF and the display shows the message of results recording Remember that if N...

Page 82: ...ontact to the STOP input The test set measures All trip delays D1 D2 of the sequence All reclose delays R1 R2 of the sequence they are measured from the trip command leading or falling edge according to the selection We don t know the nominal close delays R1 R2 they can be different during the test for instance fast reclose slow reclose neutralization In order to avoid stopping the test before its...

Page 83: ...e N 1 faults followed by N Close commands of different delays because they are all the same fault and there will be no Close command after fault N 1 The reclaim time test that is the test that the reclaim time is correctly set cannot be performed directly because the Recloser does not have an auxiliary output that trips as it expires For this reason the reclaim time is tested with two test sequenc...

Page 84: ...ot close This behavior confirms that faults occur before TDr has expired The following time diagram explains the test evolution The second test allows also to verify the reclose timings RX and the number of reclose commands N The first fault starts the sequence The relay trips after D1 the CB closes after R1 The test set automatically injects fault No 2 after the programmed TD that is less than TD...

Page 85: ...ured reclose delay This makes the test time rather long if TD is three minutes test duration is more than 30 minutes TEST CONTROL Fault injection Maintained ESC Next select the Recloser test on the main menu as follows TD on the first test 1 05 TDr on the second one 0 95 TDr RECL NUMBER N RECLOSER DELAY MEASURE FROM Ton One input checked Breaker simulation unchecked Next select the save as Automat...

Page 86: ...START light will not turn on this confirms that the CB has not closed In all instances as the test is over the ON TIME light turns off the test set goes to OFF and the display shows the message of results recording For the second test sequence the last time result will be 0 s confirming that there was no trip within 10 times the last measured reclose delay NOTE if it is wished to avoid waiting thi...

Page 87: ...he fault value from test result it is necessary to compute back the corresponding fault impedance This task is easy with single phase and three phase fault a bit cumbersome with phase to phase faults Currents are in phase with the power supply This means that it is necessary to choose the proper T1000 PLUS power supply connection as a function of the type of power supply single phase or three phas...

Page 88: ...e line angle usually 75 to 85 and possibly also at 0 and 90 Please note that this angle is the Φ I V angle to be used during the test but WITH NEGATIVE SIGN the reason is that Z V I As the current is at the denominator the angle sign is changed Now it must be understood that once the angle is selected the phase angle line intercepts the characteristic at the setting values this is represented in t...

Page 89: ... exactly steep If the above is verified then the relay setting is Z In conclusion you always need two tests to verify the setting you cannot compute the values corresponding to Z start one test and decide if the setting is correct This makes the testing more difficult especially with phase to phase faults As example Z1 is checked when With Z1 d the relay trips with delay T1 With Z1 d the relay tri...

Page 90: ...een 5 and 10 A for IN 5 A or from 1 to 2 A for IN 1 A Vf fault voltage it is computed as a function of Z and the other parameters Φ I V angle of the fault current with respect to the fault voltage taken as the reference Typically tests are performed with Φ I V ranging from 0 to 90 1 12 3 Relay connection The first thing is to connect the three T1000 PLUS to the relay to be tested The connection de...

Page 91: ...DOC MIE91093 Rev 1 34 Page 91 of 145 PH 3 1 1 PH VN V1 V1 VN V1 VN Note in phase to phase faults currents are equal in module and opposite in phase CONNECTION OF THREE T1000 PLUS TO THE DISTANCE RELAY ...

Page 92: ...oltage output measurement Press ON on both T1000 PLUS and adjust the main voltage output to 100 V Check that the displayed angle is the following one if not reverse the supply of T1000 PLUS 2 Repeat the sequence with T1000 PLUS 3 FAULT SUPPLY T1000 PLUS 2 T1000 PLUS 3 SINGLE 3 PH 240 120 1 PH 0 0 THREE 3 PH 240 120 PH 1 2 3 PH 180 120 PH 2 3 3 PH 240 60 PH 3 1 3 PH 60 180 PH 1 2 1 PH 180 0 PH 2 3 ...

Page 93: ...ess ON TIME on T1000 PLUS 1 outputs are generated and timers start on all T1000 PLUS This sequence is to be followed whenever a fault is generated The other selection to perform on all T1000 PLUS is the pre fault range and mode AUX VAC VDC Aux VAC control Range RET Mode Pre fault fault Pre fault amplitude Pre fault phase Set the range at the value closer to VN usually it is 62 5 V The pre fault am...

Page 94: ... Choose the test angle in the R X plane If the distance relay is set on the CT star point towards Busbar the angle Φ I V has the same value but negative otherwise it has the same value These angles depend upon the test angle and the supply see the table below The angle is adjusted prior to actual zone testing as follows Start the test adjust the fault current adjust the fault voltage at 30 V Now s...

Page 95: ...ones as follows VOLTAGE V1 V1 V2 V2 V3 V3 V4 V4 TIMING T1 T2 T2 T3 T3 T4 T4 NO TRIP ZONE LIMIT 1 2 3 STARTER Where T1 T2 T3 T4 are respectively the time settings for zones 1 2 3 4 case of three zones plus the starter Once fault current and pre fault voltage amplitudes have been adjusted to VN stop the test and start again Adjust the fault voltage of the selected phase at a value slightly less than...

Page 96: ... V3 16 V VSTART 32 V We adjust the current of I1 to 8 A the V I phase angle is 75 line side or 105 Busbar side V1 fault voltage is 3 2 V V2 and V3 are 57 8 V We start the test at 3 V if trip time is 0 05 s we slightly increase V1 and start again until trip time becomes 0 3 s let us assume that VT11 is 3 5 V and VT12 is 3 6 V This means that first zone limit is 0 221 Ohm the error is 10 If instead ...

Page 97: ...ith faults on phases 2 and 3 Test other types of fault 1 12 6 Phase to phase fault In phase to phase faults voltage and current vectors are modified during the test as shown in the following figure which refers to the fault of phases 2 and 3 Note that in this type of fault the fault voltage is the phase to phase voltage fault currents are identical in module and opposite in phase the fault current...

Page 98: ...able to use the third generator the one not involved in the fault to measure the phase to phase fault voltage Last but not least the phase arrangement of fault voltages is not the same as pre fault voltages This means that we have to compute the voltage to current fault angle and the angle between pre fault voltage and fault voltage In conclusion given the fault impedance Z and the test angle φ we...

Page 99: ...5 sqrt VN 2 Vf 2 For instance if Z 1 Ohm If 10 A Vf 20 V VN 57 8 V VX 30 58 V The third phase does not change its amplitude equal to VN 4 Phase angle We will compute first of all the angle of fault voltage with respect to the voltage when the fault amplitude is zero φX1 that is φX1 atg Vf VN Given this angle the following table summarizes the pre fault angle and the fault angle for all types of te...

Page 100: ...e zone having the impedance of 1 Ohm for other zones they should be repeated This made clear the other thing to make clear is how to perform the test Once all values are correctly programmed and adjusted start the test the relay will trip in zone N or in zone N 1 To check the setting in the first case you need to increase Vf until the relay trips in zone N 1 in the second case you should decrease ...

Page 101: ...n 5 else also phase angles must be computed and changed In our example at first test the relay trips in zone N with Vf 20 V on next test higher voltage the relay trips in zone N 1 with Vf 20 5 V then Z 20 20 5 4 10 1 012 Ohm 1 12 7 Three phase fault In single phase faults voltage and current vectors are modified during the test as shown in the following figure VR N VR VT VS VT N VS N IR IS IT V2 V...

Page 102: ...ed on all the faulty phases its value is the one selected by the operator for instance 10 A 2 Healthy voltages phase angles Choose the test angle in the R X plane If the distance relay is set on the CT star point towards Busbar the angle Φ I V has the same value but negative otherwise it has the same value These angles are adjusted prior to actual zone testing as follows Start the test adjust the ...

Page 103: ...T31 the trip time should be the one of zone 1 Slightly increase the fault voltages and start again with value VT32 trip time should become T2 The procedure can be repeated at will until the first zone is checked with the desired accuracy the result is Z1 VT31 VT32 2 If Once a limit has been found repeat the test for other zone limits During these tests current and phase are no more modified Exampl...

Page 104: ...slightly increase all voltages and start again until trip time becomes 0 3 s let us assume that VT31 is 1 55 V and VT32 is 1 65 V This means that first zone limit is 0 2 Ohm the error is zero If instead with 1 5 V the trip time is 0 3 s we reduce all voltages and start again until trip time becomes 0 05 s let us assume that VT31 is 1 4 V and VT32 is 1 5 V This means that first zone limit is 0 181 ...

Page 105: ... the measured one prior to convert it into the measured parameter The following connection scheme shows the connection of current AC voltage DC voltage to the converter and the connection of the converter output to the low range DC current measurement input of T1000 PLUS This scheme applies to converters having a conversion error of 2 up For more accurate tests you need a reference converter In th...

Page 106: ...e the corresponding current measurement and prepare a calibration table Next generate the selected parameters measure the reading report it to the table and compute the converter error For instance you want to test a current converter with the following characteristic I0 4 mA I100 20 mA From this the nominal output current as a function of the input current is Iout 4 Iin 20 4 100 4 0 16 Iin ...

Page 107: ...ase generator it is possible to test single phase meters or three phase with three or two equipments provided that voltages are connected in parallel and currents in series The following connection scheme shows the connection of current AC voltage DC voltage to the energy meter under test and also to a sample meter This scheme applies to all classes of energy meters the accuracy range being given ...

Page 108: ...time TN EN V I pf it should be large enough to avoid that time measurements error influence the test result more than 10 s Define the corresponding number of impulses N EN Ks Press ON and adjust current voltage angle to the desired values Press OFF Select on T1000 PLUS the COUNT mode program a number of impulses equal to N TIMER START STOP Stop Count N ESC Select the measurement of the generated e...

Page 109: ...ngle V I and angle power factor Define the nominal test time TN EN V I pf it should be large enough to avoid that time measurements error influence the test result more than 10 s Define the corresponding number of impulses N EN Ks Press ON and adjust current voltage angle to the desired values Press OFF Select on T1000 PLUS the COUNT mode program a number of impulses equal to N TIMER START STOP St...

Page 110: ... of test turns N NOTE The test is eased taking advantage of the optional SHA 2003 reading head and support In this case the option should be located in front of the meter under test as shown in the following picture The reading head can be used for rotating disk meters and for meters with an LED signaling light For rotating disk meters power on the head and press the Disk or LED Switch to the left...

Page 111: ...or LED meters first of all the light can be red but not green or blue Power on the head and press the Disk or LED Switch to the left Then mount the scanning head so that the green light from the the head is lighting the meter s LED then release the Disk or LED Switch the light is removed Next press ON so that the energy meter turns and move the adjustment knob so that the LED on the head front bli...

Page 112: ...int Before proceeding with the test description we give some basic hints on differential transformer protections 1 15 2 The transformer There are many ways for connecting the transformer primary and secondary windings they are classified as vectorial group IA is the primary current phase 1 Ia is the secondary current phase 1 Depending on the connections of winding 1 and 2 and the polarity the vect...

Page 113: ... the Ipu per unit current after the CT on both HV and LV sides when the transformer is at full load The transformer TAPs are calculated according to the nominal power Pn the primary and secondary voltage V1n and V2n the CTRatio and the nominal current In n n I CTR V P Tap 3 1 1 1 n n I CTR V P Tap 3 2 2 2 These values are the p u nominal current at relay level after the CT They are fundamental whe...

Page 114: ...rmer primary side pu current I2 transformer secondary side pu current Depending on the relay manufacturer the Restraint current is calculated as 2 1 I I IR this formula is used by Siemens relays 2 2 1 I I IR this is the standard formula 3 2 1 I I IR this is used by some of GE relays for three windings transformer 2 1 I I IR this is used on Ret316 relays The differential current is defined as 2 1 I...

Page 115: ... Group YY0 Tap 1 1 Tap 2 1 There is now some difference between testing with the external TD1000 module or with the TD1000 model When using the external D1000 option the connection is as follows T1000 PLUS generates the current I1 connected as displayed above D1000 generates the current I2 A1 is the internal measure of T1000 PLUS A2 is the External measure of T1000 PLUS The test principle is that ...

Page 116: ...s the D1000 front panel There are two pairs of sockets IN and OUT IN is to be connected to the VCAUX output of T1000 PLUS D1000 converts the voltage into current and generates the differential current that is measured prior to connection to the relay So when we say that the differential current is to be adjusted this means adjusting the auxiliary voltage ...

Page 117: ... difference is that there is no need of an external second current source as TD1000 has two independent current sources the main one and the one coming from the AUX output selected as a current generator It should be understood that this source as D1000 is actually an high current voltage source the output current is a function of the burden The difference between D1000 and TD1000 is that D1000 ca...

Page 118: ...he maximum test current Connect the TRIP output to the STOP input Select the connection socket measurement pressing the push button 57 the LED turns on This enables current output measurement WARNING if you do not select the output socket the test displays false current or voltage values If you have D1000 Connect the auxiliary voltage output sockets 62 to D1000 IN sockets D1000 converts the applie...

Page 119: ... reached go back and select 300 VA Set the save function as follows Test control Save Confirm at trip ESC Set the timer with the following selections Timer start stop START INT RET STOP EXT Clean Voltage RET Edge ESC NOTE select stop clean or voltage according to the relay trip contact connections Set the external current measurement that is ID as follows Meters External I Enabled 10 A ESC If you ...

Page 120: ...the differential current when the restraint current is minimum test values are Restraint Current 2 2 0 2 2 2 I I I I I B A R Differential Current 2 I I I I B A D D1000 or just generate IA and IB test with TD1000 NOTE it is impossible to test the point with IR 0 as IR is a function of Id Now increase slightly the current and press OFF Press now ON TIME the delay is the relay trip time Also this res...

Page 121: ...d as many points IR ID as desired 1 15 6Displaying characteristic with X Pro 1000 First of all transfer to the computer all records stored in the memory of the T1000 PLUS The parameter involved in the test are Iac and Ext I you can show them directly in the software or edit a formula by clicking the Formulas button and edit IR 2 Iac ExtI 2 as Formula 1 1 Select Formula 1 2 Select Ext_I 3 And click...

Page 122: ...DOC MIE91093 Rev 1 34 Page 122 of 145 The relative graph could be as follows not too bad for a manual test 4 Edit the Formula 1 5 and confirm ...

Page 123: ... following When you test relays for Yd or Dy Transformers since the test is performed in single phase mode a 3 1 732 coefficient is to be applied on the current flowing in the Y connected pole For a Yd transformer the Restraint and Differential Currents formulas are the following o Restraint Current 2 3 2 3 2 1 1 I I I I I I B A R o Differential Current ...

Page 124: ...ccount the above formulas become a little more complex o Restraint Current 2 3 2 3 2 2 1 1 1 2 1 Tap I I Tap I Tap I Tap I I B A R o Differential Current 2 2 1 1 1 2 1 3 3 Tap I I Tap I Tap I Tap I I B A D 1 15 8Second harmonic restraint test This test requires that you generate a distorted waveform The only way to generate such current waveform is to parallel the main and auxiliary currents havin...

Page 125: ...D1000 or TD1000 until the relay trip drops out Take note of the two currents and calculate the 2nd Harm H the harmonic percentage is with D1000 100 _ _ 2 2 I Ext Iac I Ext H Or with TD1000 100 2 1 2 2 2 I I I H 1 16 PRIMARY END TO END TEST The purpose of the test is the check the complete protective scheme of a line differential relay including the CTs This kind of test is particularly complex and...

Page 126: ...al and External faults Double ended injection The double ended injection requires 2 x T1000 PLUS in addition to 2 x GPS and 2 x SWT3 NOTE T1000 PLUS is a single phase test set The phase reference of the output current depends upon the Mains voltage supply of the test set Since the Mains supply is provided by the Transformer for the Auxiliary circuits usually connected as Dy11 or Dy1 it is very imp...

Page 127: ...est the following will describe the complete setup of the instruments 1 16 1 Test setup To perform the test it is necessary the following material at both ends 1 x T1000 PLUS current generator 1 x GPS with antenna and cables for the synchronization 1 x SWT3 to change the Mains supply 1 x HCSW high current switch to rotate the phase angle of the output by 180 And follow the following steps 1 Connec...

Page 128: ...e start up select relay mode from the menu Then follow these steps at the two ends Turn the Main Knob fully counter clockwise Press the Right Arrow ON Turn the Main knob clockwise until the reading is about 100 A Leave it there and check the relay readings in terms of o Local Current 1 o Remote Current 1 o Relative Angle o Measured differential current In this condition the differential current an...

Page 129: ...ave connected the T1000 PLUS to phase R in the remote end you have three possibilities on the local end If you measure something like 200 or 346 A it means the two T1000 PLUS are connected to a different phase reference Switch SWT3 to the next position until you get the proper values T1000 PLUS is connected to You may measure approximately 1 phase R 0 or 400 A 2 phase Y 200 or 346 A 200 x 1 732 3 ...

Page 130: ...asure something like 200 or 346 A it means the two T1000 PLUS are connected to a different phase reference As you may see in this condition Phase B of one end correspond to the phase R 180 of the other end Switch SWT3 to the next position until you get the proper values 1 16 3 T1000 PLUS setup for End to End test T1000 PLUS is connected to You may measure approximately 1 phase B 0 or 400 A 2 phase...

Page 131: ... time the GPS issues a pulse in our case every 10 seconds 1 16 4 Line differential tests With reference to the following table Test Test type Test Execution 1 Static Differential pick up Single ended injection 2 SOTF pickup Single ended injection 3 Internal and External faults Double ended injection we ll perform each test one by one 1 16 4 1 SOTF pick up This test is performed with a single ended...

Page 132: ...e T1000 PLUS 2 Slowly increase the current output in one and only until the relay trips 3 Record the measured tripping current 4 Set the same current value on the other end 5 Check if the relay trips Start the injection with the GPS The relay trips Internal fault Reverse current by 180 using HCSW The relay does not trip External fault 6 You may have get the following results depending upon the ori...

Page 133: ...r heating the current tends to decrease For another test repeat the procedure for the memory erase At the end of the tests you have the time versus current curve from which you can derive the time versus temperature curve given the conversion coefficients For the test conduction please refer to paragraph 1 1 test of over current relays 1 18 LOW VOLTAGE AND MEDIUM VOLTAGE CIRCUIT BREAKER TESTS 1 18...

Page 134: ...nt acting on knob 6 The problem with CB s can be that they are set for high currents that can be tested only if T1000 PLUS does not intervene because of its thermal limitations Before starting compare the CB timing characteristic to the following table that refers to the 100 A output CURRENT OUTPUT A MAXIMUM POWER VA LOAD TIME s RECOVERY TIME min 30 300 STEADY 50 450 30 min 100 75 560 600 45 100 8...

Page 135: ...r with the following selections Timer start stop START INT RET STOP INT RET NOTE the INT selection for STOP makes the timer to stop as soon as the current is cut by the CB 1 18 3 I Threshold The first session is finding threshold I Select ON slowly increase the current As the CB trips pressing the multi function knob the tripping value can be saved The TRIP LED 43 turns on for 5 seconds during 5 s...

Page 136: ...formed applying a voltage to the CT secondary side and slowly increasing it while measuring the current sunk by the CT When the saturation approaches the current increases sharply this is the saturation knee More precisely the IEC standard C 57 13 paragraph 6 10 2 defines the knee point as the value of the voltage for which a voltage increase of 10 causes a current increase of 50 T1000 allows to m...

Page 137: ... Example IN 5 A VA 20 VA class 5P20 Max V IN 20 5 4 V Knee voltage 4 20 80 V This knee can be tested very easily The maximum nominal knee voltage is 200 V as you need to proceed some more further 1 19 2 Test set connection The saturation knee test of a CT is performed applying a voltage to the CT secondary side and slowly increasing it while measuring the corresponding current The connection is sh...

Page 138: ...nd Save Keep on adjusting and saving with steps that you can decide but they will be reduced to 10 and to 5 as you get close to the nominal voltage knee Keep on with small voltage increments and watch the absorbed current When you see it increasing by 50 when you increment the voltage of 5 then the knee has been reached SLOWLY REDUCE THE TEST VOLTAGE if you don t there will be a magnetic remanence...

Page 139: ...n this CT the nominal voltage knee is 160 V When Vac is 165 V formula 1 says 181 V correspondingly Formula 2 says 45 mA Now go to the Vac value of 181 V and you find a current sink of 45 mA this means that 165 V is the measured voltage knee ...

Page 140: ...qual to 10 times the Pick up Current 10I From these parameters the diagram can be drawn as follows A Parameter KT In this instance IEC and IEEE curves correspond to the following formula c 1 b I I a K s t R T Constants of the formula change according to the type of curve they are summarised in the following table IEC IEEE a c b IEC Class A Standard Inverse 0 14 0 0 02 IEC Class B Very Inverse 13 5...

Page 141: ...hey are summarised in the following table IAC ANSI a b c d e IAC Inverse 0 2078 0 863 0 8 0 418 0 1947 IAC Short Time Inverse 0 0428 0 0609 0 62 0 001 0 0221 IAC Long Time Inverse 80 0 2 2 2 IAC Very Inverse 0 09 0 7955 0 1 1 2855 7 9586 IEC Extremely Inverse 0 004 0 6379 0 62 1 7872 0 2461 ANSI Extremely Inverse 0 0399 0 2294 0 5 3 0094 0 7222 ANSI Very Inverse 0 0615 0 7989 0 34 0 284 4 0505 ANS...

Page 142: ...to the following formula 1 c I I b a K s t R T Constants of the formula change according to the type of curve they are summarised in the following table US a c b US Moderately Inverse 0 0226 0 0104 0 02 US Inverse 0 18 5 95 2 US Very Inverse 0 0963 3 88 2 US Extremely Inverse 0 0352 5 67 2 ...

Page 143: ...DOC MIE91093 Rev 1 34 Page 143 of 145 Here are the nominal inverse time characteristics for Normal Very Extremely and Long Time Inverse plotted for KT from 0 1 to 1 for the case of IEC definitions ...

Page 144: ... Parameter t I The Time Current Curves are calculated with the following equation tI F 1 I I A s t R a where 1 1 10 A F B a t I Set time delay at 10 times the Pick up Current In this instance parameters are summarised in the following table ...

Page 145: ... 80 0 2 IEC Long Time Inverse 120 0 1 IEC Short Time Inverse 0 05 0 0 04 IEEE US Moderately Inverse 0 0104 0 0226 0 02 IEEE US Very Inverse 3 88 0 0963 2 IEEE US Extremely Inverse 5 67 0 0352 2 IEEE US Inverse 5 95 0 18 2 IEEE US Short Inverse 0 00342 0 00262 0 02 IAC Normally Inverse 1 7868 0 03593 2 0938 IAC Short Inverse 0 05326 0 006786 1 2969 IAC Long Inverse 1 1228 0 43718 1 ...

Reviews: