background image

www.desatech.com    www.ironhaus.com

123126-01A

21

InStaLLatIOn

Continued

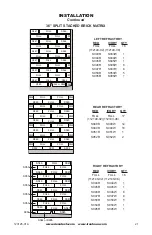
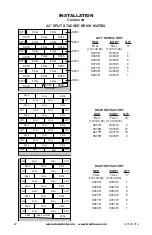
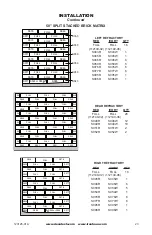
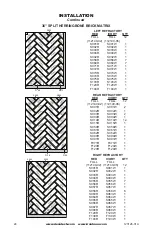
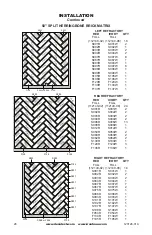
36" SPLIT STACKED BRICK MATRIX

LEFT REFRACTORY

RED

IVORY

QTY

FULL

(112140-02)

FULL

(112140-06)

16

S043R

S043W

1

S044R

S044W

1

S045R

S045W

1

S046R

S046W

6

S047R

S047W

6

S050R

S050W

5

S095R

S095W

1

S047

S046

S046

S050

S050

S050

S050

S050

S043

S046

S046

S046

S046

FULL

FULL

FULL

FULL

FULL

FULL

FULL

FULL

FULL

FULL

FULL

FULL

FULL

FULL

FULL

FULL

S047

S047

S047

S047

S047

S045

S044 or S095

REAR REFRACTORY

RED

IVORY

QTY

FULL

(112140-02)

FULL

(112140-06) 

17

S048R

S048W

12

S049R

S049W

10

S051R

S051W

1

S052R

S052W

2

FULL

S048

S048

S048

S048

S048

S048

S048

S048

S048

S048

S048

S048

FULL

FULL

S049

S049

S049

S049

S049

S049

S049

S049

S049

S049

FULL

FULL

FULL

FULL

FULL

FULL

FULL

FULL

FULL

FULL

FULL

FULL

S052

S051

S052

FULL

FULL

S047

S046

S046

S050

S046

S046

S046

S046

FULL

FULL

FULL

FULL

FULL

FULL

FULL

FULL

FULL

FULL

FULL

FULL

FULL

FULL

FULL

FULL

S047

S047

S047

S047

S047

S045

S044 or S095

S050

S050

S050

S050

S054

RIGHT REFRACTORY

RED

IVORY

QTY

FULL

(112140-02)

FULL

(112140-06)

16

S044R

S044W

1

S045R

S045W

1

S046R

S046W

6

S047R

S047W

6

S050R

S050W

5

S054R

S054W

1

S095R

S095W

1

Summary of Contents for IBBM-36N-TKA

Page 1: ...s or any other appliance WHAT TO DO IF YOU SMELL GAS Do not try to light any appliance Do not touch any electrical switch Do not use any phone in your building Immediatelycallyourgassupplierfromaneighbor s phone Follow the gas supplier s instructions If you cannot reach your gas supplier call the fire department Installation and service must be performed by a quali fied installer service agency or...

Page 2: ...under IRONHAUS brand name by DESA Heating LLC TABLE OF CONTENTS Safety 3 Unpacking 4 Introduction 5 Selecting Location 6 Specifications 6 Product Dimensions 7 Preinstallation Preparation 10 Venting Installation 12 Installation 17 Operation 31 Cleaning and Maintenance 33 Replacement Parts 34 Service Hints 34 Technical Service 34 Accessories 34 Wiring Diagram 35 Troubleshooting 36 Parts 38 Warranty ...

Page 3: ...e or its controls can be dangerous 1 This appliance is only for use with the type of gas indicated on the rating plate This appliance is not convertible for use with other gases unless a certified kit is used 2 For propane LP fireplace do not place propane LP supply tank s inside any structure Locate propane LP supply tank s outdoors To prevent performance problems do not use propane LP fuel tank ...

Page 4: ...ectly on carpet ing vinyl tile or any combustible material other than wood The fireplace must set on a metal or wood panel extending the full width and depth of the fireplace 17 Do not use fireplace if any part has been exposed to or under water Immediately call a qualified service person to arrange for replacement of the unit 18 Do not operate fireplace if any log is broken 19 Do not use a blower...

Page 5: ...of the components B Use of any component part not approved by DESA Heating LLC in combination with this appliance C Installation and or operation in a manner other than instructed in this manual D The burning of anything other than the type of gas approved for use in this gas appliance The installation must conform with local codes or in the absence of local codes with the current National Fuel Ga...

Page 6: ...e safest and most efficient location for your appliance you must take into consideration the following guidelines 1 The location must allow for proper clear ances see clearance information on page 10 2 Consider a location where heat output would not be affected by drafts air con ditioning ducts windows or doors 3 A location that avoids the cutting of joists or roof rafters will make installation e...

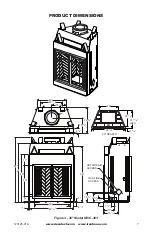
Page 7: ...1A 7 29 14 1 2 22 1 2 26 5 8 4 1 2 15 5 8 4 1 2 1 58 7 1 4 11 15 1 4 3 1 2 9 1 2 10 1 2 67 61 49 11 7 30 1 45 1 8 36 OUTSIDE AIR ACCESS GAS LINE ACCESS 36 HEARTH 1 5 16 19 13 16 Ref 35 3 8 22 18 3 8 Figure 3 36 Model IBVC 36Y Product Dimensions ...

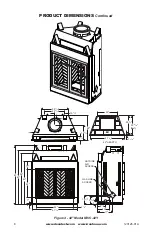
Page 8: ... 8 Product Dimensions Continued 22 3 4 30 1 2 29 4 3 8 15 3 4 17 5 8 67 61 49 7 1 30 11 58 42 51 1 8 4 1 2 3 1 2 9 1 2 10 1 2 81 2 13 17 OUTSIDE AIR ACCESS GAS LINE ACCESS 23 13 16 Ref 1 5 16 41 3 8 25 22 1 2 42 HEARTH Figure 4 42 Model IBVC 42Y ...

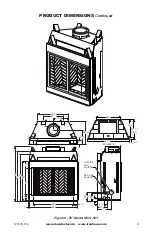
Page 9: ...01A 9 Product Dimensions Continued 38 1 2 28 1 2 43 8 17 5 8 15 3 4 24 49 30 11 61 67 58 7 1 59 50 4 1 2 3 1 2 9 1 2 10 1 2 8 1 2 13 17 GAS LINE ACCESS OUTSIDE AIR ACCESS 23 13 16 Ref 1 5 16 33 49 3 8 221 2 50 HEARTH Figure 5 50 Model IBVC 50Y ...

Page 10: ...Frame opening for fireplace using dimen sions shown in Figures 6 and 7 2 If fireplace is to be installed directly on carpeting tile other than ceramic or any combustible material other than wood flooring fireplace must be installed upon a metal or wood panel extending full width and depth of fireplace 3 Set fireplace directly in front of this open ing and slide unit back until nailing flanges touc...

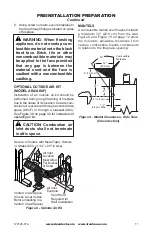
Page 11: ...ccessed through a vented crawl space AK4F or through a sidewall AK4 See Figure 39 on page 32 for instruction of operating air kit CAUTION Combustion air inlet ducts shall not terminate in attic space 3 7 6 cm 1 1 2 3 8 cm Max 8 6 15 2 cm 14 12 22 9 cm Combustible Materials 30 Figure 9 Mantel Clearances Side View Cross Section Figure 8 Outside Air Kit Secure to Collars with Metal Tape Screws or Str...

Page 12: ...2 diameter or less and require a minimum height in accordance with the roof pitch and a minimum of 8 ft distance from a vertical wall or obstruction see Figure 11 WARNING This appliance must be properly connected to a system and must not be connected to a chimney flue servicing a separate solid fuel burning appliance Lowest Discharge Opening Listed Vent Cap 8 Ft Min Roof Pitch x 12 Listed Clearanc...

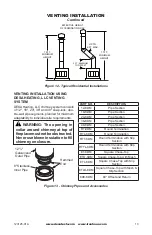
Page 13: ... enclosure Figure 13 Chimney Pipes and Accessories Hemmed End 8 Stainless Inner Pipe 12 3 8 Galvanized Outer Pipe PART NO DESCRIPTION 12 8DM Pipe Section 18 8DM Pipe Section 24 8DM Pipe Section 36 8DM Pipe Section 48 8DM Pipe Section RT 8DM Round Termination RTL 8DM Round Termination RTT 8DM Round Termination with Slip Section RTTL 8DM Round Termination with Slip Section ET 8DM Square Chase Top ET...

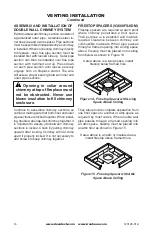
Page 14: ...en install ing double wall snap lock chimney together it is important to assure joint between chimney sections is locked Check by pulling chimney upward after locking Chimney will not come apart if properly locked It is not necessary to add screws to keep chimney together Firestop Spacers V3600FS 8DM Firestop spacers are required at each point where chimney penetrates a floor space Their purpose i...

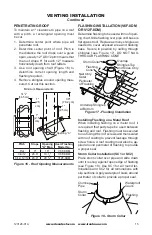
Page 15: ...roof opening chart Figure 16 to determine correct opening length and flashing required 4 Remove shingles around opening mea sured Cut out this section 14 3 8 36 5 cm 30 76 2 cm 1 2 5 cm 1 2 5 cm Minimum Measurements 1 2 5 cm Opening A Nail Only Outer Perimeter of Flashing Storm Collar Flashing Cone Underlap Shingles at Bottom Overlap Shingles Top and Sides Only Figure 17 Flashing Installation Inst...

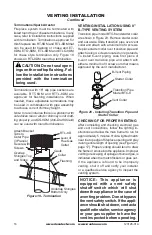
Page 16: ...odel BTC 8 and starter collar are shown in Figure 20 Remove starter collar and set aside Slide transition pipe over vent collar and attach with a minimum of 4 screws Replace starter collar over transition pipe and attach using 4 screws located on leg stands To install b vent piping slide first piece of b vent over transition pipe and attach with either a minimum of 3 screws or other means approved...

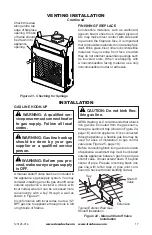
Page 17: ...rgassupply is OFF A manual shutoff valve has been included in the appliance s gas supply system You may consider installing an extra gas shutoff valve outside appliance s enclosure check with local codes where it can be accessed more conveniently with a key through a wall as shown in Figure 21 In conformance with local codes route a 1 2 NPT gas line to appliance through hole in left or right side ...

Page 18: ...g Gas Line Gas Line Opening Equipment Shutoff Valve Valve on Module CAUTION Compoundsused on threaded joints of gas piping shall be resistant to the action of Liquefied Petroleum LP or propane and should be applied lightly to ensure excess sealant does not enter the gas line WARNING All gas piping andconnectionsmustbetested for leaks after the installation is completed After ensuring that gas valv...

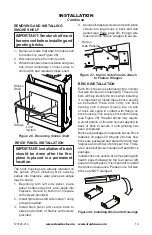
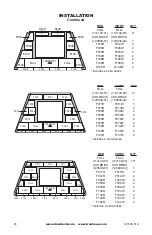
Page 19: ...t applied to back of brick to secure it until grouting has been completed Bricks are packaged in separate boxes Brick matrixes on pages 20 through 26 show how bricks are packaged and placed for each size fireplace and number of bricks per box There are 2 extra full bricks included in Hearth Brick package Install bricks one section at a time starting with hearth panel followed by the rear panel lef...

Page 20: ...20848 01 ASH BRICK 120848 02 1 F011R F011W 1 F013R F013W 2 F036R F036W 2 F059R F059W 4 F078R F078W 2 F079R F079W 2 F132R F132W 2 F140R F140W 2 F141R F141W 2 Includes 2 extra bricks RED IVORY QTY FULL 112140 01 FULL 112140 05 10 ASH BRICK 120848 01 ASH BRICK 120848 02 1 F011R F011W 3 F012R F012W 2 F024R F024W 2 F036R F036W 2 F059R F059W 2 F104R F104W 2 F134R F134W 2 F140R F140W 2 F142R F142W 2 Incl...

Page 21: ...Y RED IVORY QTY FULL 112140 02 FULL 112140 06 17 S048R S048W 12 S049R S049W 10 S051R S051W 1 S052R S052W 2 FULL S048 S048 S048 S048 S048 S048 S048 S048 S048 S048 S048 S048 FULL FULL S049 S049 S049 S049 S049 S049 S049 S049 S049 S049 FULL FULL FULL FULL FULL FULL FULL FULL FULL FULL FULL FULL S052 S051 S052 FULL FULL S047 S046 S046 S050 S046 S046 S046 S046 FULL FULL FULL FULL FULL FULL FULL FULL FUL...

Page 22: ... S076W 6 S077R S077W 6 S081R S081W 1 S082R S082W 1 FULL S077 S076 S046 S050 S046 S046 S046 S046 S077 S076 S077 S076 S077 S076 S077 S076 S077 S076 FULL FULL FULL FULL FULL FULL FULL FULL FULL FULL FULL FULL FULL S080 S045 or S081 FULL FULL FULL S050 S050 S050 S050 S050 FULL FULL FULL FULL FULL FULL FULL FULL FULL FULL FULL FULL FULL FULL FULL FULL S051 S076 S077 S076 S077 S076 S077 S076 S077 S076 S...

Page 23: ... FULL 112140 06 28 S048R S048W 12 S049R S049W 10 S051R S051W 2 S052R S052W 2 FULL S048 FULL FULL FULL S049 S048 S049 S048 S049 S048 S049 S048 S048 S048 S048 S048 S048 S048 S048 S049 S049 S049 S049 S049 S049 S052 S051 S051 S052 FULL FULL FULL FULL FULL FULL FULL FULL FULL FULL FULL FULL FULL FULL FULL FULL FULL FULL FULL FULL FULL FULL FULL FULL RIGHT REFRACTORY RED IVORY QTY FULL 112140 02 FULL 11...

Page 24: ...5W 1 S059R S059W 1 S061R S061W 1 S062R S062W 1 S090R S090W 1 S091R S091W 1 F071R F071W 1 F120R F120W 1 F129R F129W 1 F U L L S 0 0 2 F U L L S 0 0 4 S 0 0 1 S 0 0 1 S 0 9 1 S 0 1 4 S 0 1 4 S 0 1 4 S 0 1 4 S 0 1 4 S 0 1 4 F 0 7 1 S003 S003 F U L L F U L L F U L L F U L L F U L L F U L L F U L L F U L L F U L L S 0 1 5 S 0 6 1 S 0 1 4 S 0 1 4 S 0 1 4 S 0 1 4 S 0 1 4 S 0 1 4 S 0 9 0 S 0 6 2 F129 F U ...

Page 25: ...4 S 0 7 4 S 0 7 4 S 0 7 4 S 0 7 4 S 0 7 4 S 0 7 4 S 0 0 2 S 0 0 2 S003 S003 F120 F129 RIGHT REFRACTORY RED IVORY QTY FULL 112140 02 FULL 112140 06 18 S001R S001W 2 S002R S002W 8 S003R S003W 2 S004R S004W 2 S065R S065W 1 S074R S074W 1 S086R S086W 1 S089R S089W 8 S092R S092W 1 S093R S093W 1 S094R S094W 1 S104R S104W 1 F054R F054W 2 F U L L S 0 8 6 S 0 0 2 S 0 0 2 S 0 0 2 S 0 0 2 S 0 0 2 S 0 0 2 S 0 ...

Page 26: ...L L S 0 0 4 S 0 0 1 S003 F120 S093 or S099 F130 F U L L S 0 0 2 F U L L F U L L F U L L S 0 9 8 S 0 9 7 S 0 9 7 S 0 9 7 S 0 9 7 S 0 9 7 S 0 9 7 F 1 3 7 F U L L F U L L F U L L F U L L F U L L F U L L F U L L F U L L F U L L F U L L S 1 0 5 F U L L S 1 0 6 F U L L S 0 6 7 S 0 0 7 S 0 0 7 S 0 0 7 S 0 0 7 S 0 0 7 S 0 0 7 S 0 0 7 S 0 0 7 S003 F U L L F U L L S 0 0 6 S 0 0 6 S 0 0 6 S 0 0 6 S 0 0 6 S 0...

Page 27: ...ore use 5 Begin grouting by first doing a Filler Pass This is done by filling the joint about 3 4 full with grout mixture It is important to work with only 6 bricks at a time so grout doesn t have time to set up before striking 6 Complete a Finishing Pass around 6 bricks you just put filler pass around This is done by slowly filling in remainder of the joint with a thick amount of grout mixture Mi...

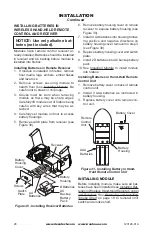
Page 28: ...lly lift module out of firebox being careful with any wires that may be at tached 4 Carefully set module on floor to access battery housings 5 Remove switch plate from receiver see Figure 30 6 Remove battery housing cover on remote receiver to expose battery housing see Figure 30 7 Install 4 AA batteries into housing follow ing positive and negative directions on battery housing cover removed in s...

Page 29: ...er Material Ember Flakes Lava Rock Installing floor media 1 Ember flakes should be placed upright into grooves between ports on ember bed see Figure 33 2 Place lava rock around base of burner on hearth floor Make sure burner ports are not covered 3 Gloves must be worn when working with ember material Pull ember material apart into pieces no larger than a dime Place pieces loosely and sparingly dir...

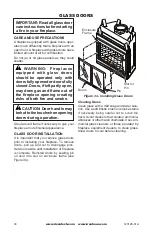
Page 30: ...ing creating risks of both fire and smoke CAUTION Door handle may behottothetouchwhenopening doors during operation Grout around frame if necessary to give your fireplace a more finished appearance Glass Door Installation It is important that you remove glass doors prior to installing your fireplace To remove doors pull up and out to disengage pins Set doors aside until installation of fireplace i...

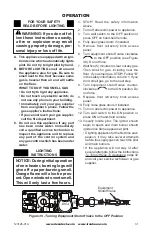
Page 31: ...window to vent smell This will only last a few hours 1 STOP Read the safety information above 2 Turn off all electric power to appliance 3 Turn wall switch to the OFF position or press OFF on hand held remote 4 Fully open glass doors if installed 5 Remove front refractory brick access panel 6 Turn equipment shutoff valve clockwise to the OFF position see Figure 39 Do not force 7 Wait five 5 minute...

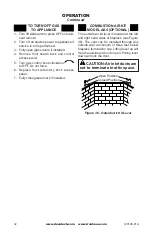
Page 32: ...r to open Pulling lever down will lock the door CAUTION Air inlet ducts are not to terminate in attic space Open Position Closed Position Figure 36 Outside Air Kit Lever TO TURN OFF GAS TO APPLIANCE 1 Turn off wall switch or press OFF on hand held remote 2 Turn off all electric power to appliance if service is to be performed 3 Fully open glass doors if installed 4 Remove front hearth brick and co...

Page 33: ...ectricalpowerbeforeservicing appliance WARNING Failure to keep the primary air opening s of theburner s cleanmayresultin sooting and property damage WARNING Fireplaces equipped with glass doors should be operated only with doorsfullyopenedordoorsfully closed Doors ifleftpartlyopen may draw gas and flame out of the fireplace opening creating risks of both fire and smoke Cleaning Glass Clean glass w...

Page 34: ...eplacement part number Service Hints When Gas Pressure Is Too Low pilot will not stay lit burner will have delayed ignition fireplace will not produce specified heat propane LP gas supply may be low if using propane LP gas If using propane LP gas you may feel your gas pressure is too low If so contact your local propane LP gas supplier Technical Service You may have further questions about install...

Page 35: ...RY PACK REMOTE RECIEVER VALVE THTP TP TH Red Bk Bn Bk D SIZE D SIZE Bn 4 AA SIZE BATTERY NOTE CUT CONNECTOR STRIP 1 4 NOTE CONNECTION IN FIELD LIMIT SWITCH Red Bu Yl Bu Bk Og Gn Yl Gn Bn Bk Og Bk Bk Bn Bu Bu TO J BOX ADAPTER I S PILOT CONNECTORS Bk Red I S 13 CABLE TIE Wiring Diagram ...

Page 36: ...rating sufficient voltage REMEDY 1 Check to see if you have gas supply and that equipment shutoff valve is opened 2 Repeat lighting procedure several times to purge all air out of lines If after repeated attempts appliance does not light call for qualified service and repair 3 Remove debris and dirt inspect and clean any other possible obstructions 4 Contact your gas supplier to check pressure 5 H...

Page 37: ... glues etc See IMPOR TANT statement above 2 For propane LP gas low fuel supply 3 Gas leak See Warning statement at top of page 1 Gas leak See Warning statement at top of page 2 Control valve defective 1 Foreign matter between control valve and burner 2 Gas leak See Warning statement at top of page 1 Air holes at burner inlet blocked 2 B u r n e r f l a m e h o l e s blocked 3 Improper venting or e...

Page 38: ...www desatech com www ironhaus com 123126 01A 38 Parts Models IBVC36 IBVC42 AND IBVC50 1 22 25 21 6 7 10 9 11 12 13 15 16 14 8 2 3 26 17 23 24 5 19 18 4 20 ...

Page 39: ...1 10 23490SA Standoff 4 11 Fireplace Surround Assembly 1 12 109720 02 Clearance Spacer 6 13 117891 01 Fireplace Handle Bracket 4 14 21171 Gas Conduit Cover 4 15 109752 01 Conduit One 1 16 109752 02 Conduit Two 1 17 110037 01 Electrical Duct Assembly 1 18 Ash Box Assembly 1 19 Ash Box Ring 1 20 Hearth Support Brace 1 21 Inner Dome Assembly 1 22 122031 03 Smoke Shelf 36 1 122031 02 Smoke Shelf 42 1 ...

Page 40: ...www desatech com www ironhaus com 123126 01A 40 Parts Module Models Ibbm 36 n p tka Ibbm 42 n p tka Ibbm 50 n p tka 1 9 6 8 7 10 11 4 2 12 3 5 ...

Page 41: ...B M 3 6 P T K A I M B K 3 6 S S R I PART NO DESCRIPTION QTY 120842 01 36 Split Stack Left Panel Assembly 1 120842 02 42 Split Stack Left Panel Assembly 1 120842 03 50 Split Stack Left Panel Assembly 1 120845 01 36 Split Herringbone Left Panel Assembly 1 120845 02 42 Split Herringbone Left Panel Assembly 1 120845 03 50 Split Herringbone Left Panel Assembly 1 120843 01 36 Split Stack Right Panel Ass...

Page 42: ...mage and results from alterations are not covered by this warranty IRONHAUS disclaims all other warranties whether expressed or implied and specifically disclaims the implied warranties of merchantability and fitness for a particular purpose In no event shall IRONHAUS be liable to customer or user in warranty contract negligence strict liability or otherwise for any damages whether incidental or c...

Page 43: ... authorized dealers of this prod uct and or DESA Heating LLC who will provide original factory replacement parts Failure to use original factory replacement parts voids this warranty Travel handling transportation diagnostic material labor and incidental costs associated with warranty repairs unless expressly covered by this warranty are not reimbursable under this warranty and are the responsibil...

Page 44: ...Y 42101 www desatech com 1 866 672 6040 Model located on product or identification tag ______________________________ Serial No located on product or identification tag ___________________________ Date Purchased ___________________________ Keep receipt for warranty verification 123126 01 ...

Reviews: