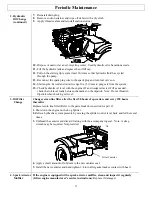
Iron & Oak BHVH2418GX Owner'S Manual Download Page 31


31 

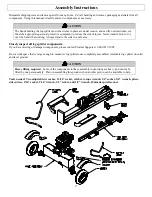
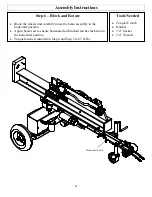
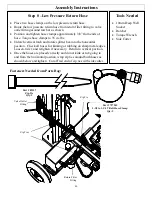
Parts Breakdown – Exploded View – Rev H 


Unit Key: A = BHVH2418GX, B = BHVH3018GX, C = BHVH3018GXT, D = BHVH3018GXS 


Ref 

Part 

Description 

Unit 


Ref 

Part 

Description 

Unit 

30313 

.177 x 3 Bridge Cotter Pin 

All 


54 

800741 

Beam 

A, B, C 

82089 

5/16-24 x 3/4 HHCS 

All 


800741SG 

Beam (Green) 

82100 

5/16 Split Lock Washer 

All 


55 

797740 

Tow Bar 

All 

82157 

250# x 14-7/8 Cable Tie 

All 


56 

797749 

Wedge 

All 

82222 

1/4-20 Nylon Lock Nut 

All 


57 

797804 

Keeper Spacer 

All 

82232 

1/4 x 3/4 Self Tap Screw 

All 


58 

797805 

Keeper 

All 

82530 

M20 SAE Washer 

All 


59 

797808 

Fender Extender 

82567 

M18-2.5 Nylon Lock Nut 

All 


60 

802188 

Suspension Axle/Tank 

82601 

5/16-24 x 1 HHCS 

All 


803130 

Axle/Tank 

A, B 

10 

82622 

5/16-18 x 1-1/2 HHFB 

All 


803130SG 

Axle/Tank (Green) 

11 

82624 

3/8-16 x 1 HHFB 

All 


61 

797870 

Hydraulic Filter Breather Dipstick Cap 

All 

12 

82629 

1/2-13 x 3-1/2 HHFB 

All 


62 

798826 

30 Ton Suspension, Iron & Oak Decal 

13 

82630 

5/16-18 Nylon Lock Flange Nut 

All 


797943 

30 Ton Iron & Oak Decal 

14 

82631 

3/8-16 Nylon Lock Flange Nut 

All 


797944 

24 Ton Iron & Oak Decal 

15 

82632 

1/2-13 Nylon Lock Flange Nut 

All 


798827 

30 Ton Green Iron & Oak Decal 

16 

82671 

5/8-11 x 2-1/2 Carriage Bolt 

10 

All 


63 

797945 

Small T-Bolt Hose Clamp 

All 

17 

82672 

5/16-18 x 3-1/2 HHFB 


64 

797946 

Large T-Bolt Hose Clamp 

B, C, D 

82621 

5/16-18 x 3/4 HHFB 

A, B, D 


797945 

Small T-Bolt Hose Clamp 

18 

82673 

5/8-11 Nylon Lock Flange Nut 

10 

All 


65 

798026 

Keeper Shim 

All 

19 

82675 

1/2-13 x 1-1/4 HHFB 

All 


66 

779542 

Safety Cables (includes both) 

All 

20 

82676 

1/2-13 x 3 HHFB 

All 


67 

782689 

18” Cable Tether


All 

21 

82677 

3/8-16 x 1-1/4 HHFB 

All 


68 

788207 

LP Suction Hose 1” x 25.5”


B, C, D 

22 

82678 

3/8-16 X 3/4 HHFB 


798451 

LP Suction Hose 3/4” x 25.5”


23 

82679 

1/4-20 X 1-1/2 HHFB 

All 


69 

791311 

Jack 

All 

24 

82724 

9/16-18 x 3-1/2 HHCS 

All 


70 

798452 

LP Return Hose 3/4” x 67” 


All 

25 

778498 

5/16 x 3-1/2 Catch Pin 

All 


71 

798453 

HP Cylinder Ext. Hose 

All 

26 

778592 

1-1/4 Cylinder Clevis Pin 

All 


72 

800742 

HP Supply Hose 1/2"x  67" 

All 

27 

778642 

O-Ring x HB Elbow Fitting 

All 


73 

BR001113 

Filter Canister 

All 

28 

778827 

O-Ring x FPT Elbow Fitting 

All 


74 

BR008303 

Wheel 

All 

29 

803122 

MPT x HB Elbow Fitting 

All 


75 

BR008540 

2" Ball Coupler 

All 

30 

787711 

1/2” Magnetic Hex Plug


All 


76 

BR020110 

Large Pump Mount Bracket 

B, C, D 

31 

788040 

Medium Manual Tube 

All 


BR020010 

Small Pump Mount Bracket 

32 

788243 

Latch Rod, Short 

All 


77 

BR006001B 

L090/095 Coupling Insert 

B, C, D 

33 

788244 

Latch Rod Pin 

All 


BR006002B 

L075 Coupling Insert 

34 

788245 

Latch Spring 

All 


78 

BR006001C 

L095 x 1” Coupling


B, C, D 

35 

788343 

Pivot Bracket 

All 


BR006002C 

L075 x 

3/4” Coupling


36 

803123 

1" MPT x 1" HB Elbow Fitting 

B, C, D 


79 

BR006001D 

L095 x 1/2” Coupling


B, C, D 

803120 

3/4” MPT x 3/4” HB Elbow Fitting


BR006002D 

L075 x 1/2” Coupling


37 

803125 

Suction Strainer, SAE ORB 

B, C, D 


80 

GX270 

Honda Engine, GX270 

B, C, D 

38 

790488 

Straight Fitting 

All 


GX160 

Honda Engine, GX160 

39 

790548 

Beam Rest 

All 


81 

MX-313786 

1” Handle Grip


All 

40 

790562 

Log Table 

All 


82 

788301 

Wheel Hub 

All 

41 

790564 

Adapter Sleeve 

All 


83 

82630 

5/16-18 Nylon Lock Flange Nut 

All 

42 

790639 

Valve Plate 

All 


84 

82624 

3/8-16 x 1 HHFB 

43 

790746 

Pivot Bolt 

All 


85 

82631 

3/8-16 Nylon Lock Flange Nut 

44 

791219 

O-Ring x FPT x 45 Elbow Fitting 

All 


86 

82725 

9/16-18 Nylon Lock Nut 

All 

45 

791244 

Small Filter Head 

All 


87 

791869HK 

Valve Handle Kit 

All 

46 

791861 

16 GPM Hi/Lo Concentric Pump 

B, C, D 


88 

788243K 

Latch Rod Kit, Short 

All 

791862 

11 GPM Hi/Lo Concentric Pump 


89 

799574 

3/16 X 11/16 Spring Pin 

All 

47 

791869 

Brand Valve 

All 


90 

778844 

1” Axle Washer


A, B, D 

48 

798895 

Fender Kit (includes both fenders) 

All 


91 

777124 

1” Axle Nut


All 

49 

798895 

Fender Kit (includes both fenders) 

All 


92 

82521 

½” Lug Nut


All 

50 

794653 

Log Dislodger 

All 


93 

82205 

9/16 SAE Washer 

All 

51 

794826R 

4-

1/2” x 24” Cylinder w/ Decals


B, C, D 


94 

82735 

M12-1.75 x 20 HHCS 

All 

794826K 

4-

1/2” Cylinder Seal Kit


B, C, D 


95 

82038 

1/2 SAE Washer 

All 

794827R 

4” x 24” Cylinder w/ Decals


96 

803124 

Fitting, MPT X MPT, -12 

All 

783885 

4” Cylinder Seal Kit


97 

803121 

Fitting, Rt MPT X Swivel, -12 

All 

52 

795800 

Right Torsion Stub Axle (includes hub) 


98 

803119 

Fitting, FPT X Swivel, -12 

All 

53 

795801 

Left Torsion Stub Axle (includes hub) 


Summary of Contents for BHVH2418GX

Page 1: ...size hole opening can puncture skin and cause severe blood poisoning Inspect hydraulic system regularly for possible leaks Never check for leaks with your hand while the system is pressurized Seek me...

Page 2: ...2 Hazard Signal Word Definitions...

Page 3: ...Inspection Maintenance 14 Before Each Use Fueling 17 Before Each Use Work Site Selection and Set Up 18 Splitting Operation 19 Storage 25 Periodic Maintenance 26 Troubleshooting 28 Specifications 29 Pa...

Page 4: ...nical specifications for your log splitter are provided in the Specifications section of this manual WARNING This log splitter uses a high pressure hydraulic system to generate a very strong splitting...

Page 5: ...Escaping Fluid 1 All 5 N A 778597 Horizontal Lock 1 All 6 799554 778609 Splitter Control 1 All 7 778610 Log Splitter Warning 1 All 8 778714 Vertical Lock 1 All 9 787944 Pinch Point Warning 3 All 10 7...

Page 6: ...Owner s Manual completely before operating Only one person should operate the log splitter If an assistant is helping to load logs the operator should not actuate controls until the assistant is at le...

Page 7: ...n 1 Return Line Filter 10 Engine On Off 2 Split Control Lever 11 Horizontal Lock 3 End Plate 12 Vertical Lock 4 Beam 13 Jack 5 Wedge 14 2 Ball Coupler 6 Log Dislodger 15 Safety Cables 7 Cylinder 16 Hy...

Page 8: ...or death Therefore the following instructions should be heeded at all times when inspecting or servicing the hydraulic components of the log splitter NEVER check for leaks with your hand Leaks can be...

Page 9: ...use control valve handle to extend and retract wedge five 5 times to remove air from the high pressure lines 9 With wedge retracted shut off engine 10 Check oil level again Fill if necessary 11 Repla...

Page 10: ...the log splitter with its engine running 3 Fuel Valve Off if equipped Turn fuel valve off to prevent carburetor flooding and reduce the chance of fuel leakage Refer to Engine owner s manual for fuel...

Page 11: ...occur if tire explodes When seating a bead after repair do not exceed 60 PSI Pressures higher than 60 PSI can cause the tire and wheel to rupture and explode 3 Engine Off IMPORTANT Make sure log split...

Page 12: ...ock nut with wrench 3 Proper adjustment is obtained when coupler is as tight as possible on ball and locking lever can still be opened and closed 4 Lock lever closed to secure the attachment 5 Insert...

Page 13: ...ain Drive slowly and take extra caution when traveling over rough terrain On public roads If towing on a public road make sure to comply with all local state and federal towing requirements It is the...

Page 14: ...draulic system pressure relieved 1 Make sure engine is off and cool 2 Disconnect the spark plug 3 Relieve all hydraulic system pressure by moving the Split Control Lever back and forth several times 2...

Page 15: ...handles back and forth to relieve pressure before changing or adjusting hydraulic system components such as hoses tubing fittings or other components NEVER check for leaks with your hand Leaks can be...

Page 16: ...ires Make sure tires are fully inflated and in good repair if you will be towing the splitter See tire sidewall for recommended tire pressure WARNING Do not over inflate tires Serious injury can occur...

Page 17: ...pproved container NEVER pump fuel directly into engine at gas station Static charge can build and ignite fuel Use a UL listed fuel container to transfer gas to the engine Don t overfill DO NOT overfil...

Page 18: ...sing the log splitter shut off the engine and get to fresh air RIGHT AWAY See a doctor You may have carbon monoxide poisoning 2 Fire Precautions Take the following precautions against fire 1 IMPORTANT...

Page 19: ...he splitting control Splitting wedge NEVER attempt to change the height or speed of the splitting wedge Pressure setting NEVER increase the pressure setting of the pump or control valve Safety equipme...

Page 20: ...rtical splitting position The HORIZONTAL splitting position is used for lighter logs that can be easily loaded onto the beam The VERTICAL splitting position is used for light logs as well as heavy log...

Page 21: ...sure the hydraulic oil is above 10 F before starting the engine Cold hydraulic oil can damage the hydraulic pump b If outdoor air temperature is below 32 F allow log splitter to warm up by extending a...

Page 22: ...f the log Wedge moving NEVER load or unload logs while the wedge is moving Straddling reaching across Never straddle reach across or step over the beam while the engine is running and the log splitter...

Page 23: ...use any other body part or a rope cable or other remote device to actuate the control Second person Many accidents occur when there is more than one person involved in loading and operating the log s...

Page 24: ...ystanders or the splitter could become damaged 9 Return Wedge Move Split Control Lever away from end plate to return wedge Once the control valve is actuated in the return direction the wedge is desig...

Page 25: ...Leave the fuel valve lever in the OFF position to reduce the possibility of fuel leakage Long Term Storage between infrequent uses and at end of season Drain the fuel tank and carburetor as instructe...

Page 26: ...draulic components of the log splitter NEVER check for leaks with your hand Leaks can be located by holding a piece of cardboard or wood at least two feet long with your hand at one end and passing th...

Page 27: ...level reads between the marks on the dipstick Note Do not thread in dipstick when checking oil level 3 Oil Filter Change Change return line filter after the first 50 hours of operation and every 250 h...

Page 28: ...at least 2 feet long with your hand at one end and passing the other end near the suspected area wear eye protection Look for discoloration of the cardboard or wood If injured by escaping fluid no ma...

Page 29: ...orizontal Vertical Horizontal Maximum Log Length 25 25 25 Maximum Log Diameter 16 16 16 Hydraulic Cylinder Bore 4 4 5 4 5 Hydraulic Cylinder Stroke 24 24 24 Spark Arrestor No Yes Yes Fuel Valve Yes Ye...

Page 30: ...30 Parts Breakdown Exploded View Rev H...

Page 31: ...x HB Elbow Fitting 1 All 73 BR001113 Filter Canister 1 All 28 778827 O Ring x FPT Elbow Fitting 2 All 74 BR008303 Wheel 2 All 29 803122 MPT x HB Elbow Fitting 1 All 75 BR008540 2 Ball Coupler 1 All 3...

Page 32: ...the exhaust system fuel tanks or fuel lines Fire can result Remote Control NEVER attach a rope cable or other remote device to the splitting control Splitting Wedge NEVER attempt to change the height...

Page 33: ...to load logs Loose dangling Loose or dangling apparel can become entangled in moving parts Never wear jewelry or loose fitting clothing Gloves Wear snug fitting gloves without drawstrings or loose cu...

Page 34: ...ver add fuel or remove gas cap if engine is running or still hot Stop the engine and allow to cool at least two minutes before adding fuel Heat flames sparks Stay away from sources of heat flame or sp...

Page 35: ...and get to fresh air RIGHT AWAY See a doctor You may have carbon monoxide poisoning Other exhaust dangers Engine exhaust some of its constituents and certain vehicle components contain or emit chemic...

Page 36: ...the log is too stringy or tough to split completely A stuck log will move back with the wedge on the initial attempt to retract the wedge If this happens retract the wedge completely to allow the log...

Page 37: ...a safe area Closely inspect all log splitter components If you have missing or damaged components please contact Product Support at 1 800 817 1005 Find a work space that is large enough to maneuver l...

Page 38: ...Flange Nut Qty 6 Part 82630 5 16 18 Nylon Lock Flange Nut Qty 4 Part 82677 3 8 16 x 1 1 4 HHFB Qty 4 Part 82631 3 8 16 Nylon Lock Flange Nut Qty 4 Part 82672 5 16 18 x 3 1 2 HHFB BHVH3018GXT only Qty...

Page 39: ...ire onto hub with valve stem facing out Thread nuts onto studs until hand tight Tighten the lug nuts in stages Follow the sequence listed Torque nuts to 1st Stage 20 25 ft lbs 2nd Stage 35 40 ft lbs 3...

Page 40: ...ructions with the kit before installing the tow bar Lock the jack in the down position on a flat surface and adjust so the tow bar sits level Align the holes and install 2 bolts and 2 nuts Torque to 5...

Page 41: ...prevent it from tipping over The beam assembly weighs approximately 350 pounds and will cause bodily injury if it falls on someone Step 3 Stand beam upright CAUTION Beam assembly is top heavy Carefull...

Page 42: ...ld the beam in place while maneuvering any assembly Align holes in pivot bracket with holes in bottom of beam Insert 2 bolts as shown Add 2 nuts Hand tighten nuts Do not torque at this time Tools Need...

Page 43: ...ith the latching face on the valve side of the splitter Attach to the beam using 2 bolts and 2 nuts Hand tighten nuts Do not torque at this time Tools Needed None Fasteners Needed from Parts Bag Latch...

Page 44: ...otate the beam assembly to the horizontal position Adjust beam rest to ensure horizontal latch indeed latches the beam in the horizontal position Torque fasteners installed in Step 4 and Step 5 to 83...

Page 45: ...s on only one end of the hose Screw hand tight High Pressure Supply Hose end with thread sealant applied into the pump outlet Wrench tighten the fitting to 1 5 3 0 Turns Past Finger Tight position Pro...

Page 46: ...in lbs Unlatch vertical latch and rotate splitter beam to the horizontal position Check all hoses for kinking or rubbing on sharp metal edges Loosen twist and retighten if necessary Return to vertical...

Page 47: ...y and install 2 nuts on bolts leaving them loose enough to install the cradles Slide log tables onto bolts Install upper 2 bolts and 2 nuts and tighten Torque to 34 ft lb Tools Needed Ratchet Torque W...

Page 48: ...ecure with 2 locknuts Torque to 19 ft lbs Repeat step for other fender Tools Needed Torque Wrench Ratchet 1 2 Socket 1 2 Wrench Fasteners Needed from Parts Bag Part 82621 5 16 18 x 3 4 HHFB Qty 4 Part...

Page 49: ...Light Kit Item 797859 Fits all BHVHxx18 models Engine Guard Item 797872 Fits all BHVHxx18 models standard equipment on BHVH3018GXT Any Questions Comments Problems or Parts Orders Call Iron Oak Produc...

Page 50: ...e means personal residential household use by a consumer Commercial use means all other uses including but not limited to use for commercial income producing or rental purposes or when purchased by a...

Page 51: ...ent Unit City State ZIP Code Model Information Purchase Date Application Type Homeowner Commercial Rental Model i e BHVH2418GX Serial i e BHVH2418GXA012345678 Signature IMPORTANT WARRANTY INFORMATION...

Page 52: ...52 20195 S Diamond Lake Rd Ste 100 Rogers MN 55374 1 800 350 8739...

Reviews: