background image


11

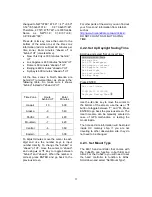
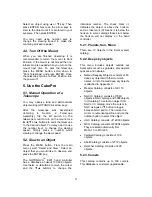
changed to N47º31'48”: 47.53º = 47º +0.53º, 
0.53º=0.53x60'=31.8', 0.8'=0.8x60"=48". 
Therefore, 47.53º=47º31'48" or 47d31m48s. 
Same as N47º31.8’: 31.8’=31’+0.8’, 
0.8’=0.8x60”=48”. 

Press 

 or 

 key, move the cursor to the 

bottom of the screen to set the time zone 
information (add or subtract 60 minutes per 
time zone). Enter minutes “ahead of” or 
“behind” UT (universal time). 

  New York City is 300 minutes “behind” 

UT 

  Los Angeles is 480 minutes “behind” UT 

  Rome is 60 minutes “ahead of” UT 

  Beijing is 480 minutes “ahead of” UT 

  Sydney is 600 minutes “ahead of” UT 

All the time zones in North America are 

behind

 UT (universal time), as shown in the 

following table. So make sure it shows 
“behind” instead of “ahead of” UT.  


Time Zone 

Hours 

behind UT 

Enter 

Minutes 

Hawaii -10  600 

Alaska -9  540 

Pacific -8  480 

Mountain -7 

420 

Central -6  360 

Eastern -5  300 

To adjust minutes, move the cursor to each 
digit and use the number keys to input 
number directly. To change the “behind” or 
“ahead” of UT, move the cursor to “ahead” 
and using 

 or 

 key to toggle between 

“behind” and “ahead”. When the number is 
correct, press ENTER and go back to the 
previous screen.  


For other parts of the world, you can find out 
your “time zone” information from internet, 
such as 

http://www.timeanddate.com/worldclock/

DO NOT COUNT DAYLIGHT SAVING 
TIME. 


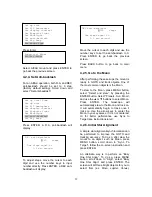
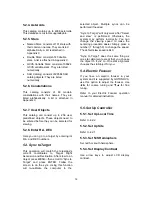
4.2.2. Set Up Daylight Saving Time 

Scroll up and select “Set up local Time” 


Press ENTER.  


Use the 

 or 

 key to move the cursor to 

the bottom of the screen, use the 

 or 


button to toggle between “Y” and “N”. Press 
ENTER to go back the previous screen. The 
local time also can be manually entered in 
case of GPS malfunction or testing the 
mount inside.  

The time and site information will be stored 
inside HC memory chip. If you are not 
traveling to other observation site, they do 
not need to be changed. 


4.2.3.  Set Mount Type 

The 8401 hand controller that comes with 
the CubePro can function in both EQ and 
AltAz. For the CubePro you will need to set 
the hand controller to function in AltAz. 
Scroll down and select “Set Mount Type”, 

Set up Local Time 
Set up site 
Set N/S hemisphere 
Set display contrast 
Set Eyepiece light 
Set Backlight 
Set anti-backlash 
Set Key Beep 

Set local time: 
 
2008-06-01 11:55:09 

Daylight Saving Time 

Y


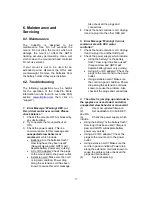
Summary of Contents for SmartStar CubePro

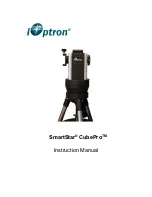
Page 1: ...SmartStar CubeProTM Instruction Manual ...

Page 2: ... Star Alignment 12 4 3 Turn Off the Mount 13 5 Use the CubePro 13 5 1 Manual Operation of a Telescope 13 5 2 Slew to an Object 13 5 2 1 Planets Sun Moon 13 5 2 2 Deep sky objects 13 5 2 3 Comets 13 5 2 4 Asteroids 14 5 2 5 Stars 14 5 2 6 Constellations 14 5 2 7 User Objects 14 5 2 8 Enter R A DEC 14 5 3 Sync to Target 14 5 4 Electric Focuser 14 5 5 Set Up Controller 14 5 5 1 Set Up Local Time 14 5...

Page 3: ... 17 6 1 Maintenance 17 6 2 Troubleshooting 17 6 3 iOptron Customer Service 18 Appendix A Technical Specifications 19 Appendix B GOTONOVATM 8401 HC MENU STRUCTURE 20 Appendix C GOTONOVATM Star List 22 Appendix D Set Up USB PC Connection 27 Appendix E Firmware Upgrade 34 Appendix F Use a PC to Control an iOptron Mount 37 Appendix G RS 232 Command Set 38 WARNING NEVER USE A TELESCOPE TO LOOK AT THE S...

Page 4: ...d metal hinges makes the mount very sturdy Compact design of the tripod and the mount makes it easy to carry around in a travel case The mount assembling takes less than 5 minutes Standard dovetail makes this mount compatible with many different OTAs CubeProTM is compatible with all ASCOM compliant planetarium programs and many other programs such as Sky X Starry Night and Voyager Package Contents...

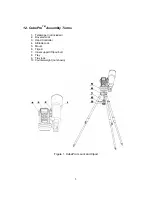
Page 5: ...M Assembly Terms 1 Telescope not included 2 Dovetail Lock 3 Hand Controller 4 Altitude Lock 5 Mount 6 Tripod 7 Inner support Tripod bolt 8 Tray 9 Tray lock 10 Counterweight not shown Figure 1 CubePro mount and tripod ...

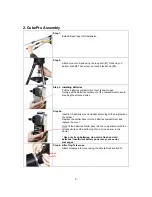
Page 6: ...aking the attached wires Step 3a Insert 8 AA batteries not included according to the diagrams on the holder Replace the holder back into the batteries compartment and replace the cover Note fit the batteries holder back into the compartment with the attached wires at the bottom right corner see arrow in the photo Use only fresh batteries do not mix fresh and old batteries insufficient battery powe...

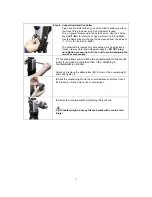
Page 7: ...ic focuser laser pointer and autoguider adapter DO NOT plug non iOptron accessories into the unit to avoid damaging the mount or accessories 7 This step allows you to attach the counterweight to the mount note if you have a scope less than 7 lbs attaching a counterweight is optional Unlock and remove the altitude lock 4 Screw on the counterweight shaft and tighten it 8 Slide the counterweight onto...

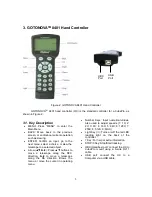
Page 8: ...escope to a selected object Arrow Press buttons to move a telescope along the DEC direction to move a telescope along the RA direction Brows the menu or move the cursor in operating menu Number Keys Input numerical values Also used to adjust speeds 1 1X 2 2X 3 8X 4 16X 5 64X 6 128X 7 256X 8 512X 9 MAX Light Key Turns on off the red LED reading light on the back of the controller Key For help or ex...

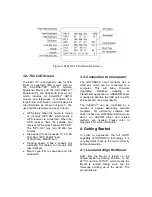
Page 9: ...unar Def user defined Mount Type EQ is equatorial and A A altazimuth 3 3 Connection to a Computer The GOTONOVA hand controller has a USB port which can be connected to a computer This will allow Firmware Upgrading Database Updating or Planetarium application A USB2COM driver is needed to simulate the USB port to a RS 232 serial port see Appendix D The CubeProTM can be controlled by a number of pop...

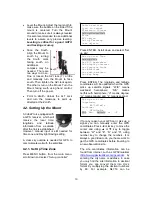
Page 10: ... button from the main menu scroll down and select Set up controller Press ENTER Scroll down and select Set up site Press ENTER The longitude and latitude coordinates will be updated when the GPS picks up satellite signals W E means west east hemisphere N S means north south hemisphere d means degree m means minute and s means second If for any reason your GPS can t pick up a signal you can manuall...

Page 11: ...oggle between behind and ahead When the number is correct press ENTER and go back to the previous screen For other parts of the world you can find out your time zone information from internet such as http www timeanddate com worldclock DO NOT COUNT DAYLIGHT SAVING TIME 4 2 2 Set Up Daylight Saving Time Scroll up and select Set up local Time Press ENTER Use the or key to move the cursor to the bott...

Page 12: ...he Moon and lock on It will automatically begin to track once it locks on Use the arrow keys to center the Moon in your eyepiece if it is not centered Or for better performance use Sync to Target see instructions later 4 2 6 Initial Star Alignment A simple star alignment synchronization can be performed to improve the GOTO and tracking accuracy To do so after slew the mount to an object such as Mo...

Page 13: ...observe and press the ENTER key The GOTONOVATM 8401 hand controller has a database of about 130 000 objects Use the or buttons to move the cursor and the buttons to change the individual number The check mark indicates the object is above the horizon and a cross mark X means it is below the horizon In some catalogs those stars below the horizon will not display on the hand controller 5 2 1 Planets...

Page 14: ...ght Ascension and Declination After slew to an object press MENU then scroll to Sync to Target and press ENTER Follow the screen to do the sync Using this function will re calibrate the computer to the selected object Multiple syncs can be performed if needed Sync to Target will only work after Select and slew is performed Otherwise the system may perform incorrectly You can change the slewing spe...

Page 15: ...ree Star Align is only supported by EQ mode 5 6 1 One Star Align From the main menu select Align Select One Star Align Use and buttons to select a star and press ENTER A list of align planets or stars that are above the horizon is computed based on your local time and location Use arrow buttons to move the telescope and center the star in your eyepiece You can use the number buttons to change the ...

Page 16: ...ecting Set up tracking Then the user can select Sidereal speed Solar speed Lunar speed and User defined speed For User defined speed this can be adjusted from 91 to 109 of sidereal speed by pressing the or buttons 5 9 User Objects Besides various star lists available in the hand controller you can add edit or delete your own user defined objects All data you enter is supposedly J2000 0 epoch 5 10 ...

Page 17: ...good condition Power drop along the extension cord has been known to cause this error message Also check all the plugs and connections 4 Check the hand controller cord Unplug it and re plug into the other HBX port 5 Error Message Warning Can not communicate with DEC motor controller 1 Check the hand controller cord Unplug it and re plug into another HBX port 2 Check the power supply which include ...

Page 18: ... concerning your CubePror contact the iOptron Customer Service Department Customer Service hours are 9 00 AM to 5 00 PM Eastern Time Monday through Friday In the unlikely event that the CubePro requires factory servicing or repairs write or call the iOptron Customer Service Department first to receive an RMA before returning the telescope to the factory Please provide details as to the nature of t...

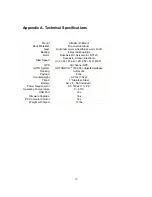
Page 19: ...DC12V Slew Speed Dual Axis 9 Gear Electronic 1 2 8 16 64 128 256 512 MAX GPS 32 channel GPS GOTO System GOTONOVATM 120 000 objects database Tracking Automatic Payload 8 lbs Counterweight 3 3 lbs 1 5kg Tripod 1 Stainless Steel Battery AA x 8 Not Included Power Requirement DC 12V 2V 1 2A Operating Temperature 0 40ºC USB Port Yes Firmware Upgrade Yes PC Computer Control Yes Weight with tripod 12 lbs ...

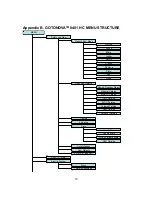
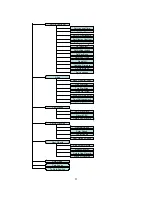
Page 20: ...sky Object Messier Catalog NGC IC Catalog UGC Catalog MCG Catalog Caldwell Catalog Abell Catalog Herschel Catalog Named Deepsky Object Messier Catalog NGC IC Catalog UGC Catalog MCG Catalog Caldwell Catalog Abell Catalog Herschel Catalog Named Stars Double Stars GCVS Variable Stars SAO Catalog Constellations Constellations User Objects User Objects Enter R A and DEC Enter R A and DEC Sync To Targe...

Page 21: ...ign Easy One Star Align One Star Align One Star Align Two Star Align Two Star Align Three Star Align Three Star Align Disp R A Axis Error Disp R A Axis Error Test Anti backslash Test Anti backslash Polaris Position Polaris Position PEC Option PEC Option PEC Play Back PEC Play Back Record PEC Record PEC Delete PEC Record Delete PEC Record Set Up Tracking Set Up Tracking Sidereal Speed Sidereal Spee...

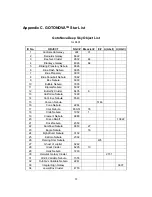
Page 22: ...a 6302 12 Butterfly Cluster 6405 6 13 California Nebula 1499 14 Cat s Eye Nebula 6543 15 Cocoon Nebula 5146 16 Cone Nebula 2264 17 Cork Nebula 650 51 76 18 Crab Nebula 1952 1 19 Crescent Nebula 6888 20 Draco Dwarf 10822 21 Duck Nebula 2359 22 Dumbbell Nebula 6853 27 23 Eagle Nebula 16 24 Eight Burst Nebula 3132 25 Eskimo Nebula 2392 26 Flaming Star Nebula 405 27 Ghost of Jupiter 3242 28 Great Clus...

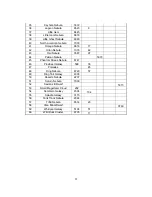
Page 23: ...44 Pelican Nebula 5070 45 Phantom Streak Nebula 6741 46 Pinwheel Galaxy 598 33 47 Pleiades 45 48 Ring Nebula 6720 57 49 Ring Tail Galaxy 4038 50 Rosette Nebula 2237 51 Saturn Nebula 7009 52 Sextans B Dwarf 5373 53 Small Magellanic Cloud 292 54 Sombrero Galaxy 4594 104 55 Spindle Galaxy 3115 56 Tank Track Nebula 2024 57 Trifid Nebula 6514 20 58 Ursa Minor Dwarf 9749 59 Whirlpool Galaxy 5194 51 60 W...

Page 24: ...ntaurus Cen 63 Perseus Per 20 Cepheus Cep 64 Phoenix Phe 21 Cetus Cet 65 Pictor Pic 22 Chamaeleon Cha 66 Pisces Psc 23 Circinus Cir 67 Piscis Austrinus PsA 24 Columba Col 68 Puppis Pup 25 Coma Berenices Com 69 Pyxis Pyx 26 Corona Australis CrA 70 Reticulum Ret 27 Corona Borealis CrB 71 Sagitta Sge 28 Corvus Crv 72 Sagittarius Sgr 29 Crater Crt 73 Scorpius Sco 30 Crux Cru 74 Sculptor Scl 31 Cygnus ...

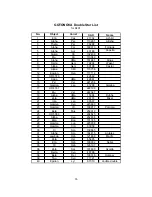
Page 25: ...70 Chertan 118 Merak 166 Sheratan 023 Alkaid 071 Cor Caroli 119 Merope 167 Sirius 024 Alkalurops 072 Cursa 120 Mesartim 168 Skat 025 Alkes 073 Dabih 121 Miaplacidus 169 Spica 026 Almach 074 Deneb 122 Mintaka 170 Sterope 027 Alnasl 075 Deneb Algedi 123 Mira 171 Sulafat 028 Alnilam 076 Deneb Kaitos 124 Mirach 172 Syrma 029 Alnitak 077 Denebola 125 Mirfak 173 Talitha 030 Alphard 078 Dubhe 126 Mirzam ...

Page 26: ...661 15 Psi Vel 221234 16 Gamma Leo 81298 Algieba 17 HR 4167 222199 18 Mu Vel 222321 19 Alpha UMa 15384 Dubhe 20 Zeta UMa 28737 Mizar 21 Iota Leo 99587 22 Gamma Cen 223603 23 Gamma Vir 138917 Porrima 24 Beta Mus 252019 25 HR 5089 204545 26 Alpha Cen 252838 27 Zeta Boo 101145 28 Gamma Lup 225938 29 Gamma CrA 83958 30 Xi Sco 159665 31 Alpha Sco 184415 Antares 32 Lambda Oph 121658 Marfic 33 Zeta Her 6...

Page 27: ... 1 Download USB2COM driver cp2102 zip file for 8401 from iOptron Website 2 Install cp2101 usb2com driver Choose the appropriate driver for your OS In this case is a Windows XP operation system Double click on it and you will see Click Next ...

Page 28: ...28 Select I accept the terms of license agreement and click Next Using the default installation path c SiLabs MCU CP210x or specify your own path by click Change Click Next Then click Install ...

Page 29: ...e USB cable to the USB port on your PC plug the other end of the USB cable to hand controller Turn on the power on the mount 4 Install the Hardware The computer will find a new hardware and show the following screen Select No not this time and click Next ...

Page 30: ...or specific location and click Next Select Search for the best driver in these locations and check Include this location in the search Click on Browse and select the cp210x driver from directory c SiLabs MCU CP210x Win2K_XP click OK ...

Page 31: ... Next The computer will start to install the driver for the USB2COM When the installation is done click Finish If the computer shows find a new hardware screen again just repeat the steps in this section again ...

Page 32: ...g computer communication with the mount via ASCOM platform and planetarium software applications However you need to find assigned COM port number for the USB connection To do so right click My Computer and click Properties Click Hardware click Device Manager ...

Page 33: ...33 Double click on Ports COM LPT find out the COM number and write it down in the following figure it is COM4 ...

Page 34: ...dix E Firmware Upgrade 1 Download and install Firmware Downloader from iOptron Website 2 Double click and open iOptron Downloader On the interface select appropriate port using pull down menu in this case COM4 ...

Page 35: ...r and click Open Select Main Program in Update Type Click Start Download It shows Please reset GOTONOVA GOTOSTAR waiting for connection On the hand controller press MENU and using scroll to select Set up controller press ENTER then select Upgrade firmware press ENTER and the upgrade starts ...

Page 36: ...ect COM port number for CP210x 2 Wrong bin file make sure you have the correct bin file for firmware upgrade 3 Wrong downloader you should use iOptron Downloader instead of the Flash Downloader 4 Use cp210x driver provided by iOptron The newest version from SiLab may not work properly for iOptron s hand controller ...

Page 37: ... download from http ascom standards org 4 iOptron ASCOM drive download it from iOptron website http www ioptron com Files File iOptronAscomSetupV1 02 rar and 5 Planetarium software Some company integrated iOptron s products into their planetarium software such as Voyage and The Sky X Pro Therefore an ASCOM plug in will not be needed Most planetarium software can be used to control iOptron s produc...

Page 38: ...eenwich mean time The offset can be entered in signed format 12 to 12 hours Command Sg sDDD MM SS Response 1 Set the current longitude The east is positive while the west is negtive Command St sDD MM SS Response 1 Set the current latitude Command SL HH MM SS Response 1 Set the current local time Command SC MM DD YY Response 32 spaces followed by followed by 32 spaces followed by Set the current da...

Page 39: ...d GZ Response sDD MM SS Get the current Azimuth Command GC Response MM DD YY Get the current calendar day Telescope Motion Command MS Response 0 if command accepted 1Object is below horizon the desired object is below 0 degrees altitude 8 trailing spaces before 32 total characters plus Target command Slew to the most recently defined RA and DEC coordinates in RA DEC mode Command Mn Ms Me Mw Respon...

Page 40: ...r on which the telescope is currently positioned Position Command CM Response Coordinates matched there are 5 spaces between Coordinates and matched and 8 trailing spaces before the the total response length is 32 character plus the Calibrate mount Current Right Ascension and Declination become the commanded Right Ascension and Declination This command does the same thing as synchronize to target ...

Page 41: ...specified the power up default of FS is assumed Command F1 F2 F3 F4 Response none Set the focus speed to 1 2 3 4 from slow to fast Command V Response current servo controller software RS232 command language version number This command returns the current servo controller software RS232 command language version Command Vs Response current servo controller software infomation This command returns th...

Page 42: ...ommand SE Response 0 1 This command gets the slewing status 1 in slewing 0 not in slewing Command GAM Response 0 1 2 This command gets the current mount type 0 Altitude Azimuth type 1 fork mount 2 Germany equator mount Command PK Response 1 This command parks the telescope Command STPKP0 STPKP1 STPKP2 STPKP3 STPKP4 Response 1 These command sets the mount park position 0 original to north pole 1 Le...

Reviews: