13
PREPARING FOR INSTALLATION
inVENTer PAX standard set
•
Installation and operating instructions
3
Preparing for installation
3.1
Installation advices
• The ventilation unit is connected directly to the 230 V AC mains.
Installation and electrical connection must only be carried out by qualified personnel.
• Before installation, carefully read the sections installation and electrical connection to avoid
installation errors.
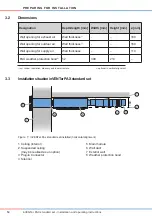
• Before installing the wall duct, cut the folded spiral-seam ducts to a size of the wall thickness
+ 10 mm. After cutting to size, insert the folded spiral-seam ducts into the insulating sleeves.
Ensure that the folded spiral-seam ducts terminate with the insulating sleeves at the room
interior end.
• The inVENTer PAX ventilation system can be installed over several rooms.If the main module
is connected to an duct system, the air flow is reduced. Real values may be evaluated based
on the airflow-pressure curve (page 39). Note that the specifications of the airflow-pressure
curve refer to the standard set.
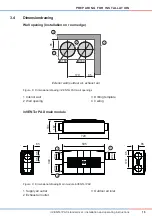
• Observe the predetermined minimum distances on both sides of the wall (see dimensional
drawing):
1 Minimum distance to adjacent components on the exterior wall: 250 mm from hole center
2 Minimum distance to adjacent components on the interior wall: 85 mm from hole center
3 Distance between exhaust air outlet and outdoor air inlet: 170 mm
4 Minimum distance between two ventilation units to avoid the mixing of outdoor air and
exhaust air. 1.20 m
• Connect each ventilation unit to its own outdoor air inlet and supply air outlet.
• Install the wall duct outside airtight and inside vapour tight into the air resistance layer.
Material must be provided by the customer.
• The volume of supply air should match the volume of extract air.
We recommend an external air supply for inVENTer PAX. This may be realised by appropriate
overflow measures: An air gap of about 10 mm below the door, unscrew the hinges by 5 mm,
use a ventilation grille or similar.
• The ventilation unit must not be used for drying out buildings and must remain sealed against
dust during the construction work. It must not be put into operation until after completion of
the construction work.
10
4
2
3
1
1 Insulating sleeve
2 Folded spiral-seam duct
3 Interior wall side
4 Exterior wall side


