26
ASSEMBLY AND INSTALLATION
inVENTer PAX standard set
•
Installation and operating instructions
4.7
Mount the weather protection hood
The PAX weather protection hood in horizontal alignment is the standard exterior closure for
the inVENTer PAX ventilation system. For mounting the weather protection hood in vertical
alignment see the instructions attached to the weather proection hood.
NOTICE
Mounting the weather protection hood on unfinished exterior wall.
Damage to the exterior wall!
►
Only mount the weather protection hood when the exterior wall is completed and fully cured.
NOTICE
Penetration of condensation water and/or algae accumulation around the weather protec-
tion hood.
Damage to the external wall and masonry and/or discolouration of the facade!
►
Before installation of the weather protection hood apply all sealing tapes circumferentially.
►
In vulnerable areas, apply a biocidal/water repellent treatment to the plaster surface around
the weather protection hood before installing (Consult your planner!).
Spirit level, marker pen, drilling machine with drilling bit Ø 8 mm, screw driver, rawl
plugs (wall plugs for insulation when exterior wall is insulated), permanently elastic
outdoor sealing compound
Requirements:
The exterior wall is finished and even.
The wall duct is inserted and shortened.
NOTICE
Drip rails on wether protection hood aligned incorrectly.
Damage to the exterior wall and masonry!
►
Observe correct alignment of drip rails to the top and bottom.
TIP:
When fitting the base plate for the PAX weather protection hood on exterior walls with
thermal insulation, use wall plugs for insulation for a secure hold. These are not part of the
scope of supply, but are available as an option.
►
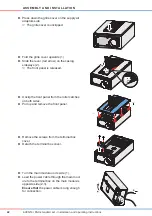
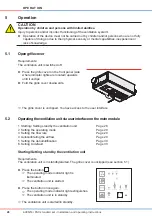
Place the base plate onto the wall duct from the
exterior.
Ensure that
the openigs on the base plate are
centrally aligned over the wall duct.
Ensure that
the drip rail is positioned to the
bottom.
►
Level the base plate using a spirit level.
►
Mark the 4 drill holes (red arrows).
►
Drill the 4 holes with Ø 8 mm, min. 50 mm deep.
►
Insert the rawl plugs.


