2
TruVision NVR 50 Quick Start Guide
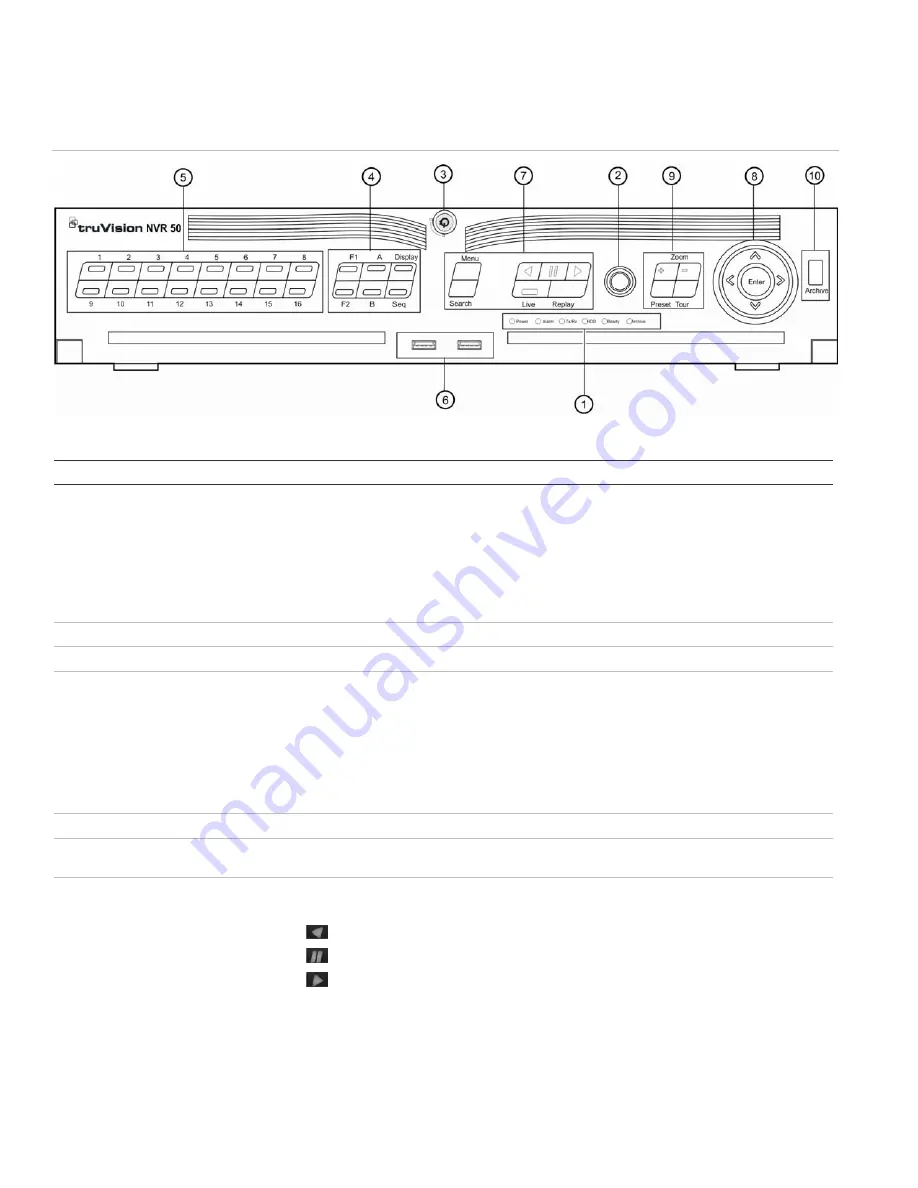
NVR 50 front and back panels
Figure 1:
NVR 50 front panel
Table 1: Front panel elements
Item Name
Description
1. Status
LEDs
Power:
Green indicates the NVR is working correctly. Red indicates a fault.
Alarm:
Lit indicates an external alarm status or motion.
Tx/Rx:
Tx/Rx indicator blinks green when network connection is functioning properly.
HDD:
HDD indicator blinks red when data is being read from or written to the HDD.
Ready:
Green indicates the device is functioning properly.
Archive:
Archive indicator blinks green when record files or pictures are being exported to a USB
or eSATA device.
2.
IR receiver
Receiver for IR remote.
3.
Front Panel Lock
You can lock or unlock the front panel with a key.
4. Display
buttons
Display
: Toggles through the various multiviews: full, quad, 1+5, 1+7, 9, and 16.
Sequence
: Starts/stops sequencing in live view mode.
A
: Selects the main monitor
B
: Selects the spot monitor (in live view)
F1
: In all-day playback, click to start and stop video clipping.
F2:
In live view mode, click to display/hide the time bar.
In all-day playback, click to hide/display the playback control toolbar.
5.
Numeric buttons
Switch between different cameras in live, PTZ control or playback modes.
6.
USB Interfaces
Universal Serial Bus (USB) ports for additional devices such as a USB mouse and USB Hard Disk
Drive (HDD).
7.
Menu and Search buttons
Playback buttons
Menu:
Enter/exit the main menu.
Search:
Enter the advanced search menu.
: Jump back to the oldest available video and starts the playback.
: Pause playback.
: Instantly playback the currently selected file. Default time is 1 minute.
Live
: Switch to live view mode.
Replay
: Replay the current file in playback Starts at the beginning of the file.