background image

 FLX-44 Installation Guide 


10 


-


9600 baud 

-


8 Data Bits 

-


1 Stop Bit 

-


Parity = none 

Remote RS232 Control via Tunneling 

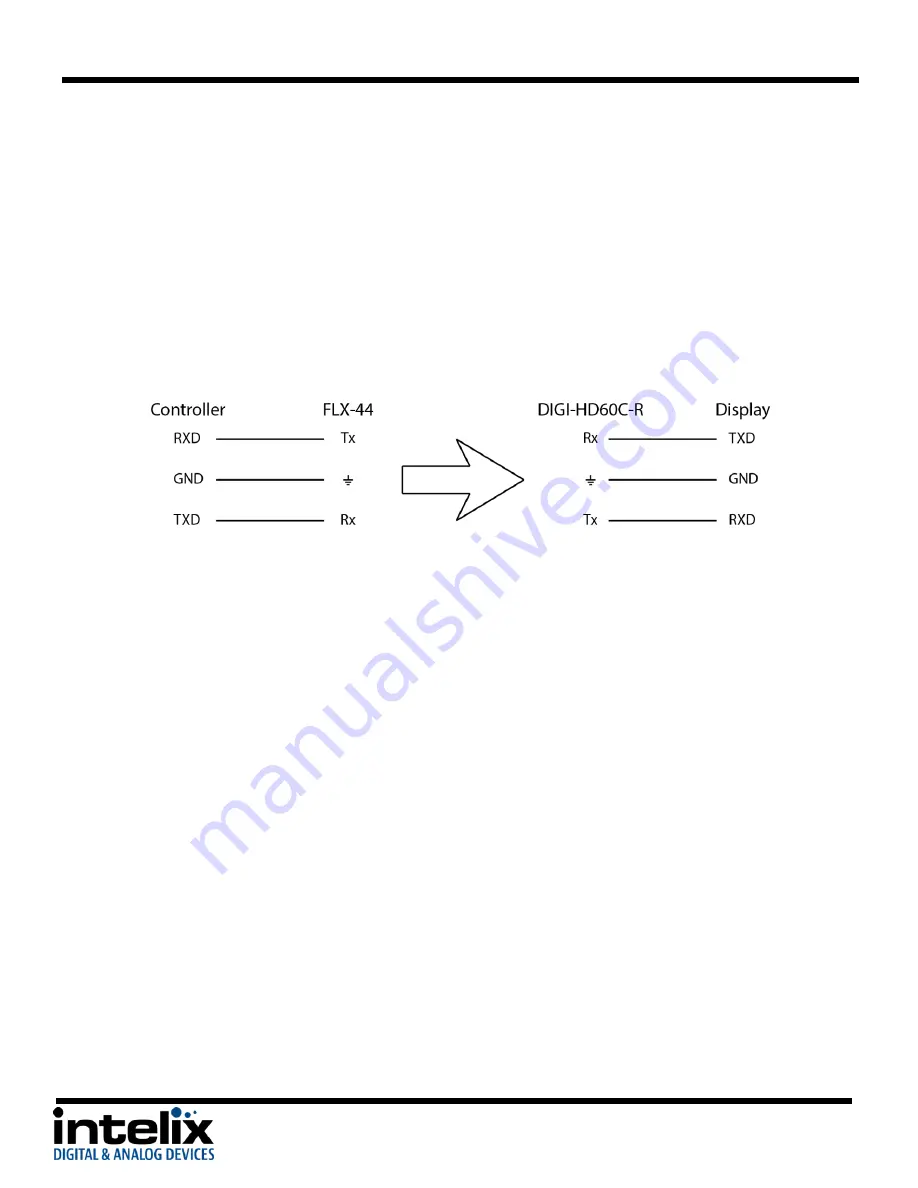
Discrete remote control of remote display devices is possible by connecting an RS232 output of a control 
system to the 3-pole terminal block on the output of the matrix.  
 
To  use  the  RS232  extension  capabilities  of  the  FLX-44,  connect  the  TX,  ground,  and  RX  control  signal 
wires to the removable 3-pole terminal block (see page 6, 

Rear Panel

, item C). Consult the manual of the 

control device(s) to determine which pins the TX/RX signals are carried on. Be sure to always connect TX 
to RX and RX to TX.  


A compatible HDBaseT with control receiver is required to pass the control signals to the display devices. 
Intelix recommends the DIGI-HD60C-R. 

Remote RS232 Control via Routing 

The FLX-44 has the logic to pass RS232 commands to remote devices through the TCP/IP or DE9 RS232 
ports.    The  destination  command  string  is  embedded  in  a  command  which  includes  the  destination 
HDBaseT output port and baud rate. See page 21 for an example of the routed commands. 
 
A compatible HDBaseT with control receiver is required to pass the control signals to the display devices. 
Intelix recommends the DIGI-HD60C-R. 
 

Connect TCP/IP Control 

Matrix Control 

The  TCP/IP  port  (see  page  6, 

Rear  Panel

,  item  E)  requires  a  standard  straight-through  Category  5  or 

greater cable with the TIA/EIA-568B crimp pattern for operation. The default settings for the TCP/IP port 
are: 
 

-


IP address: 192.168.0.178 

-


Port: 8080 

Web Browser Control 

The  FLX-44  includes  a  web  portal  to  allow  control  of  the  matrix  via  a  standard  web  browser.  The  IP 
address is the same address that is used for TCP/IP control. See page XX for more information. 

Summary of Contents for FLX-44

Page 1: ...Rev 131211 8001 Terrace Ave Phone 608 831 0880 Suite 201 Toll Free 866 462 8649 Middleton WI 53562 Fax 608 831 1833 FLX 44 Installation and Operation Guide ...

Page 2: ...PARATUS Use the mains plug to disconnect the apparatus from the mains THE MAINS PLUG OF THE POWER CORD MUST REMAIN READILY ACCESSIBLE Do not defeat the safety purpose polarized or grounding type plug A polarized plug has two blades with one wider than the other A grounding type plug has two blades and a third grounding prong The wide blade or the third prong is provided for your safety If the prov...

Page 3: ...HDBaseT Outputs 8 HDBaseT Link Wiring 9 Connect Audio Outputs 9 Connect IR Control 9 Source Device Control A 9 IR In B and IR All In D 9 IR Eye D 9 Connect RS232 Control 9 Matrix Control 9 Remote RS232 Control via Tunneling 10 Remote RS232 Control via Routing 10 Connect TCP IP Control 10 Matrix Control 10 Web Browser Control 10 Remote RS232 Control via Routing 11 Apply Power 11 LCD Panel Boot up I...

Page 4: ...onfiguration Tab 17 Network Tab IP Address 18 EDID Management 19 Full EDID Copy 19 Hybrid EDID Copy 19 Third Party Control Setup 20 TCP IP Connection 20 RS232 Connection 20 RS232 and TCP IP Commands 21 Routing Commands 21 Preset Commands 22 System Commands 22 EDID Commands 22 HDCP Commands 23 RS232 Routing 23 Troubleshooting 24 Matrix does not power on 24 Cannot view 3D content 24 Cannot hear surr...

Page 5: ...a simple IR remote control to allow IR switching This IR remote control can be learned into universal remotes and IR based control systems An IR All In port is provided which allow one IR connection to control all four remote displays The matrix also features a full command set for RS232 and Ethernet control with third party control systems plus control via a web browser RS232 commands to remote d...

Page 6: ...fore change is applied Rear Panel A IR output ports for each HDMI source B IR input ports for each HDBaseT output C RS232 input for each HDBaseT output D IR input for matrix when front is covered or matrix is located in a concealed location E TCP IP Ethernet control input also allows control via web browser F IR input for all HDBaseT outputs G HDMI inputs H HDMI outputs outputs 1 and 2 only I HDBa...

Page 7: ...ed IR remote performs all of the functions available on the front panel of the FLX 44 Please see page 11 for information on controlling the matrix from the front panel and the IR remote The remote control requires two AAA batteries which are included ...

Page 8: ...bles that are less than or equal to 5 meters in length For source devices that are further away an HDMI extension device will be required to complete the connection Connect Displays HDMI Outputs Connect the display devices to HDMI outputs see page 6 Rear Panel item H using HDMI cables that are less than or equal to 5 meters in length For display devices that are further away it is highly recommend...

Page 9: ... with the FLX 44 Source Device Control A IR output port of the matrix is connected to the IR receiver of the source device using a DIGIB EMT sold separately The IR signal is passed from the display location through the HDBaseT connection and provides control of the source device The IR signal from the remote display location can also control the matrix IR In B and IR All In D IR paths to control t...

Page 10: ...R Remote RS232 Control via Routing The FLX 44 has the logic to pass RS232 commands to remote devices through the TCP IP or DE9 RS232 ports The destination command string is embedded in a command which includes the destination HDBaseT output port and baud rate See page 21 for an example of the routed commands A compatible HDBaseT with control receiver is required to pass the control signals to the ...

Page 11: ...s to the display devices Intelix recommends the DIGI HD60C R Apply Power Plug the power supply into the power input port on the rear of the matrix see page 6 Rear Panel item C Connect the IEC power cable into the power supply The matrix will turn on once the IEC cable is plugged into AC power LCD Panel Boot up Information While the matrix is booting up the front LCD panel will show the IP address ...

Page 12: ...cating a routing change To route video and audio from input 2 to output 4 1 Press input 2 2 Press output 3 3 Press TAKE Advanced Routing To route video and audio from input 3 to all outputs 1 Press input 3 2 Press outputs 1 2 3 and 4 3 Press TAKE IR Remote Operation The buttons on the IR remote are identical to the buttons on the front panel of the FLX 88 The IR routing command sequences are ident...

Page 13: ... the computer to use the same network prefix as the IP address assigned to the matrix For example the IP address of the matrix is 192 168 0 178 Set the computer to use a static IP address within the same network range such as 192 168 0 42 2 Connect the network crossover cable to the computer and to the TCP IP port on the FLX 44 Router connection 1 Configure the router to use the same IP range as t...

Page 14: ...ddress is 192 168 0 178 2 Select User from the UserName drop down 3 Enter the password to gain control of the matrix The default password is 123456 4 Press the Enter key on your keyboard or tablet to go to the matrix control screen Matrix Control Click the input to output route and the button will turn green once the route has been changed ...

Page 15: ...168 0 178 2 Select Administrator from the UserName drop down 3 Enter the password to gain control of the matrix The default password is admin 4 Press the Enter key on your keyboard or tablet to go to the matrix control screen 5 Click the Setup button in the top right corner of the matrix control screen to access the administrative controls ...

Page 16: ...event tampering from this screen Interface Tab The Interface setup screen features options to customize the end user s experience with the matrix Title Bar Label o This changes the title that is shown on the Matrix Control screen LCD Readout o The LCD panel can be customized with a limit of 16 characters per line o Apostrophe comma and backslash are not supported characters Button Labels o Input a...

Page 17: ...ay can be copied to an input A Full copy will copy all the video and audio capabilities of the display A Hybrid copy will copy the video capabilities of the display and specify PCM two channel audio which is ideal when using the analog audio outputs After the EDID copy mode output to copy from and input to copy to are selected click the Go button You will be presented with an EDID copy success win...

Page 18: ...FLX 44 Installation Guide 18 Network Tab IP Address The Network setup screen features DHCP or Static IP settings for the matrix ...

Page 19: ...y video and audio EDID of output yy to input xx EDIDHyyBxx Copy video EDID of output yy and specify 2 channel PCM to input xx EDIDMInit Restore factory EDID information Full EDID Copy To copy the video and audio EDID information from output 3 to input 1 transmit the following command EDIDM03B01 Hybrid EDID Copy Hybrid EDID copy is the preferred command to use when the audio is going to be routed t...

Page 20: ...age 13 for setting up the matrix and page 16 for configuring the IP address The default IP address is printed on a sticker on the bottom of the FLX 44 RS232 Connection The RS232 control port requires a standard straight through serial cable for operation The default settings for the RS232 port are 9600 baud 8 Data Bits 1 Stop Bit Parity none ...

Page 21: ... xx to output yy xxByy AV xx 0yy CR LF Route input xx to all outputs xxAll xx To All CR LF Route inputs to corresponding outputs All All Through CR LF Route input xx to multiple outputs yy Number of outputs is unlimited each output must be separated by a comma xxByy yy xxVyy yy CR LF Turn off all outputs All All Closed CR LF Turn off specific output yy yy AV yy Closed CR LF Output yy routing statu...

Page 22: ...ieve matrix model information Type FLX 44 CR LF Lock the front panel keys Lock System Locked CR LF Unlock the front panel keys Unlock System Unlock CR LF Retrieve matrix firmware version number Version Vz z CR LF Turn off matrix command feedback MessageOff Closed the Message Return CR LF Turn on matrix command feedback MessageOn Enabled the Message Return CR LF EDID Commands Description Command Re...

Page 23: ... In addition to immediate transmission the FLX 44 can store commands to be broadcast when the matrix is powered on or off through the standby commands PWON and PWOFF Y is the output code B is the baud rate is the RS232 string Command Y B Output Code Timing 1 1 Immediate TX A PWON command Baud Baud Code E PWOFF command 2400 1 2 2 Immediate TX 4800 2 B PWON command 9600 3 F PWOFF command 19200 4 3 3...

Page 24: ...ify display is 3D compatible Verify source device can output 3D content Verify twisted pair cable does not exceed 40 meters Cannot hear surround sound audio Copy EDID from output to input Verify output can broadcast surround sound audio Verify source device is configured to output surround sound audio No video from HDBaseT output Verify the green link LED on the HDBaseT output is lit solid ...

Page 25: ...ategory 5e 6 or 6A with TIA EIA 568B crimp pattern Bandwidth 6 75 Gbps Input DDC Signal 5 0 volts p p TTL Input Video Signal 0 5 to 1 0 volts p p Supported IR Carrier Frequency 33 55 kHz at 5 volts Chassis and Environmental Enclosure Painted Aluminum Dimensions 435mm x 235mm x 44mm 17 13 x 9 25 x 1 73 Rack Spacing 1 RU Shipping Weight 2 27 kg 5 lbs Operating Temperature 0 to 40 C 32 to 104 F Opera...

Page 26: ...FLX 44 Installation Guide 26 ...

Page 27: ...FLX 44 Installation Guide 27 ...

Page 28: ...28 Thank you for your purchase Please contact us with your questions and comments Intelix 8001 Terrace Ave Ste 201 Middleton WI 53562 Phone 608 831 0880 Toll Free 866 462 8649 Fax 608 831 1833 www intelix com intelix intelix com ...

Reviews: