Intel® Server System M20NTP1UR - System Integration and Service Guide
73
6.10
M.2 SSD Replacement
Required Tools and Supplies
•
Replacement PCIe* M.2 SSD
•
Anti-static wrist strap and conductive workbench pad (recommended)
•
Phillips* head screwdriver
1.
Power off the system and disconnect all cable from the back of the system.
2.
Remove the system top cover (see
Section 6.1.1
3.
Remove the Air Duct (see
Section 6.2.1
4.
Remove the riser card assembly (see
5.
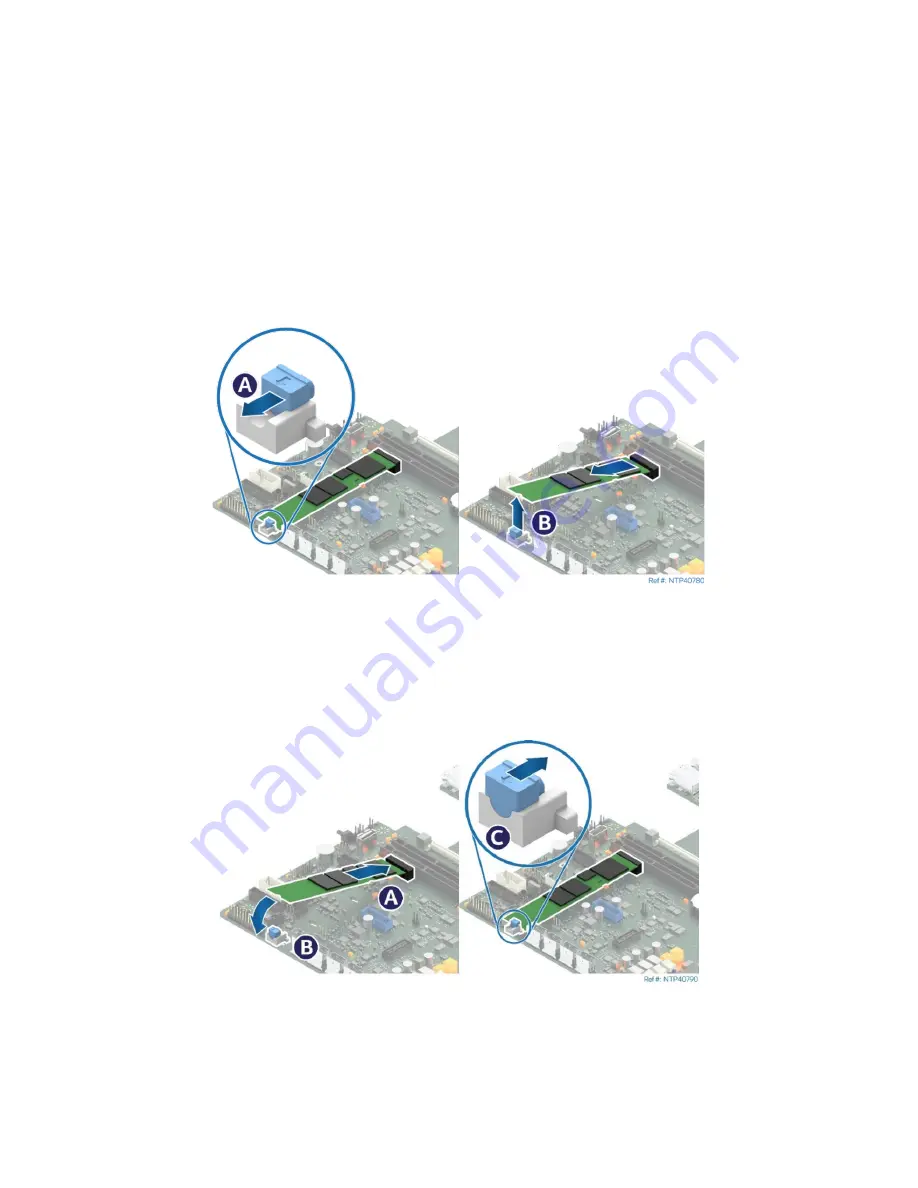
Remove the M.2 SSD from the server board (See
Figure 90. M.2 SSD Removal
•
Slide the blue latch away from the M.2 SSD (see Letter “A”).
•
Carefully lift the free end of the M.2 SSD (see Letter “B”) and gently pull it out of the connector.
6.
Locate and carefully unpack the replacement M.2 SSD. Hold it by its edges. Do not touch the gold
contacts.
7.
Install the M.2 SSD to the server board (See
Figure 91. M.2 SSD Installation
•
Line up the alignment feature within the M.2 SSD edge connector with the alignment key within
the server board M.2 SSD slot connector.
•
Carefully insert the M.2 SSD into the slot connector (see Letter “A”).
•
Push down on the free end of the M.2 SSD until it lays flat onto the latch assembly (see Letter “B”).
•
To secure the M.2 SSD to the server board, slide the blue latch over its back edge (see Letter “C”).
Summary of Contents for M20NTP1UR
Page 2: ...2 This page intentionally left blank...
Page 101: ...Intel Server System M20NTP1UR System Integration and Service Guide 101 1 2 3 4 5...
Page 102: ...Intel Server System M20NTP1UR System Integration and Service Guide 102 1 2 3 4 5 6 1 2 3...
Page 103: ...Intel Server System M20NTP1UR System Integration and Service Guide 103 1 2 3 4 5...
Page 112: ...Intel Server System M20NTP1UR System Integration and Service Guide 112 1 2 3 4 5 ESD 6 1 2 3...
Page 113: ...Intel Server System M20NTP1UR System Integration and Service Guide 113 1 2 3 4 5...


