


“RAID Ready”
R
54
User's Manual
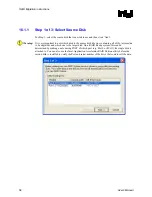
4. Create a RAID 0 or RAID 1 volume via the Intel Application Accelerator RAID Edition
utility and perform a ‘Create from Existing Disk’ migration (right-mouse click on ‘RAID
Volumes’ or select option under ‘RAID’ file menu)
5. When migration is complete, Reboot
6. Optional: Use 3rd party application or Windows* to create and format a new data partition on
unused space, if any (see Note below)
Note:
To ensure that non-Windows* partitions are kept intact, the migration to RAID 0 does not utilize
the extra space made available by adding the second hard drive. To take advantage of the extra
hard drive space you will need to do one of the following:
1. Create a new partition using Windows Disk Management (See Section 17.4.1 for
instructions)
or
5. Extend the partition to fill the rest of the available space. Windows does not natively include
tools to do this, but there are 3rd party software utilities to accomplish this such as
PartitionMagic* or Partition Commander*.
17.4.1
Creating a New Partition Using Windows* Disk
Management
To create a new partition using Windows* Disk Management, complete the following steps:
Complete one of the following Step 1 tasks, then proceed with the remaining steps:
1a. Right-Click 'My Computer', select 'Manage'. In the Computer Management program window,
left-click 'Disk Management' in the program tree on the left (located under ‘Storage’
subsection).
or
1b Within the Control Panel (Start/Control Panel), double-click 'Administrative Tools'. In the
window that appears, double-click 'Computer Management'. In the Computer Management
program window, left-click 'Disk Management' in the program tree on the left (located under
‘Storage’ subsection).
2. Maximize the Computer Management program window for easier viewing.
3. In the Computer Management program window, you should see your RAID Volume
represented as a physical disk. Notice that the RAID Volume size is the size of the two Serial
ATA disks combined. At this point, you should see the partitions within the RAID Volume
that were originally on the single disk you used as your source. After the partitions, you
should see a gray area labeled 'Free Space'. This area will have to be partitioned and
formatted before it may be used.
Summary of Contents for Application Accelerator RAID Edition
Page 1: ...Intel Application Accelerator RAID Edition User s Manual Revision 1 1 July 2003 ...
Page 8: ...R 8 User s Manual This page is intentionally left blank ...
Page 10: ...Scope of This Document R 10 User s Manual This page is intentionally left blank ...
Page 12: ...RAID Background R 12 User s Manual This page is intentionally left blank ...
Page 14: ...RAID 0 Striping R 14 User s Manual This page is intentionally left blank ...
Page 16: ...RAID 1 Mirroring R 16 User s Manual This page is intentionally left blank ...
Page 18: ...RAID Migration Feature R 18 User s Manual This page is intentionally left blank ...
Page 24: ...BIOS Importance Settings R 24 User s Manual This page is intentionally left blank ...
Page 40: ...Intel RAID Option ROM R 40 User s Manual This page is intentionally left blank ...
Page 52: ...Issues During Installation R 52 User s Manual This page is intentionally left blank ...


