background image

                                                                                                                             Page 8 of 15                                                                                             : 11/20/2012 4:14 PM 


LED Behavior 

Mini Remote has a two-color LED (Green and Red) which momentarily indicates whether an on or an off 
is being sent. 

LED State 

Meaning 

Blink green (once) 

On sent 

Blink red (once) 

Off sent 

Blink red  (for a few 
seconds) 

One or more scene members did not acknowledge (note: scene members 
may still have heard the scene command and adjusted their settings) 

Turn Unit On/Off (Pocket Mode) 

 
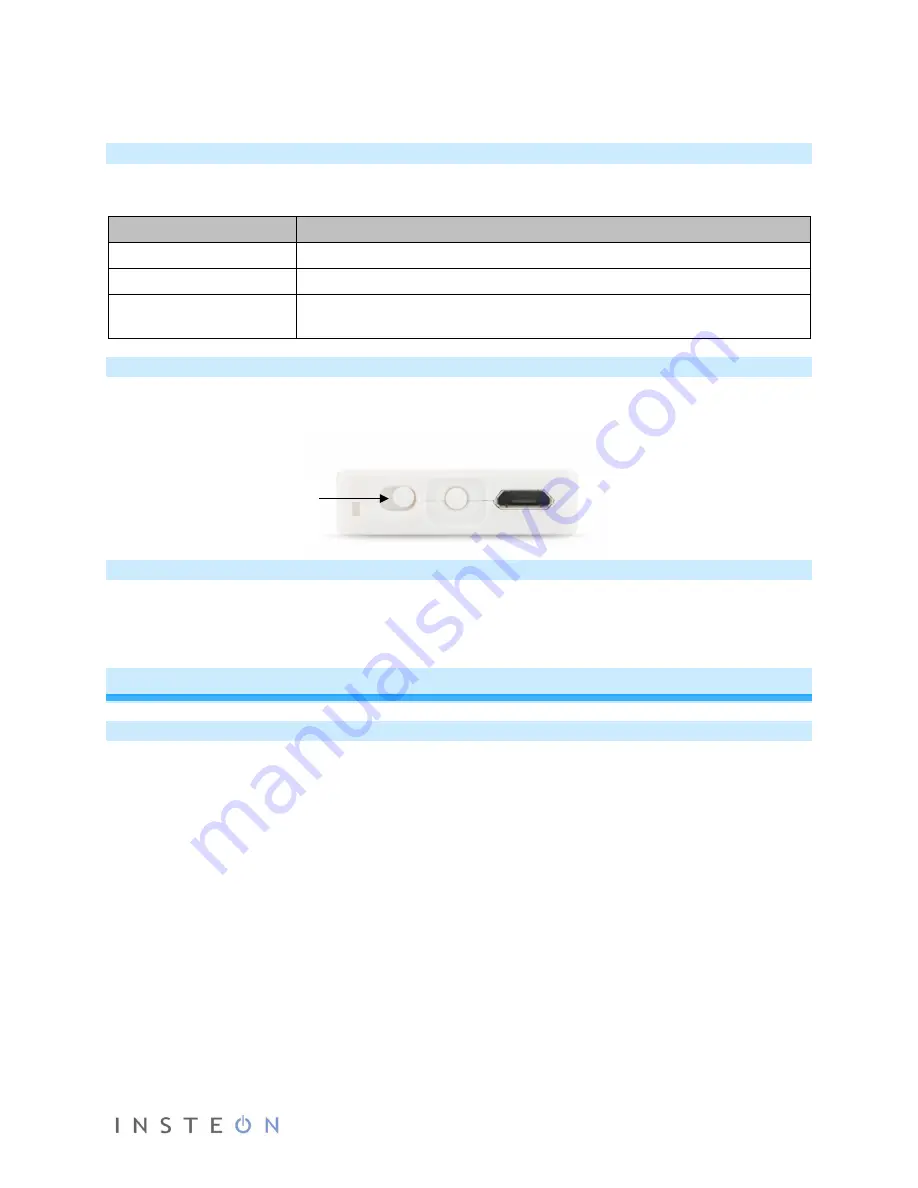
The Mini Remote features a power switch located next to the set button. If you plan on carrying the Mini 
Remote in your pocket it is recommended that you turn it off to prevent buttons from accidentally being 
pressed. This is also recommended if your RemoteLinc will not be in use for long periods of time. 


Stuck button 

If a button on Mini Remote is held for more than 4 minutes, the RemoteLinc will automatically stop 
transmitting to preserve battery life. The Mini Remote will automatically turn back on when the button that 
was depressed is no longer being pressed. 

Advanced Features 

Make Mini Remote a Controller of Multiple Responders 

1)  Tap the Mini Remote paddle (top or bottom) – if in 2 scene mode, tap the top of the paddle for scene 

1 or the bottom for scene 2 

2)  Press and hold set button for 3 seconds - until you hear a beep 

LED will begin blinking green 

3)  Tap set button  

LED will begin double-blinking green 

4)  Adjust each responder to the desired state, then press and hold responder set button until Mini 

Remote double-beeps  

LED will continue double-blinking green 

5)  When all your devices have been added, tap Mini Remote’s set button  

Mini Remote will double-beep and its LED will turn off 

Power Switch 

(right On, left Off) 

Summary of Contents for Mini Remote 2342-432

Page 1: ...Page 1 of 15 2342 x32 Rev 11 20 2012 4 13 PM Mini Remote INSTEON Remote Control Keypad 4 Scene 2342 432 EU 2342 532 AUS NZ Owner s Manual ...

Page 2: ...Unit On Off Pocket Mode 8 Stuck Button 8 Advanced Features 8 Make Mini Remote Button a Controller of Multiple Responders 8 Remove Mini Remote Button as a Controller of Multiple Responders 8 Change Button Mode 8 Button Toggle 8 Button Non Toggle 4 Scene 9 Turn LED Off or Back On 10 Turn Beeper On or Back Off 10 Beeper Behavior 10 LED Behavior during Setup 11 Factory Reset 11 Specifications 12 Troub...

Page 3: ...ote Mounted on wall with no trim plate wireless keypad Mounted on wall in a single gang Decorator trim plate wireless keypad built in look Mounted on wall in a multi gang Decorator trim plate add to the number of controllers in your room without hiring an electrician and or tearing out drywall Placed on a Tabletop Stand sold separately Clipped to your car s visor with Visor Clip sold separately On...

Page 4: ... off a scene Power switch to disable buttons Beeper for easy setup Recharges with standard charger with via Type A to Micro B cable sold separately 9 12 month battery life based on average usage Battery charge LED indicator built in Low battery transmit warning use with software to trigger email text message All settings stored in non volatile memory and preserved even through power loss 2 year wa...

Page 5: ...e USB Power Adapter 2444B6 For use with Mini Remote USB Charging Cable requires adapter for regions outside US Wall Mount Bracket 2444B4 Wall mount your Mini Remote anywhere Gang two or more together for more control Can be installed adjacent to existing wired in switches Mini Remote can easily be removed for portability or recharging Use with any decorator wallplate Pair the Wall Mount Bracket wi...

Page 6: ...im Double tap Fast On and Double tap Fast Off Make Mini Remote Button a Controller 1 Tap on the Mini Remote scene button of choice 2 Adjust the responder to the state you want when the scene is activated from Mini Remote 3 Press and hold Mini Remote set button until it beeps LED will begin blinking green 4 Press and hold responder set button until the responder beeps or its LED flashes Mini Remote...

Page 7: ... Icon Tap Press and hold Double tap On Right Turn scene on Brighten until release dimmable responders only Instant full on Off Left v Turn scene off Dim until release dimmable responders only Instant full off 8 Scene Toggle Mode Each button controls its scene members as follows Last Command Sent Tap Press and hold Double tap Off Dim Turn scene on Brighten until release dimmable responders only Ins...

Page 8: ...If a button on Mini Remote is held for more than 4 minutes Mini Remote will automatically stop transmitting to preserve battery life The Mini Remote will automatically turn back on when the button that was depressed is no longer being pressed Advanced Features Make Mini Remote Button a Controller of Multiple Responders 1 Tap Mini Remote scene button of choice or v will both work 2 Press and hold s...

Page 9: ... hold set button until it beeps LED will begin blinking green 2 Press and hold set button until it beeps again LED will begin blinking red 3 Press and hold set button until it beeps a third time LED will begin blinking green 4 Press and hold set button until it beeps a fourth time LED will begin blinking red 5 Tap set button LED will begin double blinking red 6 Press the appropriate button for the...

Page 10: ...fault the beeper is disabled on Mini Remote Follow these instructions to enable it 1 Press and hold set button until it beeps LED will begin blinking green 2 Press and hold set button until it beeps again LED will begin blinking red 3 Press and hold set button until it beeps a third time LED will begin blinking green 4 Tap set button LED will begin double blinking green 5 Press the appropriate but...

Page 11: ...d slowly Remove Responder Setup Mode Double Blinking Green slowly Multi Add Responder Setup Mode or Beeper on off Setup Mode Double Blinking Red slowly Multi Remove Responder Setup Mode or Keypad Configuration Setup Mode Factory Reset The factory reset procedure clears all settings from Mini Remote including INSTEON scenes 1 If possible unlink remove all scene responders prior to performing factor...

Page 12: ...s On Maximum scene Links 400 Scene Commands Supported On Off Begin Brightening Begin Dimming End Brightening End Dimming Fast On Fast Off Software Configurable Yes Operation LED Type Two color Green and Red LED during Use Green Flash Once On sent Bright Fast On Red Flash Once Off Dim Fast Off Red Blink for 3 Seconds Scene Acknowledge Missing LED Always used for setup default On during use Setup Bu...

Page 13: ... responder Mini Remote will not turn on a responder it may turn it off Responder ramp rate may be extremely slow Relink to responder with faster ramp rate Responder may be linked at off Relink to responder making sure it s linked at on Responder s load doesn t appear to turn on right away Responder ramp rate may be set too slow Relink to responder with faster ramp rate Responder s is taking a long...

Page 14: ...t via designated collection facilities appointed by the government or local authorities Correct disposal and recycling will help prevent potential negative consequences to the environment and human health For more detailed information about the disposal of your old equipment please contact your local authorities waste disposal service or the shop where you purchased the product DECLARATION OF CONF...

Page 15: ...r warranties whether oral or written express or implied including any warranty or merchantability or fitness for a particular purpose Any implied warranty including any warranty of merchantability or fitness for a particular purpose which may not be disclaimed or supplanted as provided above shall be limited to the two years of the express warranty above No other representation or claim of any nat...

Page 16: ...Page 1 of 15 11 20 2012 4 14 PM Mini Remote INSTEON Remote Control Switch 2342 442 EU 2342 542 AUS NZ Owners Manual ...

Page 17: ...n Off Pocket Mode 8 Stuck button 8 Advanced Features 8 Make Mini Remote a Controller of Multiple Responders 8 Remove Mini Remote as a Controller of Multiple Responders 9 Change Paddle Scene Configuration e g Change to 2 Scene Mode 9 Turn LED Off or Back On 10 Turn Beeper On or Back Off 10 Beeper Behavior 11 LED Behavior during Setup 11 Factory Reset 11 Specifications 12 Troubleshooting 13 Certific...

Page 18: ...m plate wireless keypad Mounted on wall in a single gang decorator trim plate wireless keypad built in look Mounted on wall in a multi gang decorator trim plate add to the number of controllers in your room without hiring an electrician and or tearing out drywall Placed on a Tabletop Stand sold separately Clipped to your car s visor with Visor Clip sold separately Paddle Top On Bottom Off 1 scene ...

Page 19: ...ng to sleep if button stuck down Beeper for easy setup Recharges with standard charger with via Type A to Micro B cable sold separately 9 12 month battery life based on average usage Battery charge LED indicator built in Low battery transmit warning use with software to trigger email text message All settings stored in non volatile memory and preserved even through power loss 2 year warranty What ...

Page 20: ...ower Adapter 2444B6 For use with Mini Remote USB Charging Cable requires adapter for regions outside US Wall Mount Bracket 2444B4 Wall mount your Mini Remote anywhere Gang two or more together for more control Can be installed adjacent to existing wired in switches Mini Remote can easily be removed for portability or recharging Use with any decorator wallplate Pair the Wall Mount Bracket with any ...

Page 21: ...n and Double tap Fast Off Make Mini Remote a Controller 1 Tap the Mini Remote switch top or bottom paddle if in 2 scene mode tap the top of the paddle for scene 1 or the bottom for scene 2 2 Adjust the responder to the state you want when the scene is activated from Mini Remote 3 Press and hold Mini Remote s set button until it beeps LED will begin blinking green 4 Press and hold the responder s s...

Page 22: ...ld Double tap Top Turn scene on Brighten until release dimmable responders only Instant full on Bottom Turn scene off Dim until release dimmable responders only Instant full off 2 Scene Toggle Mode The top and bottom paddle will control all its scene members as follows Last Command Sent Tap Press and hold Double tap Off Dim Turn scene on Brighten until release dimmable responders only Turn scene m...

Page 23: ...e Stuck button If a button on Mini Remote is held for more than 4 minutes the RemoteLinc will automatically stop transmitting to preserve battery life The Mini Remote will automatically turn back on when the button that was depressed is no longer being pressed Advanced Features Make Mini Remote a Controller of Multiple Responders 1 Tap the Mini Remote paddle top or bottom if in 2 scene mode tap th...

Page 24: ...ni Remote will double beep and its LED will turn off Change Paddle Scene Configuration e g Change to 2 Scene Mode 1 Press and hold set button until it beeps LED will begin blinking green 2 Press and hold set button until it beeps again LED will begin blinking red 3 Press and hold set button until it beeps a third time LED will begin blinking green 4 Press and hold set button until it beeps a fourt...

Page 25: ...e configuration Desired LED Mode Button to Press LED Off Bottom LED On default Top Mini Remote will double beep and its LED will turn off Turn Beeper On or Back Off By default the beeper is disabled on Mini Remote Follow these instructions to enable it 1 Press and hold set until it beeps LED will begin blinking green 2 Press and hold set button until it beeps again LED will begin blinking red 3 Pr...

Page 26: ... helpful information LED State Meaning Blinking Green slowly Add Responder Setup Mode or LED on off Setup Mode Blinking Red slowly Remove Responder Setup Mode Double Blinking Green slowly Multi Add Responder Setup Mode or Beeper on off Setup Mode Double Blinking Red slowly Multi Remove Responder Setup Mode Factory Reset The factory reset procedure clears all settings from Mini Remote including INS...

Page 27: ...gurable to 2 Scene Configurations 1 On Off default 2 Toggle or 2 Always On Maximum scene Links 400 Scene Commands Supported On Off Begin Brightening Begin Dimming End Brightening End Dimming Fast On Fast Off Software Configurable Yes Operation LED Type Two color Green and Red LED during Use Green Flash Once On sent Bright Fast On Red Flash Once Off Dim Fast Off Red Blink for 3 Seconds Scene Acknow...

Page 28: ...harging time 1 hour Sends Low Battery Warning Yes Troubleshooting Problem Possible Cause Solution Mini Remote won t add a scene responder Mini Remote may be out of range of nearest INSTEON device Try moving Mini Remote closer to responder Mini Remote will not turn on a responder it may turn it off Responder ramp rate may be extremely slow Relink to responder with faster ramp rate Responder may be ...

Page 29: ...signaling One or more scene members is not responding and HouseLinc or other software is attempting to communicate to Mini Remote Mini Remote is locked up Mini Remote may have glitched Power cycle Mini Remote by turning it off slide power switch to left waiting 10 seconds and turning it back on slide power switch to right Perform a factory reset on Mini Remote If you have tried these solutions rev...

Page 30: ...re relevante bestemmelser i EU direktiv 1999 5 EF Suomi Finnish Tämä laite tÿttää direktiivin 1999 5 EY olennaiset vaatimukset ja on siinä asetettujen muiden laitetta koskevien määräysten mukainen Dansk Danish Dette udstyr er i overensstemmelse med de væsentlige krav og andre relevante bestemmelser i Direktiv 1999 5 EF Polski Polish Urządzenie jest zgodne z ogólnymi wymaganiami oraz szczególnymi w...

Reviews: