background image

LampLinc Owner’s Manual  


Remotely Setting the On-Level for an X10 Scene Address 

1)  Using an X10 controller, send the CLEAR sequence: 

O16 

N16 

M16 

P16 

M16 

2)  Use the buttons on a Linked Controller to adjust the load to the desired brightness level. If you skip 

this step, the current On-Level will be used. A scene can trigger LampLinc to go off by setting the On-
Level to 0%, or off.  

3)  Send the following X10 address sequence: 

M16 

N16 

O16 

P16 

4)  Send the desired X10 scene address (house code and unit code) to lock in the new On-Level and 

X10 scene address  

Remotely Setting the Ramp Rate for an X10 Scene Address 

1)  Using an X10 controller, send the CLEAR sequence: 

O16 

N16 

M16 

P16 

M16 

2)  Send the LampLinc’s X10 Primary Address (house code and unit code) 

3)  Use the buttons on a Linked Controller to adjust the load to the desired Ramp Rate (brighter is 

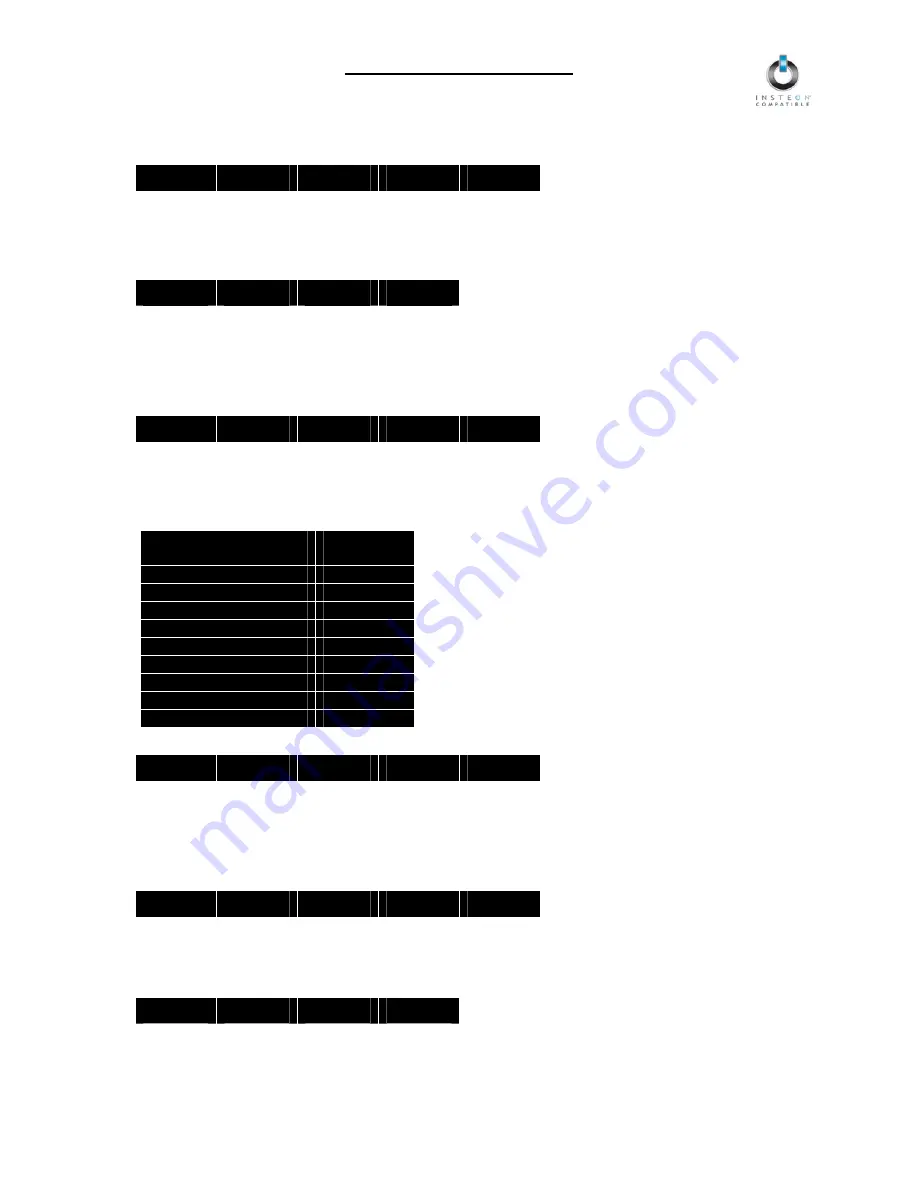
faster, dimmer is slower). The following table gives the approximate relationship between the 
brightness level you set in this step and the Ramp Rate you get: 

Approximate 

Brightness Level 

Ramp Rate 
in seconds 

90-100% 

0.1 

77-87% 

0.2 

65-74% 

0.3 

52-61% 

0.5 

39-48% 

2.0 

26.35% 

4.5 

13-23% 

6.5 

1-10% 

8.5 

Less than 1% 

9.0 

4)  Send the following X10 sequence: 

O16 

P16 

N16 

M16 

O16 

5)  Send the desired X10 scene address (house code and unit code) to lock in the new On-Level and 

X10 scene address  

Remotely Removing an X10 Scene Address 

1)  Using an X10 controller, send the CLEAR sequence: 

O16 

N16 

M16 

P16 

M16 

2)  Send the LampLinc’s X10 Primary Address (house code and unit code) 

3)  Send an X10 ON or OFF command 

4)  Send the following X10 address sequence: 

O16 

P16 

M16 

N16 

5)  Send the X10 scene address you wish to remove (house code and unit code)  


Page 11 of 14 


Summary of Contents for LampLinc 2456D3

Page 1: ...LampLinc INSTEON Plug In Lamp Dimmer Module 3 Pin Model 2456D3...

Page 2: ...emoving the X10 Primary Address 9 Setting the X10 On Level and X10 Ramp Rate for the X10 Primary Address 9 Enabling Disabling X10 Resume Dim 9 ADVANCED X10 PROGRAMMING OPTIONS 10 Remotely Setting the...

Page 3: ...to other INSTEON devices in minutes Controls standard incandescent lighting devices up to 300 Watts Indicates INSTEON setup mode activity with a Status LED Dims the load up to 32 brightness levels Ch...

Page 4: ...ON terms refer to the components of an INSTEON scene and are used on a scene by scene basis Controller sends INSTEON commands to other devices Responder reacts to commands sent out by another INSTEON...

Page 5: ...ou have any questions please call INSTEON Gold Support Line 800 762 7845 Installing LampLinc 1 Plug the lamp device also called the load you want to control into the outlet on the bottom of LampLinc 2...

Page 6: ...vices 1 Set the Controller to Unlinking Mode For most Controllers press hold an On or Scene button for 10 seconds twice or the Set button for 3 seconds twice You will have 4 minutes to complete the ne...

Page 7: ...5 74 0 3 52 61 0 5 39 48 2 0 26 35 4 5 13 23 6 5 1 10 8 5 Less than 1 9 0 NOTE If the load is ramping to less than full brightness then the time it will take will be proportionately less For instance...

Page 8: ...Triple tap the Set button on LampLinc The LampLinc Status LED should stop blinking and turn on solid 3 Test that Load Sensing has been enabled by turning the load on and off from its built in switch T...

Page 9: ...uld continue blinking The load should flash once You will have 4 minutes to complete the next step before Unlinking Mode automatically times out 3 Using an X10 controller send the X10 address you wish...

Page 10: ...e brighter is faster dimmer is slower The following table gives the approximate relationship between the brightness you set in this step and the Ramp Rate you get Approximate Brightness Level Ramp Rat...

Page 11: ...nit code 3 Use the buttons on a Linked Controller to adjust the load to the desired Ramp Rate brighter is faster dimmer is slower The following table gives the approximate relationship between the bri...

Page 12: ...command up to five times While using at least one dual band device is required when using an RF only device at least two dual band devices are recommended in any INSTEON network to ensure reliable co...

Page 13: ...ampLinc See Resetting LampLinc to its Factory Default Settings The bulb filaments are vibrating Use rough service 130 Volt or appliance grade bulbs to reduce the noise The load is buzzing when on or d...

Page 14: ...e at 800 762 7845 with the Model and Revision of the device to receive an RMA and send the product along with all other required materials to Smarthome Inc ATTN Receiving Dept 16542 Millikan Ave Irvin...

Reviews: