background image

User Manual IN-2901 - Page 23

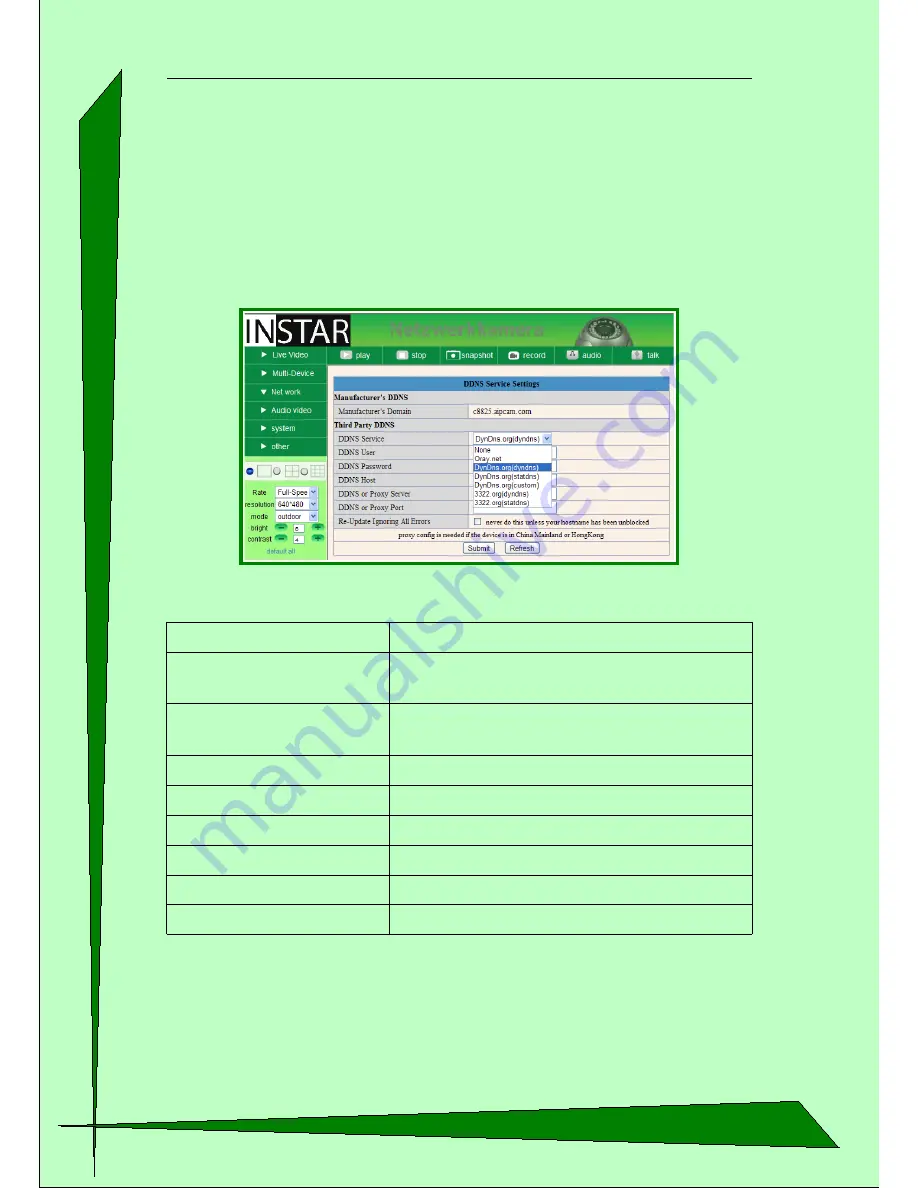
3.3.4. Submenu “DDNS Service Settings”

The easiest way to access your camera over the Internet is DDNS. Details about this you 
will find at  

4.1.1. How can I connect to my camera over the Internet?  on page  33

. You 

camera is automatically set in the factory automatically sent the newest IP address to a 
DDNS   Server   provided   by  the  manufacturer.  You   can  also  choose  a  different  DDNS 
Service if you are familiar with the settings.

Parameter

Description

Manufacturer-Domain

This is the preset DDNS Service Domain (Internet address) of 

your camera

DDNS Service

Selection of DDNS Service providers. If selected “None”  the 

preset DDNS Service will automatically be activated.

DDNS Username

Username of your DDNS-Account

DDNS Password

Password of your DDNS-Account

DDNS Host

DDNS-Domain name for your camera

DDNS or Proxy Server

This settings are only necessary if you use a Proxy Server

DDNS oder Proxy Port

This settings are only necessary if you use a Proxy Server

new Update, ignore all errors

This setting is normally not needed

Summary of Contents for IN-2901

Page 1: ...User Manual IN 2901 Page 1 INSTAR IN 2901 Weatherproof IP Camera with Night Vision and Motion Detection User Manual Version 1 01...

Page 2: ...ames trademarks product descriptions and Logos which are used in this user manual are owned by the company INSTAR Deutschland does assume no liability for the validity and actuality of this manual INS...

Page 3: ...evice 19 3 2 1 Submenu Multi Cameras only IE 19 3 2 2 Submenu Upgrade Device Firmware 20 3 2 3 Submenu Restore Factory Settings 20 3 2 4 Submenu Reboot Device 20 3 3 Menu Network 21 3 3 1 Submenu IP C...

Page 4: ...2 I have forgot my username or password What can I do 33 4 1 3 I don t see any picture in the Internet Explorer Why 34 4 1 4 The color of the picture is a bit gray What is the reason 34 4 2 Specifica...

Page 5: ...your camera This IP Camera is suitable for surveillance on your property your house apartment or your office in indoor environment as well as outdoor 1 1 Functions Fast and programmable RISC Processo...

Page 6: ...The lens with Infrared Cut filter allows you to see all natural colors This lets you use the camera as a web or weather cam with no night vision function Please note that you will not be able to use t...

Page 7: ...supply that came with your camera A power supply of another manufacturer might damage the camera Never touch the lens of the camera The best focus of the lens has already been set in the factory If yo...

Page 8: ...o element Automatic brightness adjustment 3 Lens Fixed focus 4 Power connection 5V DC Voltage Connector for the provided power supply 5 Audio Input Connection of a additional microphone 6 Reset Button...

Page 9: ...with your camera 3 Connect the power supply with the camera and plug the power supply into the wall outlet Note If you want to connect your camera directly to your computer you need to have a crossov...

Page 10: ...A start window welcomes you to the installation It is highly recommended to close all running programs before installation Continue by pressing the button Next Continue with Next The program starts in...

Page 11: ...computer has restarted you will find the symbol below on your desktop IP Camera Tool Start the IP Camera Tool with a double click on the symbol In the following screen your camera should be recognizes...

Page 12: ...ription Obtain IP from DHCP server If activated the camera receives a automatic IP address from the DHCP Server Router IP address The IP has to be in the IP range of your network Subnet Mask The Subne...

Page 13: ...ich you can open with the right mouse button you can find 4 different options besides Network Configuration see screenshot above Option Description Basic Properties Display of Device ID System Firmwar...

Page 14: ...your network mostly a router because the camera comes with the preset setting IP address automatically by DHCP 1 Connect the camera as already described in 2 1 Installation on page 9 2 Find out the I...

Page 15: ...rting from page 9 You can either open the graphical interface with the IP Camera Tool by double clicking the IP address or directly with your Internet Browser for example Internet Explorer Firefox Saf...

Page 16: ...b interface can vary according to which web browser you are using Some control Elements of your camera can be shown with limited access or limited authority rights according to the user settings Admin...

Page 17: ...ure mirroring time stamp Operator Administrator Info Camera name Time settings User Management Display Log Settings Backup Restore Administrator E Mail FTP Alarm Settings Record Path for Video recordi...

Page 18: ...light sensor can adjust the brightness automatically The brightness of the Video can be adjusted from 0 very dark to 15 very bright and the contrast from 0 no contrast to 6 high contrast One click on...

Page 19: ...u the different cameras will be set The first camera is always the camera which you are currently configuring All cameras which can be found in your network will be shown in the box Device List in LAN...

Page 20: ...ware should only be done after contacting your distributor dealer 3 2 3 Submenu Restore Factory Settings Here you can reset the configuration to factory default settings You will get a confirmation bo...

Page 21: ...DNS Server information from a DHCP Server in your network This is mostly done by the router in your network We recommend you to not use this function since the camera might get a different IP address...

Page 22: ...start the camera in order to make sure it connects to the Internet 3 3 3 Submenu UPnP If your router supports this function you can activate it in your camera This will allow your router to automatica...

Page 23: ...familiar with the settings Parameter Description Manufacturer Domain This is the preset DDNS Service Domain Internet address of your camera DDNS Service Selection of DDNS Service providers If selecte...

Page 24: ...ption OSD only IE On Screen Display Shows the Date and Time in the right corner You can choose among the colors black yellow red white and blue Reversal Vertical mirroring of the picture Mirror Horizo...

Page 25: ...own Device ID Mac address Firmware Version Version of the Cameras Firmware Web UI Version Version of the graphical User interface Alias Name of the camera see Submenu Alias Settings Alarm Status Statu...

Page 26: ...If you have an Internet connection with your camera it is recommended to use the setting Sync with NTP Server and select a preconfigured NTP Server from the list or if you use a special time server y...

Page 27: ...picture change the frame rate resolution light frequency brightness contrast and control the camera The group Guest can only watch the Live Video 3 5 5 Submenu Backup Restore Here you can save the se...

Page 28: ...User Manual IN 2901 Page 28 3 5 6 Submenu Log In this menu you can see the access log from your camera...

Page 29: ...e n the Submenu Alarm The necessary data which you need to fill in all the information can be received from your Email provider or your administrator After filling in all information please first clic...

Page 30: ...FTP Server with the FTP Protocol included in the camera You have to fill in all information about your FTP Server Please ask your Administrator or Provider for the necessary information Weather or no...

Page 31: ...see Submenu Ftp Service Settings Parameter Description Motion Detect Armed Activated motion detection in the camera Motion Detect Sensibility The higher the setting the more sensitive range 1 10 Alarm...

Page 32: ...Please see the settings above Scheduler If you want to set the camera so it records only during a set time you can select the Scheduler Simply select the time and weekdays where the camera should be...

Page 33: ...the Domain Service was successful you can see the Internet address in the following Menu System Submenu Device Info If you would like to use DDNS you have to manually find out the IP address given by...

Page 34: ...ild in In order to do so the Lens of the camera does not have any Infrared Filter This effects the picture during the day a little bit As a result you might see the green color more gray This is not a...

Page 35: ...your camera The Serial number starts with Inxxxxx If you are sending your camera for repair please make sure you include the filled out RMA form and attach a copy of the bill INSTAR Deutschland answe...

Page 36: ...order to optimize the recovery and recycling of the materials they contain and reduce the impact on human health and the environment The crossed out wheeled bin symbols on the product reminds you of...

Reviews: