background image

233 

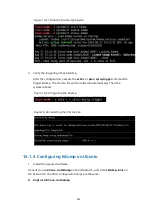
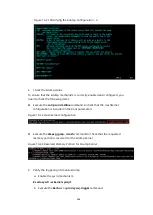
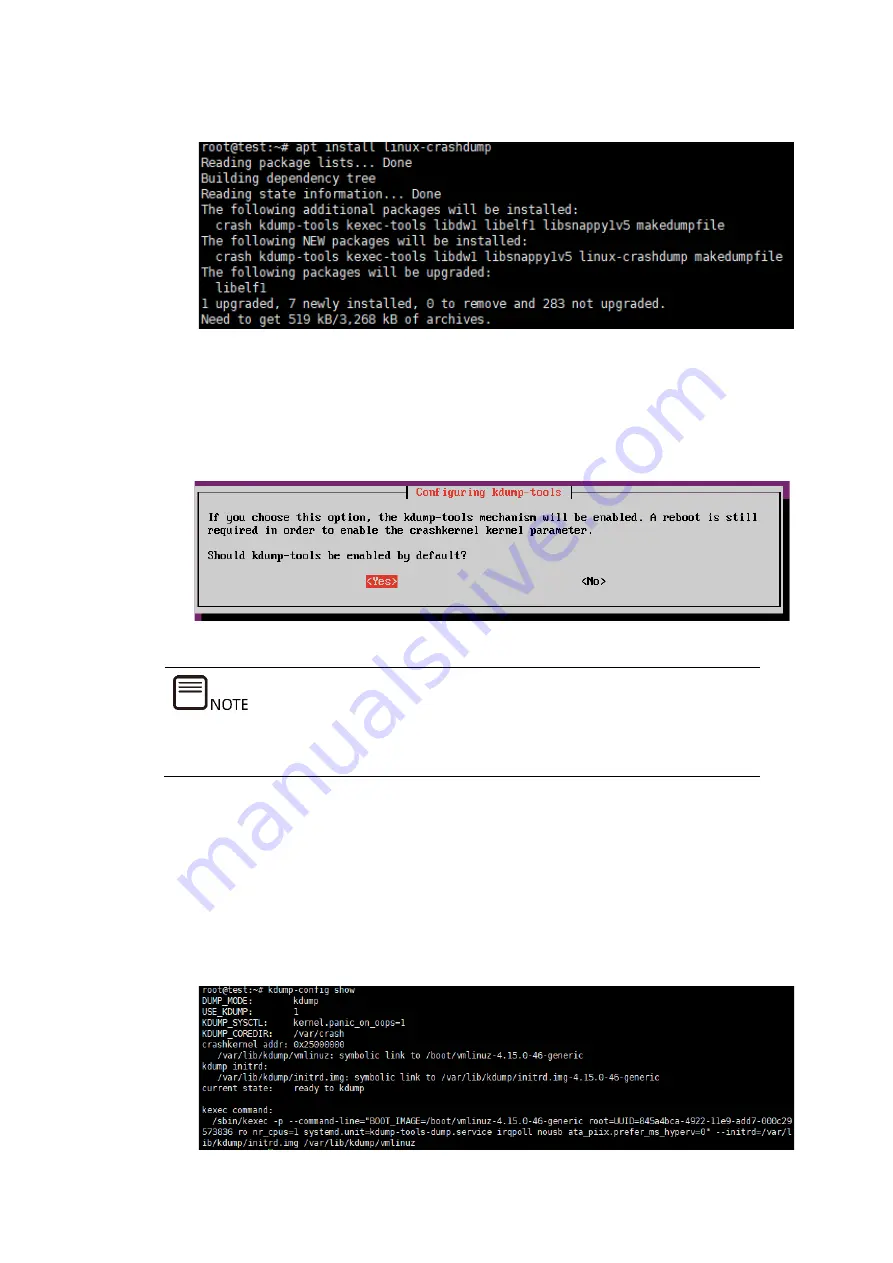
Figure 10-24 Installing the Linux-crashdump 


# kdump-config load 

# reboot 

Figure 10-25 Installing the Kdump-tools 


After reboot, the crashkernel parameters will be automatically generated in the 

/boot/grub/grub.cfg

 file. 


2.


Configure the kdump. 

a.


Check the current kdump configuration, which can meet your 
requirements by default. 

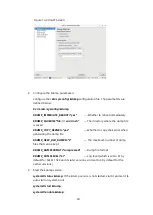
# kdump-config show 

Figure 10-26 Kdump Configuration 


Summary of Contents for OS

Page 1: ...Inspur Server OS Installation Guide Document Version V2 3 Release Date January 19 2022 ...

Page 2: ... the other trademarks or registered trademarks mentioned herein are the property of their respective holders Statement of Use Please read through the following statements carefully before using our server You may only start using this server after you have read the following statements and agreed to the terms below For any questions on the terms below please contact your supplier or contact us dir...

Page 3: ...during use please contact our Customer Service Back up data properly during use This is a Class A product and may cause radio interference In such case users may need to take necessary measures to mitigate the interference Please read over and follow the safety rules and regulations in the manual The logos and name copyrights of software and hardware mentioned in this manual belong to their respec...

Page 4: ...performed by experienced technicians only Symbol Conventions The symbols that may be found in this document are defined as follows Symbol Description A potential for serious injury or even death if not properly handled A potential for minor or moderate injury if not properly handled A potential loss of data or damage to equipment if not properly handled Operations or information that requires spec...

Page 5: ...the content related to Whitley platform V2 1 2021 06 30 Updated the symbols and optimized the document format V2 2 2021 10 08 Added the VMware installation method Added notes about the CentOS installation method V2 3 2022 01 19 Added notes about the RAID array configuration of different RAID controller cards ...

Page 6: ...Config Utility Screen 10 4 3 2 Creating a RAID Array RAID 1 for example 14 4 4 Loading the OS Image 18 4 5 Selecting the BIOS Boot Device 19 4 6 Installing the OS Windows Server 2016 20 4 7 Installing the OS VMware ESXi 7 0 Update 1 29 5 Installing an OS via BMC for Whitley Cedar Island Platform 50 5 1 Preparing the Installation Image 50 5 2 Logging in to the BMC Web GUI 50 5 3 Configuring the RAI...

Page 7: ... for Whitley Cedar Island Platform 143 7 1 Preparing the Installation Image 143 7 2 Configuring the RAID Arrays UEFI Mode 143 7 2 1 Logging in to the Configuration Screen 143 7 2 2 Creating a RAID Array RAID 1 for example 147 7 3 Setting the BIOS Time and Boot Device 155 7 4 Selecting the BIOS Boot Device 157 7 5 Installing the OS Windows Server 2019 158 7 6 Installing the OS SLES 15 SP2 166 7 7 I...

Page 8: ... SLES 229 10 1 4 Configuring Kdump on Ubuntu 232 10 1 5 Configuring the Memory Dump Service on Windows 237 10 1 6 Configuring the Memory Dump Service on VMware ESXi 245 10 2 Configuring the Serial Port Redirection 247 10 2 1 Configuring the Serial Port Output on Linux 250 10 2 2 Configuring the Serial Port Output on Windows 253 10 2 3 Verifying the Serial Port Configuration 254 10 3 Configuring th...

Page 9: ...3 Error COMRESET failed Reported during the RHEL 7 4 OS Installation 262 10 8 4 Entering the Dracut CLI during the RHEL 7 OS Installation 262 11 How to Obtain Help 264 11 1 Preparations before Contacting Inspur 264 11 2 How to Obtain Help 264 Appendix Acronyms and Abbreviations 265 ...

Page 10: ...or KVM When remotely logging in to the BMC Web GUI of the server on a PC you can mount the ISO image in the physical drive of the PC or the system CD ROM in the physical CD ROM drive through the virtual console See 4 2 Logging in to the BMC Web GUI for details When logging in to the server through a local KVM Keyboard Video and Mouse you can install the OS using an external CD ROM or a USB flash d...

Page 11: ...2 2 Installation Process The following figure shows the installation process of the server OS Figure 2 1 OS Installation Process ...

Page 12: ...e ISO image in the physical drive of the PC to install the OS Install via a USB flash drive CD ROM Install the OS using the system CD ROM or the USB flash drive with the image Do not create the boot partition to the USB flash drive during the OS installation The server generally has no built in CD ROM drive so an external CD ROM drive is required if you choose to install the OS via a CD ROM 3 1 Id...

Page 13: ...in to the Inspur Official Website Figure 3 2 Viewing Products 2 Select a server and view the White Paper NF5280M5 is used in this example Select Inspur NF5280M5 White Paper to view NF5280M5 Product Technical White Paper pdf ...

Page 14: ... OS Versions 4 Install the OS Refer to the appropriate chapters for different installation methods 4 Installing an OS via BMC for Purley Platform 5 Installing an OS via BMC for Whitley Cedar Island Platform 6 Installing an OS via a USB Flash Drive CD ROM for Purley Platform 7 Installing an OS via a USB Flash Drive CD ROM for Whitley Cedar Island Platform ...

Page 15: ...e OS official website 4 2 Logging in to the BMC Web GUI Procedure 1 Configure the IP address of the BMC management network port To configure the BMC IP address in the BIOS you can Obtain the IP address automatically If the DHCP network environment is available use DynamicBmcDhcp to automatically obtain the BMC IP address Configure the IP address manually If the DHCP network environment is unavaila...

Page 16: ...7 Figure 4 1 Server Mgmt ...

Page 17: ...8 Figure 4 2 Configuration Address Source Figure 4 3 BMC IP Setting ...

Page 18: ...ddress in the address bar b When you go to the BMC Web GUI a security warning will be displayed In this case trust this screen by clicking Proceed to the IP address unsafe as shown below Figure 4 4 Security Warning 3 Log in to the BMC Web GUI a Go to the login screen Figure 4 5 Login Screen ...

Page 19: ...upports multiple RAID levels including RAID 0 1 1E and 10 This section guides you on how to configure a RAID 1 array in the Legacy mode For the RAID array configuration of different RAID controller cards please refer to the corresponding Inspur server RAID controller card configuration manuals 4 3 1 Logging in to the Config Utility Screen Logging in to the RAID Config Utility screen requires a ser...

Page 20: ...BIOS setup screen a Click Launch KVM Java Viewer download the jviewer jnlp file and run it with Java Figure 4 8 Console Redirection b After the remote connection is established wait to enter the BIOS setup screen The shortcut keys for entering the BIOS vary with platforms Please follow the prompt on the screen When the blue progress bar appears as shown below press Delete as prompted to enter the ...

Page 21: ... option filter is set to Legacy only save the change and exit the BIOS and then restart the server Figure 4 10 Setting Legacy Only 3 During POST when the prompt Press Ctrl C to Start AVAGO Config Utility appears press Ctrl and C to enter the SAS3008IR Config Utility screen SAS3008IR MPT3 BIOS Config Utility screen ...

Page 22: ...13 Figure 4 11 SAS3008IR MPT3 BIOS Config Utility Screen Inspur SAS3008IR POST screen Figure 4 12 Inspur SAS3008IR POST Screen SAS3008IR Config Utility screen Figure 4 13 SAS3008IR Config Utility Screen ...

Page 23: ...ties Screen 4 3 2 Creating a RAID Array RAID 1 for example This section guides you on how to create RAID arrays after entering the Inspur SAS3008IR Config Utility screen Procedure 1 Select INSPUR 3008IR on the SAS3008IR Config Utility main screen and press Enter to enter the Adapter Properties screen as shown below Figure 4 15 Adapter Properties Screen ...

Page 24: ...e Type screen Figure 4 16 Select New Volume Type Screen 3 Select Create RAID 1 Volume and press Enter to enter the Create New Volume screen which lists all the drives that can be added to the new RAID array Figure 4 17 Create New Volume Screen 4 Add drives to the RAID array ...

Page 25: ...isk will be set to Yes or No indicating whether the drive is added to the existing RAID array or not The drive added first is the primary drive and the drives added later are secondary drives Secondary drives will synchronize the contents of the primary drive Figure 4 18 Drive Selection Screen 5 Press C to enter the creation confirmation screen Select Save changes then exit this menu and press Ent...

Page 26: ...ure 4 20 Adapter Properties Screen 7 To view the created RAID array select RAID Properties and you will see View Existing Volume at the top Figure 4 21 View Existing Volume Option 8 Select View Existing Volume and press Enter to enter the RAID array screen and you can view the detailed information of the RAID array ...

Page 27: ...ement screen select Media Virtual Media Wizard Figure 4 23 Virtual Media Wizard 2 Mount the CD ROM or image You can use either of the following methods depending on the medium If you are using a CD ROM put the OS installation CD ROM into the CD ROM drive and select the G drive as shown below If you are using an ISO image select CD Image as shown below ...

Page 28: ...rm Action Figure 4 25 Server Restart 4 5 Selecting the BIOS Boot Device Restart the system Press F11 via the KVM to enter the BIOS boot menu when you are prompted to press a hot key and then select the BMC virtual CD ROM device AMI Virtual CDROM0 1 00 to boot the system If you are installing the OS in UEFI mode select UEFI AMI Virtual CDROM0 1 00 ...

Page 29: ... different OS types and the setup wizard screens for operating systems of the same type but different versions are slightly different For more details visit the corresponding OS official websites This section demonstrates with the Windows Server Std 2016 1607 64 bit OS Procedure 1 Load the OS image to go to the initial setup screen and then select the Language to install Time and currency format a...

Page 30: ...21 Figure 4 27 Setting the Language Time and Keyboard 2 Click Install now to start the OS installation ...

Page 31: ...22 Figure 4 28 Clicking Install Now 3 Select Windows Server 2016 Standard Desktop Experience and click Next ...

Page 32: ...23 Figure 4 29 Selecting the OS 4 Check I accept the license terms and click Next ...

Page 33: ...24 Figure 4 30 Checking I Accept the License Terms 5 Select Custom Install Windows only advanced Figure 4 31 Selecting Custom Install Windows Only advanced ...

Page 34: ...25 6 Select the destination drive to install the OS to Figure 4 32 Selecting the Destination Drive 7 Wait until the OS is successfully installed ...

Page 35: ...26 Figure 4 33 Installing Windows 8 After the installation is completed the OS automatically restarts and then you can set the password for the administrator account ...

Page 36: ...27 Figure 4 34 Setting the Administrator Password 9 Press Ctrl Alt and Delete to go to the user login screen and type the password to enter the OS ...

Page 37: ...28 Figure 4 35 User Login Screen 10 Enter the desktop and the installation is completed ...

Page 38: ...8 Installing Updating the Drivers and Firmware 4 7 Installing the OS VMware ESXi 7 0 Update 1 This section guides you on how to install the OS by directly using the OS installation CD ROM or ISO image The setup wizards vary with different OS types and the setup wizard screens for operating systems of the same type but different versions are slightly different For more details visit the correspondi...

Page 39: ... 7 0 Update 1 OS Procedure 1 Load the OS image to go to the initial setup screen Wait for the loading to complete Figure 4 37 Initial Setup Screen 2 The welcome screen is displayed after the setup wizard is loaded successfully Press Enter to continue ...

Page 40: ...31 Figure 4 38 Welcome Screen 3 When the End User License Agreement EULA screen is displayed press F11 to accept and continue ...

Page 41: ...32 Figure 4 39 End User License Agreement EULA Screen 4 Wait for the wizard to automatically scan for available devices ...

Page 42: ...33 Figure 4 40 Scanning for Available Devices 5 Press or to select a drive where the OS is to be installed and press Enter to continue ...

Page 43: ...34 Figure 4 41 Selecting a Drive 6 Press or to select a keyboard layout and press Enter to continue ...

Page 44: ...35 Figure 4 42 Selecting a Keyboard Layout 7 Set the root password and press Enter to continue ...

Page 45: ...36 Figure 4 43 Setting the Root Password 8 Confirm the drive where the OS is to be installed and press F11 to install the OS ...

Page 46: ...37 Figure 4 44 Confirming the Installation 9 Wait for the installation to complete ...

Page 47: ...38 Figure 4 45 Installing ESXi 7 0 1 10 When the installation is completed press Enter to reboot ...

Page 48: ...wing system UI management screen after the OS installation and reboot Enter the login name and password on the Authentication Required screen according to the prompt to enter the System Customization screen on which the network SSH Shell and other functions are located ...

Page 49: ...40 Figure 4 47 System UI Management Screen Figure 4 48 Authentication Required Screen ...

Page 50: ...41 Figure 4 49 System Customization Screen 12 Press or to select Configure Management Network on the System Customization screen and press Enter to enter the Configure Management Network screen ...

Page 51: ...IPv4 Configuration to configure the management network You can select Disable IPv4 configuration for management network Use dynamic IPv4 address and network configuration or Set static IPv4 address and network configuration according to your application scenario ...

Page 52: ...43 Figure 4 51 IPv4 Configuration Screen 14 Press Enter to save the configuration and confirm whether to apply the changes according to the prompt ...

Page 53: ...44 Figure 4 52 Confirming the Management Network Configuration 15 Return to the System Customization screen select Restart Management Network press Enter to restart and press F11 to confirm the restart ...

Page 54: ...45 Figure 4 53 Selecting Restart Management Network Figure 4 54 Confirming the Management Network Restart ...

Page 55: ...ctively and press Enter to enable or disable the functions The current status of the function is displayed on the right side of the screen after selecting the configuration item For example after selecting Enable ESXi Shell ESXi Shell is Disabled is displayed on the right side of the screen If you press Enter ESXi Shell is Enabled will be displayed on the right side of the screen ...

Page 56: ...Agents after Shell and SSH are configured press Enter to restart and press F11 to confirm the restart according to the prompt to apply the configuration After the restart is completed press Enter to complete the configuration and return to the System Customization screen ...

Page 57: ...48 Figure 4 57 Selecting Restart Management Agents Figure 4 58 Confirming the Restart ...

Page 58: ... the OS is installed check whether the existing driver versions match the server OS If the driver versions do not match install the drivers of the required versions For detailed operations see 8 Installing Updating the Drivers and Firmware ...

Page 59: ...cuments provided by the corresponding OS manufacturers 5 1 Preparing the Installation Image Obtain the purchased OS CD ROM file or download the OS image from the OS official website 5 2 Logging in to the BMC Web GUI Procedure 1 Configure the IP address of the BMC management network port To configure the BMC IP address in the BIOS you can Obtain the IP address automatically If the DHCP network envi...

Page 60: ...work port of the server to the LAN and manually set the BMC IP address to a static IP address in the LAN The procedure is as follows a Set BMC Dedicated Network Parameters to Manual b Address source appears Set Address source to Static c Then you can set a BMC static IP address by specifying Station IP address Subnet mask and Router IP address ...

Page 61: ...52 Figure 5 2 Static BMC IP Setting d Press ESC to send the settings to BMC and select Yes and then Ok to complete the setting ...

Page 62: ...rowser and type the IP address the configured BMC IP address in the address bar b When you go to the BMC Web GUI a security warning will be displayed For Chrome and Firefox browsers click Advanced and select Proceed to the IP address unsafe Figure 5 4 Security Warning ...

Page 63: ...epage Figure 5 6 Console Homepage 5 3 Configuring the RAID Arrays UEFI Mode This section demonstrates with the Inspur PM8204 2GB 4GB RAID controller card to guide you on how to configure RAID arrays The Inspur PM8204 supports multiple RAID levels including RAID 0 1 5 6 10 50 and 60 This section guides you on how to configure a RAID 5 array in the UEFI mode ...

Page 64: ...ness interruption Procedure 1 Restart the server Log in to the target server remotely via the BMC Web GUI select Power Supply Power Control Forced System Reset and click Perform Action to restart the server as shown below Figure 5 7 Server Restart 2 Configure the UEFI boot options in the BIOS a On the BMC Web GUI connect to the server remotely by selecting either of H5Viewer and JViewer in Remote ...

Page 65: ... 5 8 Console Redirection Click Launch H5Viewer to launch the H5Viewer Figure 5 9 Launching the H5Viewer On the Console Redirection screen click Launch JViewer to download the jviewer jnlp Java Application file and run it to enter the remote control screen b After the remote connection is established when the white progress bar appears as shown below press Delete as prompted to enter the BIOS setup...

Page 66: ... Figure 5 10 Entering the BIOS c On the BIOS setup screen select Advanced CSM Configuration confirm that the Boot options are all set to UEFI save the changes and exit the BIOS and then restart the server ...

Page 67: ...ure 5 11 Setting the Boot Options 3 Go to the RAID configuration screen Enter the BIOS setup screen again switch to the Advanced tab select INSPUR 8204 4 GB from the RAID controller card list and press Enter ...

Page 68: ...59 Figure 5 12 Selecting INSPUR 8204 4 GB Figure 5 13 INSPUR 8204 4 GB Configuration Screen ...

Page 69: ...60 5 3 2 Creating a RAID Array RAID 5 for example Procedure 1 On the main setup screen select Array Configuration and press Enter Figure 5 14 Selecting Array Configuration 2 Select Create Array ...

Page 70: ...61 Figure 5 15 Selecting Create Array 3 Set the drives used to create the RAID array to Enabled Figure 5 16 Setting the Drive to Enabled ...

Page 71: ...62 4 Select Proceed to next Form Figure 5 17 Selecting Proceed to Next Form 5 Set RAID Level to RAID 5 ...

Page 72: ...ng the RAID Level to RAID 5 6 Select Proceed to next Form to enter the configuration screen and configure the required RAID information such as the array name and stripe size Then select Submit Changes to save the changes ...

Page 73: ...64 Figure 5 19 Selecting Submit Changes 7 When you see Logical Drive Creation Successful select Back to Main Menu to complete the RAID 5 array creation ...

Page 74: ... Figure 5 20 Selecting Back to Main Menu 5 4 Setting the BIOS Time and Boot Device Procedure 1 Modify the BIOS time Under the Main tab select and modify System Date and System Time by using the arrow keys ...

Page 75: ...66 Figure 5 21 Setting System Date Figure 5 22 Setting System Time ...

Page 76: ...alog box select Yes and press Enter to save the settings and exit the BIOS setup screen The server restarts and the settings will take effect 5 5 Loading the OS Image To install the RAID controller card driver before installing the OS you need to load the ISO image of the RAID controller card driver while loading the OS image To do this you need to set the number of CD DVD device instances remotel...

Page 77: ...Redirection Settings VMedia Instance Settings On the VMedia Instance Settings screen set both CD DVD device instances and Remote KVM CD DVD device instances to 2 and click Save to complete the settings Figure 5 24 VMedia Instance Settings Figure 5 25 Modifying VMedia Instance Settings 2 Go to the JViewer remote management screen ...

Page 78: ...ure 5 27 Virtual Media Wizard 4 Mount the RHEL 8 3 image and the RAID controller card driver file a To mount the RHEL 8 3 ISO image in CD DVD Media I select CD image click Browse to select the path to the image and click Connect When Connect turns to Disconnect the image has been mounted ...

Page 79: ... 29 Mounting the RAID Controller Card Driver Image JViewer is used here to connect to the server remotely in order to mount the image If H5Viewer is to be used to connect to the server remotely see 9 4 Mounting a CD Image via BMC H5Viewer for mounting the image 5 Restart the server Log in to the target server remotely via the BMC Web GUI select Power Supply ...

Page 80: ...to restart the server as shown below Figure 5 30 Server Restart 5 6 Selecting the BIOS Boot Device 1 Via the JViewer remote screen when you are prompted to press hot keys on the BIOS boot screen press F11 to enter the boot device menu Figure 5 31 BIOS Boot Screen ...

Page 81: ...S types and the setup wizard screens for operating systems of the same type but different versions are slightly different For more details visit the corresponding OS official websites When installing the CentOS refer to the installation method for RHEL This section demonstrates with the RHEL 8 3 OS For the installation of the Windows OS see 7 5 Installing the OS Windows Server 2019 Procedure 1 The...

Page 82: ...73 Figure 5 33 OS Image Wizard Screen 2 Select Install Red Hat Enterprise Linux 8 3 press Tab to edit the grub parameters and append inst dd at the end to preload the RAID controller card driver ...

Page 83: ...e RAID Controller Card Driver 3 Following the prompts select the RAID controller card driver to be loaded as needed You need to manually type the information in the red boxes as prompted and press Enter to confirm the settings ...

Page 84: ...75 Figure 5 35 RAID Controller Card Driver 4 After the driver is loaded the language selection screen appears Select the language you like to use and click Continue ...

Page 85: ...76 Figure 5 36 Language Selection Screen 5 The INSTALLATION SUMMARY screen appears ...

Page 86: ...77 Figure 5 37 Installation Summary Screen 6 Set the installation information as needed such as Keyboard Time Date Software Selection and Root Password ...

Page 87: ...on 7 Click Installation Destination select the drive to install the OS to and create mount points To use default mount points select Automatic and click Done to go to step 9 To create mount points manually select Custom and click Done to go to step 8 ...

Page 88: ...he Mount Point Creation Mode 8 Click to create a mount point At least 4 mount points boot efi boot swap and are required You can add other mount points as needed After the creation is completed click Done to confirm the changes ...

Page 89: ...80 Figure 5 40 Creating a Mount Point 9 On the INSTALLATION SUMMARY screen click Begin Installation to install the OS ...

Page 90: ...81 Figure 5 41 Installation Progress Screen 10 After the installation is completed click Reboot System ...

Page 91: ...82 Figure 5 42 Clicking Reboot System 11 After reboot enter the following screen and configure the License Information Figure 5 43 Clicking License Information ...

Page 92: ... Check I accept the license agreement and click Done Figure 5 44 Checking I Accept the License Agreement 13 Click FINISH CONFIGURATION Figure 5 45 Finish Configuration 14 The installed RHEL 8 3 OS starts up ...

Page 93: ... If the driver versions do not match install the drivers of the required versions For detailed operations see 8 Installing Updating the Drivers and Firmware 5 8 Installing the OS VMware ESXi 6 7 Update 3 The setup wizards vary with different OS types and the setup wizard screens for operating systems of the same type but different versions are slightly different For more details visit the correspo...

Page 94: ...The wizard screen for VMware ESXi 6 7 Update 3 OS image is shown below Figure 5 47 Initial Setup Screen 2 The welcome screen is displayed after the setup wizard is loaded successfully Press Enter to continue ...

Page 95: ...86 Figure 5 48 Welcome Screen 3 When the End User License Agreement EULA screen is displayed press F11 to accept and continue ...

Page 96: ...87 Figure 5 49 End User License Agreement EULA Screen 4 Wait for the wizard to automatically scan for available devices Figure 5 50 Scanning for Available Devices ...

Page 97: ...88 5 Press or to select a drive where the OS is to be installed and press Enter to continue Figure 5 51 Selecting a Drive 6 Press or to select a keyboard layout and press Enter to continue ...

Page 98: ...89 Figure 5 52 Selecting a Keyboard Layout 7 Set the root password and press Enter to continue Figure 5 53 Setting the Root Password ...

Page 99: ...90 8 Confirm the drive where the OS is to be installed and press F11 to install the OS Figure 5 54 Confirming the Installation 9 Wait for the installation to complete ...

Page 100: ...91 Figure 5 55 Installing ESXi 6 7 0 10 When the installation is completed press Enter to reboot Figure 5 56 Installation Complete Screen ...

Page 101: ...he OS installation and reboot Enter the login name and password on the Authentication Required screen according to the prompt to enter the System Customization screen on which the network SSH Shell and other functions are located Figure 5 57 System UI Management Screen ...

Page 102: ...93 Figure 5 58 Authentication Required Screen Figure 5 59 System Customization Screen ...

Page 103: ...nt Network screen Figure 5 60 Configure Management Network Screen 13 Select IPv4 Configuration to configure the management network You can select Disable IPv4 configuration for management network Use dynamic IPv4 address and network configuration or Set static IPv4 address and network configuration according to your application scenario ...

Page 104: ...95 Figure 5 61 IPv4 Configuration Screen 14 Press Enter to save the configuration and confirm whether to apply the changes according to the prompt ...

Page 105: ...96 Figure 5 62 Confirming the Management Network Configuration 15 Return to the System Customization screen select Restart Management Network press Enter to restart and press F11 to confirm the restart ...

Page 106: ...97 Figure 5 63 Selecting Restart Management Network Figure 5 64 Confirming the Management Network Restart ...

Page 107: ...ctively and press Enter to enable or disable the functions The current status of the function is displayed on the right side of the screen after selecting the configuration item For example after selecting Enable ESXi Shell ESXi Shell is Disabled is displayed on the right side of the screen If you press Enter ESXi Shell is Enabled will be displayed on the right side of the screen ...

Page 108: ...Agents after Shell and SSH are configured press Enter to restart and press F11 to confirm the restart according to the prompt to apply the configuration After the restart is completed press Enter to complete the configuration and return to the System Customization screen ...

Page 109: ...100 Figure 5 67 Selecting Restart Management Agents Figure 5 68 Confirming the Restart ...

Page 110: ...r the OS is installed check whether the existing driver versions match the server OS If the driver versions do not match install the drivers of the required versions For detailed operations see 8 Installing Updating the Drivers and Firmware ...

Page 111: ...website Use a USB flash drive or a blank CD with a minimum capacity of 8 GB as the installation medium Burn the RHEL 7 4 OS image or the VMware ESXi 7 0 Update 1 OS image into an available installation medium using ISO CD ROM burning software such as Fedora Media Writer and Nero Burning ROM 6 2 Configuring the RAID Arrays UEFI Mode This section demonstrates with the Inspur SAS3108MR card to guide ...

Page 112: ...bar appears as shown below press Delete as prompted to enter the BIOS main menu Figure 6 1 Entering the BIOS 3 On the BIOS setup screen select Advanced CSM Configuration and confirm that Storage is set to UEFI Figure 6 2 Setting Storage to UEFI 4 Press F10 In the pop up dialog box select Yes and press Enter to save the settings and exit the BIOS setup screen The server restarts ...

Page 113: ...n again switch to the Advanced tab select the LSI SAS3108 controller from the RAID controller card list and press Enter Figure 6 3 Selecting LSI SAS3108 Controller in Advanced Tab 6 The LSI SAS3108 configuration screen is shown below ...

Page 114: ...a RAID Array RAID 5 for example Procedure 1 Select Main Menu and press Enter On the screen displayed select Configuration Management and press Enter Figure 6 5 Selecting Configuration Management 2 On the screen displayed select Create Virtual Drive and press Enter ...

Page 115: ...D 5 from the list and press Enter 5 Select Select Drives and press Enter Figure 6 7 Selecting Select Drives 6 On the screen displayed a Set Select Media Type to Both b Select the drives for creating the RAID array in sequence and set the drive status to Enabled Three drives are selected as shown below ...

Page 116: ...ess Enter 7 On the screen displayed select OK and press Enter Figure 6 9 Selecting OK 8 On the screen displayed select required options by pressing or to set the RAID parameters After the parameter settings are completed select Save Configuration and press Enter ...

Page 117: ...et Confirm to Enabled Select Yes and press Enter Figure 6 11 Confirmation Screen 10 After the prompt The operation has been performed successfully is displayed select OK and press Enter to complete the configuration Figure 6 12 Selecting OK 11 Check the configuration ...

Page 118: ...ID Information 6 3 Selecting the BIOS Boot Device Connect the USB flash drive or CD ROM with the OS image to the server and restart the server Press F11 to enter the boot menu when you are prompted to press the hot key in the BIOS and then select the USB flash drive or CD ROM marked with UEFI If you are installing the OS in Legacy mode select a non UEFI device ...

Page 119: ...S types and the setup wizard screens for operating systems of the same type but different versions are slightly different For more details visit the corresponding OS official websites When installing the CentOS refer to the installation method for RHEL This section demonstrates with the RHEL 7 4 OS Procedure 1 On the initial setup screen as shown below select the second option in the red box to te...

Page 120: ...111 Figure 6 15 Selecting the Second Option 2 Press Enter to start the test After the test is completed the setup wizard starts automatically ...

Page 121: ...112 Figure 6 16 Setup Wizard Screen 3 Select the language you like to use and click Continue ...

Page 122: ...113 Figure 6 17 Selecting the Language 4 Set DATE TIME KEYBOARD and LANGUAGE SUPPORT ...

Page 123: ...114 Figure 6 18 Setting DATE TIME KEYBOARD and LANGUAGE SUPPORT 5 Select the software installation mode as needed The default is Minimal Install ...

Page 124: ...115 Figure 6 19 Software Selection 6 Select the destination drive to install the OS to and configure the partitions ...

Page 125: ...KDUMP which is used to collect system information for crash diagnosis It is enabled by default We recommend you to enable it so as to locate problems when the system crashes 8 Configure the network Set the option in the red box to ON to automatically connect to the existing network ...

Page 126: ...117 Figure 6 21 Network Configuration 9 Check all the information and then start the installation process ...

Page 127: ...118 Figure 6 22 Checking Information and Beginning Installation 10 Set the root password in USER SETTINGS ...

Page 128: ...119 Figure 6 23 User Settings Figure 6 24 Setting the Root Password ...

Page 129: ...120 11 On CREATE USER screen fill in the User name Password and Confirm password Figure 6 25 Create User Screen 12 After the installation process is completed click Reboot ...

Page 130: ...121 Figure 6 26 Reboot Figure 6 27 Reboot Screen ...

Page 131: ...ing Updating the Drivers and Firmware 6 5 Installing the OS VMware ESXi 7 0 Update 1 This section guides you on how to install the OS by directly using the OS installation CD ROM or ISO image The setup wizards vary with different OS types and the setup wizard screens for operating systems of the same type but different versions are slightly different For more details visit the corresponding OS off...

Page 132: ...123 Figure 6 28 Initial Setup Screen 2 The welcome screen is displayed after the setup wizard is loaded successfully Press Enter to continue ...

Page 133: ...124 Figure 6 29 Welcome Screen 3 When the End User License Agreement EULA screen is displayed press F11 to accept and continue ...

Page 134: ...125 Figure 6 30 End User License Agreement EULA Screen 4 Wait for the wizard to automatically scan for available devices ...

Page 135: ...126 Figure 6 31 Scanning for Available Devices 5 Press or to select a drive where the OS is to be installed and press Enter to continue ...

Page 136: ...127 Figure 6 32 Selecting a Drive 6 Press or to select a keyboard layout and press Enter to continue ...

Page 137: ...128 Figure 6 33 Selecting a Keyboard Layout 7 Set the root password and press Enter to continue ...

Page 138: ...129 Figure 6 34 Setting the Root Password 8 Confirm the drive where the OS is to be installed and press F11 to install the OS ...

Page 139: ...130 Figure 6 35 Confirming the Installation 9 Wait for the installation to complete ...

Page 140: ...131 Figure 6 36 Installing ESXi 7 0 1 10 When the installation is completed press Enter to reboot ...

Page 141: ...owing system UI management screen after the OS installation and reboot Enter the login name and password on the Authentication Required screen according to the prompt to enter the System Customization screen on which the network SSH Shell and other functions are located ...

Page 142: ...133 Figure 6 38 System UI Management Screen Figure 6 39 Authentication Required Screen ...

Page 143: ...134 Figure 6 40 System Customization Screen 12 Press or to select Configure Management Network on the System Customization screen and press Enter to enter the Configure Management Network ...

Page 144: ... IPv4 Configuration to configure the management network You can select Disable IPv4 configuration for management network Use dynamic IPv4 address and network configuration or Set static IPv4 address and network configuration according to your application scenario ...

Page 145: ...136 Figure 6 42 IPv4 Configuration Screen 14 Press Enter to save the configuration and confirm whether to accept the changes according to the prompt ...

Page 146: ...137 Figure 6 43 Confirming the Management Network Configuration 15 Return to the System Customization screen select Restart Management Network press Enter to restart and press F11 to confirm the restart ...

Page 147: ...138 Figure 6 44 Selecting Restart Management Network Figure 6 45 Confirming the Management Network Restart ...

Page 148: ...ctively and press Enter to enable or disable the functions The current status of the function is displayed on the right side of the screen after selecting the configuration item For example after selecting Enable ESXi Shell ESXi Shell is Disabled is displayed on the right side of the screen If you press Enter ESXi Shell is Enabled will be displayed on the right side of the screen ...

Page 149: ...gents after the Shell and SSH are configured press Enter to restart and press F11 to confirm the restart according to the prompt to apply the configuration After the restart is completed press Enter to complete the configuration and return to the System Customization screen ...

Page 150: ...141 Figure 6 48 Selecting Restart Management Agents Figure 6 49 Confirming the Restart ...

Page 151: ...r the OS is installed check whether the existing driver versions match the server OS If the driver versions do not match install the drivers of the required versions For detailed operations see 8 Installing Updating the Drivers and Firmware ...

Page 152: ...ad the OS image from the OS official website Use a USB flash drive or a blank CD with a minimum capacity of 16 GB as the installation medium Burn the Windows Server 2019 OS image the SLES 15 SP2 OS image or the VMware ESXi 7 0 Update 1 OS image into an available installation media using ISO CD ROM burning software such as Fedora Media Writer and Nero Burning ROM 7 2 Configuring the RAID Arrays UEF...

Page 153: ...art the server to enter the BIOS setup screen When the white progress bar appears as shown below press Delete as prompted to enter the BIOS main menu Figure 7 1 Entering the BIOS 2 On the BIOS setup screen select Advanced CSM Configuration and confirm that Storage is set to UEFI ...

Page 154: ...log box select Yes and press Enter to save the settings and exit the BIOS setup screen The server restarts 4 Enter the BIOS setup screen again switch to the Advanced tab select the AVAGO MegaRAID SAS 9361 8i controller from the RAID controller card list and press Enter ...

Page 155: ...146 Figure 7 3 Selecting AVAGO MegaRAID SAS 9361 8i Controller in Advanced Tab Figure 7 4 AVAGO MegaRAID SAS 9361 8i Configuration Screen ...

Page 156: ...r example Procedure 1 Select Main Menu and press Enter On the screen displayed select Configuration Management and press Enter Figure 7 5 Selecting Configuration Management 2 On the screen displayed select Create Virtual Drive and press Enter ...

Page 157: ...148 Figure 7 6 Selecting Create Virtual Drive 3 Set Select RAID Level to RAID 1 Figure 7 7 Setting Select RAID Level to RAID 1 ...

Page 158: ...4 Select Select Drives and press Enter Select the drives for creating the RAID array in sequence and set the drive status to Enabled Two drives are selected as shown below Figure 7 8 Selecting Select Drives ...

Page 159: ... Figure 7 9 Setting Drive Status to Enabled 5 After the configuration is completed select Apply Changes and press Enter On the screen displayed select OK and press Enter Figure 7 10 Selecting Apply Changes ...

Page 160: ...151 Figure 7 11 Selecting OK 6 Set the RAID parameters then select Save Configuration and press Enter Figure 7 12 Setting the Parameters s ...

Page 161: ...152 Figure 7 13 Save Configuration 7 On the screen displayed set Confirm to Enabled Select Yes and press Enter to confirm ...

Page 162: ...153 Figure 7 14 Confirmation Screen 8 On the screen displayed select OK and press Enter to confirm Figure 7 15 Selecting OK ...

Page 163: ...154 9 Check the configuration Press ESC to return to Main Menu then select Virtual Drive Management and press Enter to view the existing RAID information Figure 7 16 Selecting Virtual Drive Management ...

Page 164: ...5 Figure 7 17 Existing RAID Information 7 3 Setting the BIOS Time and Boot Device Procedure 1 Modify the BIOS time Under the Main tab select and modify System Date and System Time by using the arrow keys ...

Page 165: ...156 Figure 7 18 Setting System Date Figure 7 19 Setting System Time ...

Page 166: ...s and restart the server Press F10 In the pop up dialog box select Yes and press Enter to save the settings and exit the BIOS setup screen The server restarts and the settings will take effect 7 4 Selecting the BIOS Boot Device Connect the USB flash drive or CD ROM with the OS image to the server and restart the server Press F11 to open the boot menu when you are prompted to press the hot key in t...

Page 167: ...y with different OS types and the setup wizard screens for operating systems of the same type but different versions are slightly different For more details visit the corresponding OS official websites This section demonstrates with the Windows Server 2019 OS Procedure 1 Load the OS image to go to the initial setup screen and then select the Language to install Time and currency format and Keyboar...

Page 168: ...159 Figure 7 22 Setting the Language Time and Keyboard 2 Click Install now to start the OS installation Figure 7 23 Clicking Install Now ...

Page 169: ...160 3 Select Windows Server 2019 Standard Desktop Experience and click Next Figure 7 24 Selecting the OS 4 Check I accept the license terms and click Next ...

Page 170: ...161 Figure 7 25 Checking I Accept the License Terms 5 Select Custom Install Windows only advanced Figure 7 26 Selecting Custom Install Windows Only advanced ...

Page 171: ...he default drive click Next to go to step 8 To install the OS in a custom partition create partitions manually by clicking New to go to step 7 Figure 7 27 Selecting the Destination Drive 7 Create partitions manually select the primary partition to install the OS to and click Next ...

Page 172: ...163 Figure 7 28 Selecting the Primary Partition 8 Wait until the OS is successfully installed Figure 7 29 Installing Windows ...

Page 173: ... restarts and then you can set the password for the administrator account After the password has been set click Finish Figure 7 30 Setting the Administrator Password 10 Press Ctrl Alt and Delete to go to the user login screen and enter the password to enter the OS ...

Page 174: ...165 Figure 7 31 User Login Screen Figure 7 32 Desktop ...

Page 175: ...P2 This section guides you on how to install the OS by directly using the OS installation CD ROM or ISO image The setup wizards vary with different OS types and the setup wizard screens for operating systems of the same type but different versions are slightly different For more details visit the corresponding OS official websites This section demonstrates with the SLES 15 SP2 OS Procedure 1 Load ...

Page 176: ...167 Figure 7 33 Initial Setup Screen 2 Set Language and Keyboard Layout select SUSE Linux Enterprise Server 15 SP2 for Product to install and then click Next ...

Page 177: ...168 Figure 7 34 Language Keyboard and Product Selection 3 Check I Agree to the License Terms and click Next ...

Page 178: ...gure 7 35 Checking I Agree to the License Terms 4 Enter the Network Settings screen If the network does not need to be configured go to step 6 If the network needs to be configured click Edit to go to step 5 ...

Page 179: ...ess to obtain a dynamic IP address or select Statically Assigned IP Address to set a static IP address as needed To set a static IP address enter the IP Address Subnet Mask and Hostname Then click Next to save the changes and return to the Network Settings screen ...

Page 180: ...171 Figure 7 37 Setting the Network IP Address 6 Click Next to go to the registration screen and select Skip Registration In the Skipping Registration pop up dialog box click OK and then Next ...

Page 181: ...172 Figure 7 38 Skipping Registration Dialog Box 7 Select the extensions and modules to be installed and click Next ...

Page 182: ...173 Figure 7 39 Extension and Module Selection Figure 7 39 Add On Product Installation ...

Page 183: ...th GNOME 9 Configure partitions on the Suggested Partitioning screen To use the default partition click Next to go to step 11 To create partitions manually click Expert Partitioner and select Start with Current Proposal in the drop down list Then click Next to go to step 10 ...

Page 184: ...e OS to and click Delete to delete the existing mount points b Create a boot efi mount point Select the drive to create the boot efi mount points on click Add select Custom Size set the Size and click Next Then select EFI Boot Partition and click Next c Create a swap mount point and a mount point After the mount points are created click Accept to proceed as shown below ...

Page 185: ...176 Figure 7 42 Creating Mount Points 11 Set the time zone and click Next Figure 7 43 Setting the Time Zone ...

Page 186: ...177 12 On the Local User screen you can select Skip User Creation and click Next Figure 7 44 Local User Screen 13 Set a password for the root user and click Next ...

Page 187: ...178 Figure 7 45 Setting a Password for the Root User 14 On the Installation Settings screen confirm the settings and click Install to start the installation ...

Page 188: ...179 Figure 7 46 Installation Settings Figure 7 47 Performing Installation ...

Page 189: ...perations see 8 Installing Updating the Drivers and Firmware 7 7 Installing the OS VMware ESXi 6 7 Update 3 This section guides you on how to install the OS by directly using the OS installation CD ROM or ISO image The setup wizards vary with different OS types and the setup wizard screens for operating systems of the same type but different versions are slightly different For more details visit t...

Page 190: ...ad the OS image to go to the initial setup screen Wait for the loading to complete Figure 7 49 Initial Setup Screen 2 The welcome screen is displayed after the setup wizard is loaded successfully Press Enter to continue ...

Page 191: ...182 Figure 7 50 Welcome Screen 3 When the End User License Agreement EULA screen is displayed press F11 to accept and continue ...

Page 192: ...183 Figure 7 51 End User License Agreement EULA Screen 4 Wait for the wizard to automatically scan for available devices ...

Page 193: ...184 Figure 7 52 Scanning for Available Devices 5 Press or to select a drive where the OS is to be installed and press Enter to continue ...

Page 194: ...185 Figure 7 53 Selecting a Drive 6 Press or to select a keyboard layout and press Enter to continue Figure 7 54 Selecting a Keyboard Layout ...

Page 195: ...186 7 Set the root password and press Enter to continue Figure 7 55 Setting the Root Password 8 Confirm the drive where the OS is to be installed and press F11 to install the OS ...

Page 196: ...187 Figure 7 56 Confirming the Installation ...

Page 197: ...188 9 Wait for the installation to complete Figure 7 57 Installing ESXi 6 7 0 10 When the installation is completed press Enter to reboot ...

Page 198: ...owing system UI management screen after the OS installation and reboot Enter the login name and password on the Authentication Required screen according to the prompt to enter the System Customization screen on which the network SSH Shell and other functions are located ...

Page 199: ...190 Figure 7 59 System UI Management Screen Figure 7 60 Authentication Required Screen ...

Page 200: ...191 Figure 7 61 System Customization Screen 12 Press or to select Configure Management Network on the System Customization screen and press Enter to enter the Configure Management Network screen ...

Page 201: ... IPv4 Configuration to configure the management network You can select Disable IPv4 configuration for management network Use dynamic IPv4 address and network configuration or Set static IPv4 address and network configuration according to your application scenario ...

Page 202: ...193 Figure 7 63 IPv4 Configuration Screen 14 Press Enter to save the configuration and confirm whether to apply the changes according to the prompt ...

Page 203: ...4 Figure 7 64 Confirming the Management Network Configuration 15 Return to the System Customization screen and select Restart Management Network press Enter to restart and press F11 to confirm the restart ...

Page 204: ...195 Figure 7 65 Selecting Restart Management Network Figure 7 66 Confirming the Management Network Restart ...

Page 205: ...ctively and press Enter to enable or disable the functions The current status of the function is displayed on the right side of the screen after selecting the configuration item For example after selecting Enable ESXi Shell ESXi Shell is Disabled is displayed on the right side of the screen If you press Enter ESXi Shell is Enabled will be displayed on the right side of the screen ...

Page 206: ... Agents after Shell and SSH are configured press Enter to restart and press F11 to confirm the restart according to the prompt to apply the configuration After the restart is completed press Enter to complete the configuration and return to the System Customization screen ...

Page 207: ...198 Figure 7 69 Selecting Restart Management Agents Figure 7 70 Confirming the Restart ...

Page 208: ...r the OS is installed check whether the existing driver versions match the server OS If the driver versions do not match install the drivers of the required versions For detailed operations see 8 Installing Updating the Drivers and Firmware ...

Page 209: ...nd firmware to ensure the proper running of the server 8 1 Preparations Before installing or updating the drivers and firmware you need to query the latest versions of the drivers and firmware and then download them Procedure 1 Query the latest versions of the drivers and firmware a Go to the Inspur official website https en inspur com b Click Support Drivers to go to the page shown below and then...

Page 210: ... user interfaces vary with Windows editions This section demonstrates with the Windows Server 2016 OS to guide you on how to check the driver version of the NIC card Procedure 1 Log in to the virtual console of the server 2 Log in to the server OS 3 Click Start right click Computer and select Properties to enter the System window 4 Click Device Manager on the window 5 Click Network adapters to vie...

Page 211: ...to install a new driver and update the firmware This section demonstrates with the RHEL 7 4 OS to guide you on how to view the driver and the firmware versions of the LSI SAS3008 controller card Procedure 1 Log in to the virtual console of the server 2 Log in to the server OS as the root user 3 Execute the cat dmesg grep drivername command to query the driver and firmware information 4 Check wheth...

Page 212: ... OS to guide you on how to install or update the driver Procedure 1 Log in to the virtual console of the server 2 Log in to the server OS as the administrator 3 Load the driver 4 Update or install the driver according to the driver document 5 After the update or installation is completed check whether the driver version is the latest This section describes how to install the chipset driver on the ...

Page 213: ...gure 8 6 Uploading the Chipset Driver Package 3 Open the chipset driver package and double click SetupChipset to run it Figure 8 7 Running the SetupChipset 4 Click Run Next Accept and then Install as prompted ...

Page 214: ...205 Figure 8 8 Installation Step 1 Figure 8 9 Installation Step 2 ...

Page 215: ...206 Figure 8 10 Installation Step 3 Figure 8 11 Installation Step 4 5 Click OK to complete the installation of the chipset driver ...

Page 216: ... Load the driver 4 Update or install the driver according to the driver document 5 After the update or installation is completed check whether the driver version is the latest 8 4 Updating the Firmware To update the firmware of components such as RAID controller cards NIC cards and HBA cards refer to the firmware update instructions provided by the component manufacturers To update the firmware of...

Page 217: ...iewer Console 2 Mount a local folder a Select Media Virtual Media Wizard and then select Hard Disk USB in the pop up dialog box b Select Folder Path and click Browse to select the path to the local folder to be mounted Select the path to an empty local folder for Image Path Set a size for Size MB which should be greater than the file to be transferred ...

Page 218: ...209 Figure 9 2 Selecting the Folder Path c Click Connect and wait The connection is established when Connect becomes Disconnect Figure 9 3 Connection Step 1 ...

Page 219: ...e will be added to the remote server As shown below the dev sdc disk is added to the OS Then mount dev sdc to mnt and you will see the files in the local folder By performing read and write operations on this directory you can upload or download files between the remote server and the local folder Figure 9 5 Transferring Files ...

Page 220: ... server 2 Open the WinSCP tool on Windows and the Login dialog box will be displayed by default Figure 9 6 Login Dialog Box 3 Set the login parameters and click Login Then you can see the following screen Figure 9 7 Screen after a Successful Login 4 Upload and download files as needed ...

Page 221: ... the JDK Procedure 1 Download the JDK Installer You can download the JDK installer JDK 1 8 or above is recommended from the Oracle official website The download URL of JDK 1 8 or above is https www oracle com java technologies javase javase jdk8 downloads html Download the JDK installer applicable for Windows x64 as shown below Figure 9 8 Downloading the JDK Installer The downloaded JDK installer ...

Page 222: ...213 Figure 9 10 Running the JDK b Select the destination folder to install the JDK to and click Next Figure 9 11 Selecting the JDK Destination Folder c Wait until the JDK is fully installed ...

Page 223: ...214 Figure 9 12 JDK Installation Progress d Select the destination folder to install the JRE to Figure 9 13 Selecting the JRE Destination Folder e Wait until the JRE is fully installed ...

Page 224: ...215 Figure 9 14 JRE Installation Progress f After the JRE is successfully installed click Close Figure 9 15 Installation Complete g Check whether the configuration is successful ...

Page 225: ...ul as shown below Figure 9 16 Successful Configuration Screen 9 4 Mounting a CD Image via BMC H5Viewer Complete the following procedure to mount a CD image via BMC H5Viewer 1 Connect to the server remotely via BMC H5Viewer to enter the following screen Figure 9 17 Clicking Browse File 2 Click Browse File select the image to be mounted and click Start Media ...

Page 226: ...217 Figure 9 18 Clicking Start Media 3 When Start Media becomes Stop Media the image has been mounted successfully Figure 9 19 Image Mounted Successfully ...

Page 227: ... kernel without going through BIOS When the OS crashes it captures and retains the crash information of the first kernel for debugging and analysis It is generally used to analyze system crashes kernel panics and deadlocks If the OS release version you are using does not come with the kdump service contact the OS provider if needed Kexec is a fastboot mechanism that allows booting a Linux kernel f...

Page 228: ...need to install a common kernel of the same version as the current Xen kernel On a 32 bit system with a memory more than 4 GB you need to install a PAE kernel of the same version as the current Xen kernel rather than a common kernel You only need to install the PAE kernel and still boot with Xen No reboot is needed after the kernel installation To install the kdump toolkit 1 Check whether the kexe...

Page 229: ...220 Figure 10 1 Option Selection 2 Select the RHEL version RHEL 7 for example Figure 10 2 RHEL Version 3 Configure the dump directory ...

Page 230: ...221 Figure 10 3 Dump Target 4 Configure the memory filtering Figure 10 4 Memory Filtering 5 Configure the operation on dumping failure ...

Page 231: ...222 Figure 10 5 Operation on Dumping Failure 6 Configure the condition s for triggering the kdump process Figure 10 6 Crash Server on 7 Download the configuration script ...

Page 232: ...t the following default settings If you need to customize the configuration refer to the supplementary information 1 Add the boot parameter for RHEL 7 RHEL 8 OS a Edit etc default grub and add the parameter crashkernel to the GRUB_CMDLINE_LINUX line The parameter value depends on the physical memory size crashkernel auto physical memory 2 GB Crashkernel 128M physical memory 2 GB vim etc default gr...

Page 233: ...served memory value and manually trigger the kdump test to see whether it can generate the vmcore file According to the following explanation of Red Hat the reserved memory size depends on the disk space used by the file system For example it needs to reserve 512 MB of memory for a 2 1 TB ext4 file system and 1 88 GB of memory for a 16 TB ext4 file system Kdump fails with large ext4 file system be...

Page 234: ...ectory of dev sda1 rather than the default location var crash To store the dump to a remote machine using the NFS protocol net nfs server nfs mount For example net nfs example com export vmcores To store the dump to a remote machine using the SSH protocol net user ssh server For example net root ssh example com Execute the following command to obtain the write permission on the target machine duri...

Page 235: ...d below as needed kernel softlockup_panic 1 A panic will be triggered when the kernel has a soft lockup Nmi_watchdog 1 or 2 A system hang can be detected through the NMI Non Maskable Interrupt Watchdog mechanism You can confirm whether the interrupt configuration is successful by searching NMI in the proc interrupts file execute the grep NMI proc interrupts command and if the return value is not 0...

Page 236: ...akedumpfile d 31 c Retain all contents and compress core_collector makedumpfile c 5 Specify the action to take if the kdump capture fails Control the system behavior after a kdump capture failure by configuring etc kdump conf The default configuration is reboot vim etc kdump conf default reboot Figure 10 12 Specifying the Action after a Kdump Capture Failure Supplementary information If the recomm...

Page 237: ...ce is not started start it and set it to auto start on system boot systemctl status kdump systemctl start kdump systemctl enable kdump Figure 10 13 Checking and Starting the Kdump Service reboot 7 Verify the triggering of kdump Test whether the configuration takes effect in the CUI Character User Interface You can execute the following command to result in a system crash Before that make sure you ...

Page 238: ...ful Configuration 10 1 3 Configuring Kdump on SLES 1 Install the required software Check whether you have installed kexec tools makedumpfile and yast2 kdump Figure 10 17 Installing the Software 2 Add the boot parameters SLES 12 15 configuration a Use the kdumptool calibrate command to calculate the reserved memory required by the kdump kernel If the system memory is less than 4 GB you ...

Page 239: ... b Modify the grub boot parameters and add the calculated SIZE_High and SIZE_Low values to the specified line Add crashkernel SIZE_HIGH high crashkernel SIZE_LOW low to the grub cfg file via vim boot grub2 grub cfg Figure 10 19 Modifying the Grub Boot Parameters c Reboot the system Supplementary information You can also configure it via the YaST screen yast2kdump ...

Page 240: ...Y_KERNEL yes Whether to copy the kernel when generating the dump file KDUMP_KEEP_OLD_DUMPS 2 The maximum number of dump files that can be kept KDUMP_DUMPFORMAT compressed Dump file format KDUMP_DUMPLEVEL 31 Log level which is set to 31 by default for SLES11 SP3 and its later versions and set to 0 by default for the earlier versions 4 Start the kdump service systemctl status kdump If the kdump serv...

Page 241: ... vmcore file will be collected automatically Then the system reboots Figure 10 22 Triggering the Kdump Figure10 23 Collecting the Vmcore File 10 1 4 Configuring Kdump on Ubuntu 1 Install the required software It needs to install linux crashdump on the Ubuntu OS and install kdump tools on the Debian OS The other configuration steps are the same apt install linux crashdump ...

Page 242: ... Installing the Kdump tools After reboot the crashkernel parameters will be automatically generated in the boot grub grub cfg file 2 Configure the kdump a Check the current kdump configuration which can meet your requirements by default kdump config show Figure 10 26 Kdump Configuration ...

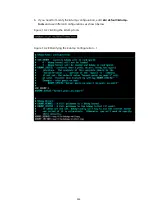
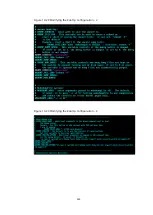
Page 243: ...If you need to modify the kdump configuration edit etc default kdump tools and use different configurations as shown below Figure 10 27 Editing the Kdump tools Figure 10 28 Modifying the Kdump Configuration 1 ...

Page 244: ...235 Figure 10 29 Modifying the Kdump Configuration 2 Figure 10 30 Modifying the Kdump Configuration 3 ...

Page 245: ...check that the crashkernel configuration is included in the boot parameters Figure 10 32 Crashkernel Configuration Execute the dmesg grep i crash command to check that the requested memory portion is reserved for the kdump kernel Figure 10 33 Reserved Memory Portion for Kdump Kernel 4 Verify the triggering of Ubuntu kdump a Enable the sysrq mechanism sudo sysctl w kernel sysrq 1 b Execute the echo...

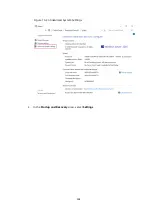
Page 246: ...system generates a dmp memory dump error report file which is stored in C Windows by default This file can be used to analyze the BSOD causes After the Windows OS is installed we recommend you to use the default settings and ensure that the C drive C has more than 10 GB idle space to save the dump files System UI Settings Procedure 1 Right click This PC and select Properties to open the system pro...

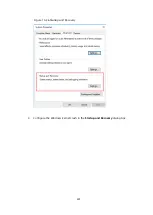
Page 247: ...238 Figure 10 35 Advanced System Settings 3 In the Startup and Recovery area select Settings ...

Page 248: ...239 Figure 10 36 Startup and Recovery 4 Configure the Windows kernel crash in the Startup and Recovery dialog box ...

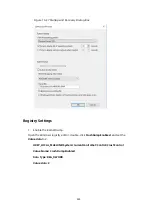
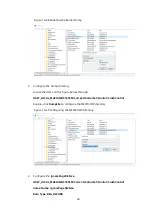
Page 249: ...stry Settings 1 Enable the Kernel Dump Open the Windows registry editor double click CrashDumpEnabled and set the Value data to 2 HKEY_LOCAL_MACHINE System CurrentControlSet Control CrashControl Value Name CrashDumpEnabled Data Type REG_DWORD Value data 2 ...

Page 250: ... HKEY_LOCAL_MACHINE SYSTEM CurrentControlSet Control CrashControl Double click DumpFile to configure the MEMDUMP directory Figure 10 39 Configuring the MEMDUMP Directory 3 Configure the IgnorePagefileSize HKEY_LOCAL_MACHINE SYSTEM CurrentControlSet Control CrashControl Value Name IgnorePagefileSize Data Type REG_DWORD ...

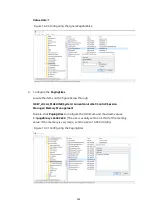
Page 251: ...gh HKEY_LOCAL_MACHINE System CurrentControlSet Control Session Manager Memory Management Double click PagingFiles to configure the minimum and maximum values C pagefile sys 2600 2600 The size is usually set to one third of the memory value If the memory is very large set the size to 10 000 10 GB Figure 10 41 Configuring the PagingFiles ...

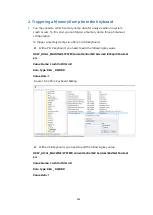
Page 252: ... USB keyboard With a PS 2 keyboard you need to add the following key value HKEY_LOCAL_MACHINE SYSTEM CurrentControlSet Services i8042prt Paramet ers Value Name CrashOnCtrlScroll Data Type REG _ DWORD Value data 1 Figure 10 42 PS 2 Keyboard Setting With a USB keyboard you need to add the following key value HKEY_LOCAL_MACHINE SYSTEM CurrentControlSet Services kbdhid Paramet ers Value Name CrashOnCt...

Page 253: ...s an administrator and execute the command shown below to obtain the dispdiag file Figure 10 44 Obtaining the Dispdiag File b After the command is executed trigger the memory dump manually Press and hold Ctrl on the right side of the keyboard and press Scroll Lock twice to trigger a BSOD error Then the server will save the MEMORY DMP file to the configured path and restart ...

Page 254: ...245 Figure 10 45 BSOD Figure 10 46 Path to the MEMORY DMP File 10 1 6 Configuring the Memory Dump Service on VMware ESXi 1 Add a coredump file esxcli system coredump file add ...

Page 255: ...ASTORE_UUID f FILENAME esxcli system coredump file add d 5d351c2a e66ebcb6 6233 000c2900f388 f test dump Figure 10 48 Configuring the File Path 2 Check the configured coredump file by executing the following command esxcli system coredump file list Figure 10 49 Checking the Dump File 3 Activate the configuration esxcli system coredump file set p vmfs volumes 5d351c2a e66ebcb6 6233 000c2900f388 vmk...

Page 256: ...ystem can be redirected to the local site through the IPMI session based on IP network SOL enables administrators to access the IP based remote system serial port As long as no network failure occurs in the server room the administrators can access the serial port output of the failed server through any server that supports SOL A remote management application can establish an IPMI over LAN session...

Page 257: ...h or black screen information and display information unrecorded in logs The following describes how to configure the serial port redirection on RHEL 6 7 SLES OS For the configuration methods on other operating systems please consult the corresponding OS manufacturers BMC SOL setting Generally SOL cannot be configured through the BMC Web GUI Hence you need to enable SOL by executing the ipmitool c...

Page 258: ...249 Figure 10 52 BIOS Serial Port Setting 1 Figure 10 53 BIOS Serial Port Setting 2 ...

Page 259: ...tty0 to the module parameter line For example module vmlinuz 2 6 32 431 20 3 el6 x86_64 ro root dev mapper vg00 lv_root rd_LVM_LV vg00 lv_swap rd_NO_LUKS rd_LVM_LV vg00 lv_root rd_NO_MD crashkernel auto LANG zh_CN UTF 8 KEYBOARDTYPE pc KEYTABLE us rd_NO_DM rhgb quiet console ttyS0 115200 console tty0 The baud rate for example 115200 mentioned above depends on the hardware settings Each server has ...

Page 260: ...0 to the command line at the end of the file In RHEL 7 ttyS0 is configured by default reboot Connect to the serial port via another computer terminal and configure a tool such as SecureCRT to view the serial port output Serial port configuration in RHEL 7 1 Modify the grub parameters vim etc default grub GRUB_CMDLINE_LINUX_DEFAULT console tty0 console ttyS0 115200n8 GRUB_TERMINAL console serial GR...

Page 261: ... console ttyS0 grub2 editenv set kernelopts root dev mapper rhel_example root ro crashkernel auto resume dev mapper rhel_example swap rd lvm lv rhel_example root rd lvm lv rhel_example swap console ttyS0 115200 console tty0 grub2 editenv list grep kernelopts kernelopts root dev mapper rhel_example root ro crashkernel auto resume dev mapper rhel_example swap rd lvm lv rhel_example root rd lvm lv rh...

Page 262: ...itle Linux SERIAL CONSOLE kernel hd0 1 boot vmlinuz root dev sda3 selinux 0 splash 0 resume dev sda1 showopts elevator cfq vga 791 console tty0 console ttyS0 115200 initrd hd0 1 boot initrd reboot 10 2 2 Configuring the Serial Port Output on Windows Press Win and R to open a dialog box enter msconfig and then press Enter Figure10 55 Boot Tab Screen ...

Page 263: ...en click OK Figure10 56 BOOT Advanced Options 10 2 3 Verifying the Serial Port Configuration 1 Use a serial to Ethernet adapter to connect a laptop with the server s BMC management network port Install SecureCRT on the laptop and then run SecureCRT to create a session Figure10 57 Serial Port Configuration 1 ...

Page 264: ...ter a memory dump process and then automatically restart to restore services During the process the dump logs will be generated for cause analysis The NMI function needs to be used together with the dump function On Windows and VMware you can directly trigger an NMI However on Linux you need to perform the following procedure 1 Add the following to the etc sysctl conf file kernel unknown_nmi_panic...

Page 265: ... state cat proc sys kernel sysrq 2 If the value is 0 the SysRq key is disabled Set the value to 1 The available values in proc sys kernel sysrq are described below 0 disable sysrq completely 1 enable all functions of sysrq 3 Trigger the SysRq key The SysRq key can be triggered using the following key combination in CLI not available in GUI Alt PrintScreen CommandKey If the keyboard can respond the...

Page 266: ...mediately by printing it to the current console or the serial port or even a printer To this end the kernel will compare the log level of the message with console_loglevel a kernel variable If the message priority is higher lower log level value than the console_loglevel the message will be printed to the current console 1 Query the console log level Execute the cat proc sys kernel printk command ...

Page 267: ...ng messages If this log level is enabled all logs will be printed 10 6 Disabling the Screen Saver If it is inconvenient to restart the OS to configure the serial port use the remote virtual console of the BMC to switch the OS to CLI and disable the screen saver This allows the last screenshot to be captured for fault location in case the OS crashes completely This section demonstrates with the RHE...

Page 268: ...levels It takes effect immediately and reverts after a restart Change the log levels only after completing all other configurations and restarting the OS Also restore the log levels after fault location Disable the screen saver It takes effect immediately and reverts after a restart Disable the screen saver only after completing other configurations The above fault locating methods have no effect ...

Page 269: ...260 Figure10 59 Error Prompt 1 b Error _intf storage fsset devicetree _devices existing xxx disk sda with existing gpt disk Figure10 60 Error Prompt 2 Cause analysis ...

Page 270: ...r 2016 OS Installation Symptoms During the Windows Server 2016 OS installation the following error is reported Windows cannot install required files The file does not exist Make sure all files required for installation are available and restart the installation Error code 0x80070002 Figure10 61 Error Prompt Cause analysis The files required for installation do not exist in the image Confirm the in...

Page 271: ... installed Figure10 62 COMRESET Failed Cause analysis The ata4 device of the server cannot be activated The system attempted to reset it but failed The errno 32 also indicates that a device error exists EPIPE 32 Broken pipe Solutions Check the corresponding ata device to confirm whether it is normal or not 10 8 4 Entering the Dracut CLI during the RHEL 7 OS Installation Symptoms ...

Page 272: ...xist Cause analysis The installation path written into the USB flash drive via UltroISO on Windows is not recognized by the Linux installation program Solutions Use Fedora Media Writer a usb media creation tool recommended by Red Hat to create bootable USB media Click the following URL to download the tool https github com FedoraQt MediaWriter releases Refer to Section 3 2 2 Making Installation US...

Page 273: ...tion Required information includes but not limited to system logs time when the fault occurred operations performed when the fault occurred and server screen output Prepare for debugging Inspur technical support engineers may assist you in further collecting fault information or rectifying the fault directly Before contacting Inspur for technical support you need to prepare spare parts screwdriver...

Page 274: ...rface CPU Central Processing Unit CUI Character User Interface DHCP Dynamic Host Configuration Protocol DVD Digital Versatile Disc ESXi Elastic Sky X Integrated EULA End User License Agreement FW Firmware GRUB Grand Unified Bootloader GUI Graphical User Interface HBA Host Bus Adapter IP Internet Protocol IPMI Intelligent Platform Management Interface ISO International Organization for Standardizat...

Page 275: ...Memory Killer OS Operating System PC Personal Computer RAID Redundant Array of Independent Disks RHEL Red Hat Enterprise Linux RJ45 Registered Jack 45 PAE Physical Address Extension PS 2 Personal System 2 SAS Serial Attached Small Computer System Interface SFTP SSH File Transfer Protocol SLES 15 SP2 SUSE Linux Enterprise Server 15 Service Pack 2 SOL Serial Over LAN SSH Secure Shell SysRq System Re...

Page 276: ...267 UEFI Unified Extensible Firmware Interface UI User Interface USB Universal Serial Bus UTC Universal Time Coordinated VGA Video Graphics Array YaST Yet another Setup Tool ...

Reviews: