background image

28 

A.  Please check the connection of top and middle and lower sign wires are well connected. 

B.  Please change a new PCB board. 

C.  Please change a new inverter. 

2.  Inverter problem: The inverter light will be on, please check by following steps: 

A.  The inverter is too hot, please stop the machine and make inverter cool down. 

B.  Please change a new inverter. 

3.  Incline problem: The incline light will be on, please check by following steps: 

A.  Please check incline signal wire is well connected, change a new wire. 

B.  Please check the incline AC wire is well connected with inverter wire. 

C.  Change a new incline motor. 

D.  Change a new inverter. 

4.  Over  voltage  problem:  The  over  voltage  light  will  be  on,  please  check  by  following 

steps: 

Please make sure the voltage is right working. 

5.  Over  current  problem:  The  over  current  light  will  be  on,  please  check  by  following 

steps: 

A.  The loading current is too heavy, please restart machine after some minutes. 

B.  Possible part of machine is blocked, and AC motor cannot move which leads to heavy current, 

please restart machine after some minutes, or lubricate the machine. 

C.  Please change a new AC motor. 

6.  There is no display on LED. 

A.  Please check the overload protect button, and press this button to start machine again. 

B.  Please check the wires of electronic parts are well connected. 

C.  Please check the connection of top and middle and lower sign wires are well connected. 

TERMS AND CONDITIONS OF WARRANTY, WARRANTY CLAIMS 

General Conditions of Warranty and Definition of Terms 

All  Warranty  Conditions  stated  hereunder  determine  Warranty  Coverage  and  Warranty  Claim 
Procedure. Conditions of Warranty and Warranty Claims are governed by Act No. 40/1964 Coll. Civil 
Code,  Act  No.  513/1991  Coll.,  Commercial  Code,  and  Act  No.  634/1992  Coll.,  Consumer  Protection 
Act, as amended, also in cases that are not specified by these Warranty rules. 

The  seller  is  SEVEN  SPORT  s.r.o.  with  its  registered  office  in  Borivojova  Street  35/878,  Prague 
13000, Company Registration Number: 26847264, registered in the Trade Register at Regional Court 
in Prague, Section C, Insert No. 116888. 

According to valid legal regulations it depends whether the Buyer is the End Customer or not. 

“The Buyer who is the End Customer” or simply the “End Customer” is the legal entity that does not 
conclude and execute the Contract in order to run or promote his own trade or business activities. 

“The Buyer who is not the End Customer” is a Businessman that buys Goods or uses services for the 
purpose  of  using  the  Goods  or  services  for  his  own  business  activities.  The  Buyer  conforms  to  the 
General  Purchase  Agreement  and  business  conditions  to  the  extent  specified  in  the  Commercial 
Code. 

These Conditions of Warranty and Warranty Claims are an integral part of every Purchase Agreement 
made  between  the  Seller  and  the  Buyer.  All  Warranty  Conditions  are  valid  and  binding,  unless 

Summary of Contents for inCondiT6000i

Page 1: ...USER MANUAL EN IN 13149 Motorized Treadmill inSPORTline inCondiT6000i ...

Page 2: ...1 OPERATION GUIDE 12 EXERCISE INSTRUCTIONS 20 THE WARM UP PHASE 20 THE EXERCISE PHASE 20 THE COOL DOWN PHASE 20 MAINTENANCE 20 AFTER EACH USE 21 GENERAL CLEANING 21 GENERAL CARE 21 IDENTIFICATION WAYS FOR THE DEGREE OF TIGHTNESS OF RUNNING BELT AND MOTOR BELT 21 CENTERING THE RUNNING BELT 21 EXPLODED DRAWING 23 PARTS LIST 24 TROUBLE SHOOTING 27 TERMS AND CONDITIONS OF WARRANTY WARRANTY CLAIMS 28 ...

Page 3: ... for your safety should you fall or move too far back on the treadmill 7 Keep hands away from all moving parts 8 Never operate the treadmill if it has a damaged cord or plug 9 Keep the cord away from heated surfaces 10 Do not operate where aerosol spray products are being used or where oxygen is being administered Sparks from the motor may ignite a highly flammable environment 11 Never drop or ins...

Page 4: ...safety key will stop the walking belt immediately the treadmill will shut off automatically Insert the safety key will reset the display 8 Do not use excessive pressure on console control keys They are precision set to function properly with little finger pressure 9 This appliance is not intended for use by persons including children with reduced physical sensory or mental capabilities or lack of ...

Page 5: ...ube 1 D Right upright tube 1 106 Bolt M10 20 14 126 Spring washer 10 14 120 Flat Washer 10 14 A Console top cover 1 B Console panel 1 96 Screw ST4 2 12 8 15 Left upright tube cover 1 16 Right upright tube cover 1 E Left handle bar 1 F Right handle bar 1 133 Bolt M8 15 8 124 Washer 8 8 138 Bolt M5 16 4 77 T shape Allen wrench 6mm 1 78 Open wrench 19mm 1 ...

Page 6: ...ot get through power before complete assembly ASSEMBLY STEPS Step 1 1 Open the carton get out the above spare parts and put the main frame on the level ground 2 Use the Phillips screwdriver 81 to remove the screw ST4 2 20 116 3 Use the 8 Allen wrench 79 to remove the bolt M10 20 106 and the spring washer 126 remove the L shape board G fasten the bolt M10 20 106 and spring washer 126 by using the 8...

Page 7: ...dle signal wire 47 and lower signal wire 48 2 Fix the left and right upright tubes C D to the main frame 1 with bolts M10 20 106 spring washer 126 and flat washer 120 by using 8 Allen wrench 79 Step 4 1 Connect the wire ports of panel B to the wire ports of console top cover A first Please choose same color wire for port to port connection ...

Page 8: ... 81 Step 5 1 Connect the top signal wire 46 and middle signal wire 47 first 2 Insert the left and right upright tube covers 15 16 into left and right upright tubes C D 3 Fix the console A to the left and right upright tubes C D with bolt M10 20 106 spring washer 126 and flat washer 120 by using 8 Allen wrench 79 ...

Page 9: ... 6 Fix left and right motor side cover 13 14 to the motor top cover 11 with screw ST4 2 12 96 by using Phillips screwdriver 81 Step 7 Fix the Left and right upright tube covers 15 16 to the motor top cover 11 ...

Page 10: ...onsole A with bolt M8 15 133 and washer 124 by using 5 Allen Wrench 80 Step 9 1 Assemble the left and right handle bar 69 70 to the console A 2 Fix the left and right handle bar 69 70 to the console A with Bolt M5 16 138 by using the Phillips screwdriver 81 ...

Page 11: ... risk of electric shock The plug of machine is equipped with grounding conductor to ensure your safety please insert the plug into correct electrical outlet DANGER Please follow all instruction of manual Wrong operation may lead to leakage of electricity If you cannot make sure the machine is grounded with right way please consult with professional electrical engineer If you find the plug cannot m...

Page 12: ...ogram button the window will display P1 P2 P23 P24 U01 U02 U03 FAT circulatory During operation display the running distance positive direction clock from 0 00 99 9 when up to 99 9 it will count again from 0 When count down it will show from setting data to 0 When down to 0 the machine will stop smoothly and show End enter into the initial situation after 5 seconds 3 Calories window Display runner...

Page 13: ...eed and incline to set the data press START to start the machine 3 START button When getting through the power and safety key attached press this button at any time to start the machine 4 STOP button This button has functions of PAUSE and STOP Under running mode press this button the machine will pause and all data will be kept matrix window will show PAU Under pause mode if you press START button...

Page 14: ...er and check the oil tank If there is no oil inside the tank please replenish the oil Before adding oil to the tank first remove the plug C and insert the oil pipe A to the hole the plug was inserted in Fill the oil pipe A with oil from the bottle B the oil bottle is part of the package The oil will flow into the oil tank The maximum tank volume is 400 ml While replenishing oil please do not excee...

Page 15: ...ries what you need The setting range is 10 999 5 When setting is finished press START button to start up the treadmill will run after 3 seconds press SPEED SPEED INCLINE INCLINE to adjust the speed and the incline press the STOP the treadmill will stop INNER INSTALL PROGRAM Press PROGRAM button DISTANCE window will display P1 P24 to choose the program you like Setting of running time then the TIME...

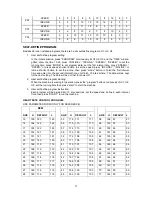
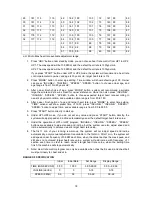
Page 16: ...1 SPEED 2 5 8 10 6 9 5 3 2 2 INCLINE 1 3 5 8 10 7 6 3 2 3 P12 SPEED 2 5 5 4 4 6 4 2 3 4 INCLINE 3 5 6 7 12 9 11 11 6 3 P13 SPEED 2 7 4 7 8 9 4 5 3 2 INCLINE 5 6 6 4 6 5 8 9 4 2 P14 SPEED 2 6 5 4 8 6 5 2 3 3 INCLINE 5 6 5 8 4 5 5 10 6 3 P15 SPEED 2 6 5 4 8 7 5 3 3 2 INCLINE 3 4 5 6 3 5 5 6 4 3 P16 SPEED 2 5 7 5 8 6 5 2 4 2 INCLINE 1 5 6 8 12 9 10 9 5 3 P17 SPEED 2 5 6 7 8 9 8 5 3 4 INCLINE 3 5 6 8 ...

Page 17: ...for power off 2 User self define program starting When the machine is waiting for operation press the program button continuously till U1 U2 U3 set the running time then press start to start the machine 3 User self define program instruction Each program will be divided into 10 time sections set the speed and incline in each interval time then press START to run the machine HEART RATE CONTROL PROG...

Page 18: ... from 80 to 180 4 After owner finish option of age and target heart rate press MODE to enter time setting TIME window will show preset time of 15 00 press INCLINE INCLINE SPEED SPEED button to adjust time and available range is from 5 00 to 99 00 5 Press START button directly to start up 6 Under HP1 HP2 mode if you do not set any value and press START button directly the system will adjust speed a...

Page 19: ...ight 100 200 F 4 Weight 20 150 F 5 FAT 19 Under weight FAT 20 25 Normal weight FAT 26 29 Overweight FAT 30 Obesity SAFETY LOCK FUNCTION Press the emergency stop button the treadmill will stop immediately Then the treadmill will enter into standby mode POWER SAVE FUNCTION The machine is with energy saving function Under standby mode at the state of waiting for operation if without any operation the...

Page 20: ...er and harder It is advisable to train at least three times a week and if possible space your workouts evenly throughout the week To tone muscle while on your treadmill you will need to have the resistance set quite high This will put more strain on our leg muscles and may mean you cannot train for as long as you would like If you are also trying to improve your fitness you need to alter your trai...

Page 21: ...vent dust build up Once a year you should remove the black motor shield and vacuum out dirt that may accumulate GENERAL CARE 1 Check parts for wear before use 2 Pay particular attention to the fixing knobs and make sure they are tight 3 Always replace the mat if worn and any other defective parts 4 If in doubt do not use the treadmill and contact our helpline TAKE CARE TO PROTECT CARPETS AND FLOOR...

Page 22: ...he belt does not run to central position adjust again Picture A If the belt moves to the left turn the left adjusting bolt quarter circle with clockwise if the belt does not run to central position adjust again Picture B Picture A If the belts move to the RIGHT Picture B If the belts move to the LEFT WARNING ALWAYS UNPLUG THE TREADMILL FROM THE ELECTRICAL OUTLET BEFORE CLEANING OR SERVICING THE UN...

Page 23: ...23 EXPLODED DRAWING ...

Page 24: ...ide cover 1 14 Right motor side cover 1 15 Left upright tube cover 1 16 Right motor trim cover 1 17 Left side rail 1 18 Right side rail 1 19 Top side rail 2 20 Left back end cover 1 21 Right back end cover 1 22 Rear top cover 2 23 Side rail anti slip pad 2 24 Cushion 4 25 Pipe cushion 6 26 Spring Ⅰ 6 27 Versatile Foot pad 2 28 Side rail fix plate 6 29 Brush 1 30 Power line 1 31 Square switch 1 32 ...

Page 25: ...Console bottom cover 1 51 Console middle top cover 1 52 Console middle bottom cover 1 53 Console panel 1 54 bookrack 1 55 Speaker 2 56 Speaker cover 1 57 Speaker net 1 58 Hand pulse frame 1 59 Hand pulse top cover 1 60 Hand pulse bottom cover 1 61 Hand pulse left cover 1 62 Hand pulse right cover 1 63 Emergency button 1 64 Safety key with rope 1 65 Emergency inside on off button 1 66 Rope press pl...

Page 26: ...83 Square oil bottle 1 84 Oil driving system top cover 1 85 Oil driving system bottom cover 1 86 Oil bottle fix plate 1 87 Oil control protect cover 1 88 Oil pipe 1 1 89 Oil pipe 2 1 90 Oil pipe 3 2 91 Oil pipe 4 1 92 Glass tube fix button 3 93 Speed sensor 1 94 Bolt M5 10 22 95 Screw ST3 5 10 19 96 Screw ST4 2 12 61 97 Screw ST2 9 8 33 98 Nut M8 17 99 Nut M10 7 100 Nut M16 4 101 Bolt M16 50 4 102...

Page 27: ... washer 16 4 126 Lock washer 10 21 127 Lock washer 8 14 128 Bolt M6 10 4 129 Screw ST4 2 30 4 130 Screw ST4 2 12 2 131 Left handle bar frame 1 132 Right handle bar frame 1 133 Bolt M8 15 8 134 Upright tube clamping washer 1 2 135 Upright tube clamping washer 2 2 136 Rubber pad φ105 φ40 3 0 2 137 Oil pipe 1 138 Bolt M5 16 4 TROUBLE SHOOTING There are some indication lights on the right of on off bu...

Page 28: ... connection of top and middle and lower sign wires are well connected TERMS AND CONDITIONS OF WARRANTY WARRANTY CLAIMS General Conditions of Warranty and Definition of Terms All Warranty Conditions stated hereunder determine Warranty Coverage and Warranty Claim Procedure Conditions of Warranty and Warranty Claims are governed by Act No 40 1964 Coll Civil Code Act No 513 1991 Coll Commercial Code a...

Page 29: ...entually by the documents without the serial number If the Buyer does not prove the validity of the Warranty Claim by these documents the Seller has the right to reject the Warranty Claim If the Buyer gives notice of a defect that is not covered by the Warranty e g in the case that the Warranty Conditions were not fulfilled or in the case of reporting the defect by mistake etc the Seller is eligib...

Page 30: ...Z26847264 Phone 420 556 300 970 E mail eshop insportline cz reklamace insportline cz servis insportline cz Web www insportline cz SK INSPORTLINE s r o Headquarters Warranty Service centre Elektricna 6471 911 01 Trencin Slovakia CRN 36311723 VAT ID SK2020177082 Phone 421 0 326 526 701 E mail objednavky insportline sk reklamacie insportline sk servis insportline sk Web www insportline sk Date of Sal...

Reviews: