background image

16 


before  any  further  exercise.  If  you  use  the  device  more  often,  you  can  choose  between  walking  and 
during. If you are not sure of the most suitable speed, follow the following information: 

Speed 1

–3.0 km/h 

physically weaker individuals 

Speed 3.0

–4.5 km/h


less physically fit individuals 

Speed 4.5

–6.0 km/h


people used to classic walking 

Speed 6.0

–7.5 km/h


fast walking people 

Speed 7.5

–9.0 km/h 


recreational runners 

Speed 9.0

–12.0 km/h


medium runners 

Speed 12.0

–14.5 km/h


experienced runners 

Speed above 14.5 km/h


professional runners 


WARNING


For walking choose a speed of 6 km / h or less. 


Runners should choose a speed of 8 km / h or higher. 

MAINTENANCE  

Identification ways for the degree of tightness of running belt and poly V-belt.  

When the running belt skips, please follow the steps as follows to make sure which belt 
needs to be adjusted, running belt or poly V-belt.  

a)  Unplug all power supply, screw and remove the Base cover.  

b)  Turn the speed to be around 3km/h, step on the running belt by pressure and try 

your  best  to  make  the  running  belt  stop.  If  running  belt  stops,  together  with  the 
front  roll,  but  the  motor  still  runs,  under  this  condition,  it  means  the  poly  V-belt 
needs to be adjusted.  

c)  Turn the speed to be around 3km/h, step on the running belt by pressure and try 

your  best  to  make  the  running  belt  stop.  If  running  belt  stops,  but  front  roll  still 
runs, under this condition, it means the running belt needs to be adjusted.  

THE ADJUSTMENT STEPS FOR POLY V-BELT  

a)

  Unplug all power supply and take off the base cover.  

b)

  Loosen the four screws for the motor, adjust the V-belt tension bolts in clockwise 

direction, and then tighten back the four screws for the motor.  

ADJUSTMENT RUNNING BELT   

a)

  Turn the speed to be 6km/h. for running   

b)

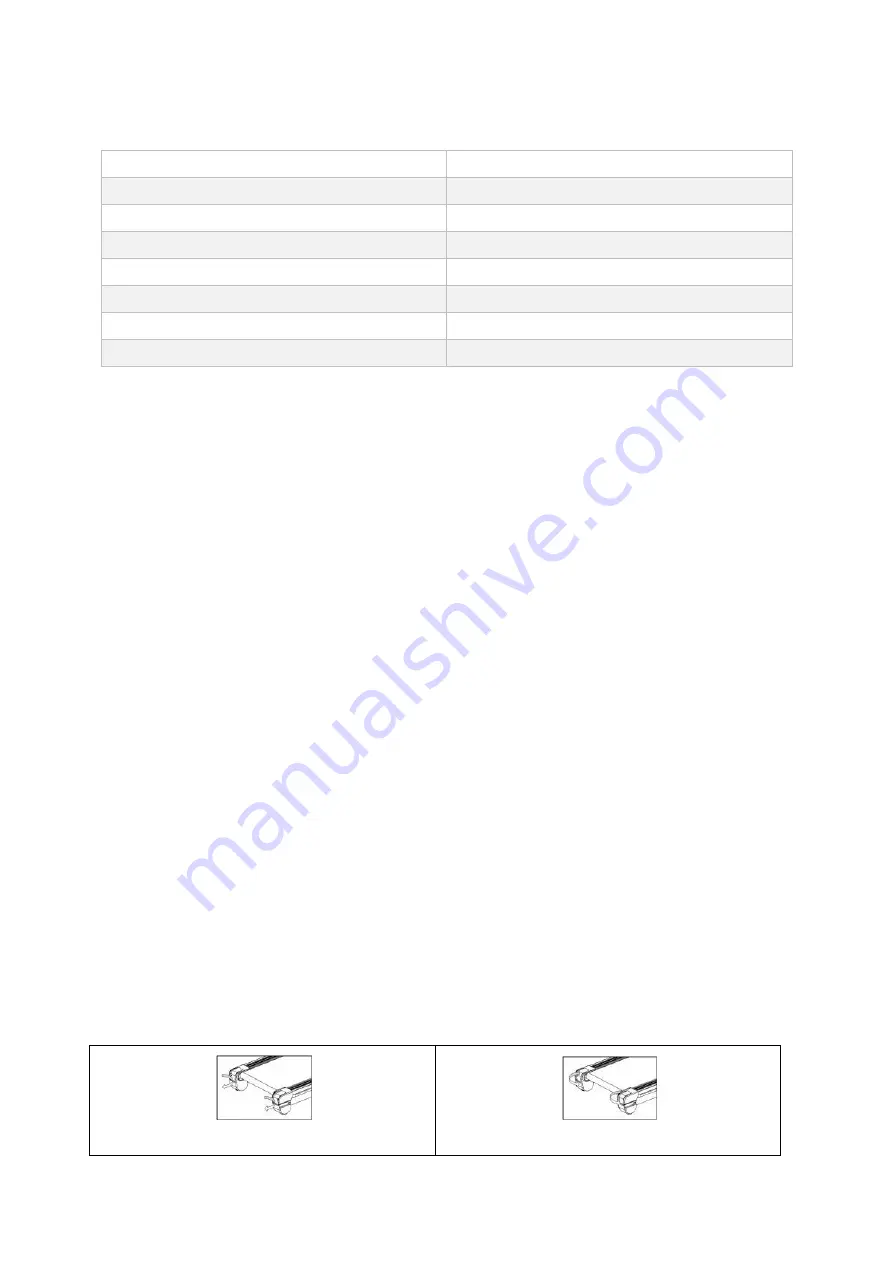
  Turn the both tension screws located at the end of the treadmill on the right and 

left sides, half a turn clockwise using the Allen key. (Diagram1 and Diagram 2)  

c)

  After adjustment, running belt still slips; please repeat the steps as above.  


Tighten the running belt (Diagram 1)  


Loosen the running belt (Diagram 2)  

Summary of Contents for Gilavar

Page 1: ...USER MANUAL EN IN 6938 Treadmill inSPORTline Gilavar...

Page 2: ...PLAY 11 Detailed Instructions 11 GENERAL TRAINING RECOMMENDATIONS 14 GETTING STARTED 15 SAFE EXERCISE 15 MAINTENANCE 16 THE ADJUSTMENT STEPS FOR POLY V BELT 16 ADJUSTMENT RUNNING BELT 16 THE ADJUSTMEN...

Page 3: ...near to the machine Use floor protection not included and keep at least 0 6 m free space around device for security Please stop exercising immediately and consult your doctor if you re feel giddy sur...

Page 4: ...efully read the instructions before installation Operate in accordance with procedures 2 Check components in the package 3 Remove all paper boxes and foams used as fasteners Check all the following co...

Page 5: ...e tube plug 2 4 Right pillar accessory 1 39 Upper cover of meter 1 5 Dashboard frame 1 40 Meter panel 1 6 Incline frame 1 41 Button board 1 7 Connecting frame 1 42 Lower cover of meter 1 8 Motor stato...

Page 6: ...rotector 1 56 Power wire 1 22 Running belt 1 57 Red connecting line 1 23 Running board 1 58 Sensor wire 1 24 Motor cover 1 59 Reed pipe for safety key 1 25 Side rail 2 60 MP3 module 1 26 Left back cov...

Page 7: ...first Use 2 pcs of Screw M8 60 with 2 pcs of washer 2 pcs of nut to solid the meter tube Don t fasten screw at first Use 2 pcs of Screw M8 20 with 2 pcs of washer to solid the meter Don t fasten screw...

Page 8: ...tion Make sure the other end of the safety key has been nipped to your clothes In this way you can pull the safe key for the machine s sudden stop under the dangerous condition Then you will not be in...

Page 9: ...TION FOR CONSOLE Time 00 00 99 59 Min Speed 1 0 22 0 km h Incline 0 22 Distance 0 00 99 9 km Calorie 0 999 KCAL Heart rate 40 250 Min Program Preset program P1 P99 User defined program U1 U2 U3 FAT FA...

Page 10: ...10...

Page 11: ...HRC F1 F3 F SPEED Display running speed G INCLINE Display running incline H Display program picture I Display runway and number of turns DIST Display running distance BMI Display body fat test data J...

Page 12: ...dow After countdown the machine will run at the speed of 1 0km h You could press INCLINE INCLINE SPEED SPEED to adjust speed and incline Press stop the machine will stop slowly Preset Program There ar...

Page 13: ...T AGE SEG FAT displayed on the window Press INCLINE INCLINE SPEED SPEED to set After setting press MODE to come into FAT At this time put your hand on the heart pulse for 5 8 seconds there will be bod...

Page 14: ...s Extend the duration of exercise each week Do not set unreachable goals In addition to running on the treadmill do other sports activities such as swimming dancing or cycling Always warm up before tr...

Page 15: ...ase the slope only when increasing the exercise load HOW TO EXERCISE It is best to exercise for 15 20 minutes The warm up phase should take about 2 minutes at 4 8 km h then increase the speed to 5 3 a...

Page 16: ...cover b Turn the speed to be around 3km h step on the running belt by pressure and try your best to make the running belt stop If running belt stops together with the front roll but the motor still ru...

Page 17: ...d and the belt affects the performance and lifetime of the product it is recommended to regularly lubricate these parts Damage to the product due to improper maintenance is not subject to warranty con...

Page 18: ...tarting The safe key isn t in the right position Put the safe key in the right position The electrical switch is placed to 0 Turn the electrical switch to 1 2 Display is not working Check the machine...

Page 19: ...wire is not connected right or the motor are broken 13 Displayed E09 on the screen Incline error Changing the upper or lower connection line 14 Displayed E0P on the screen Speed error The incline moto...

Page 20: ...20 PROGRAMS...

Page 21: ...21...

Page 22: ...admill comes with standard safety regulations and is only suitable for home use Any other use is prohibited and may be dangerous to users We are not responsible for any injury caused by improper and f...

Page 23: ...d by Act No 89 2012 Coll Civil Code and Act No 634 1992 Coll Consumer Protection as amended also in cases that are not specified by these Warranty rules The seller is SEVEN SPORT s r o with its regist...

Page 24: ...ulfilled or in the case of reporting the defect by mistake etc the Seller is eligible to require a compensation for all the costs arising from the repair The cost shall be calculated according to the...

Page 25: ...25...

Reviews: