background image


STEP 2 

Now place the tent on the trampoline and decide where will the entrance face. Entrance is marked by 
“D” and has a zipper on the outside and inside. This will be the main entrance. Make sure that there 
are  3  sleeves  that  divide  the  tent  into  4  parts  and  sleeves  are  up  against  the  top  frame  (the  curved 
parts of tent are against the mat) 

Now  slide  the  poles  through  the  sleeves.  Do  not  use  force,  if  the  poles  get  caught  up  in  the  fabric 
release it. Slide all poles.  


STEP 3  

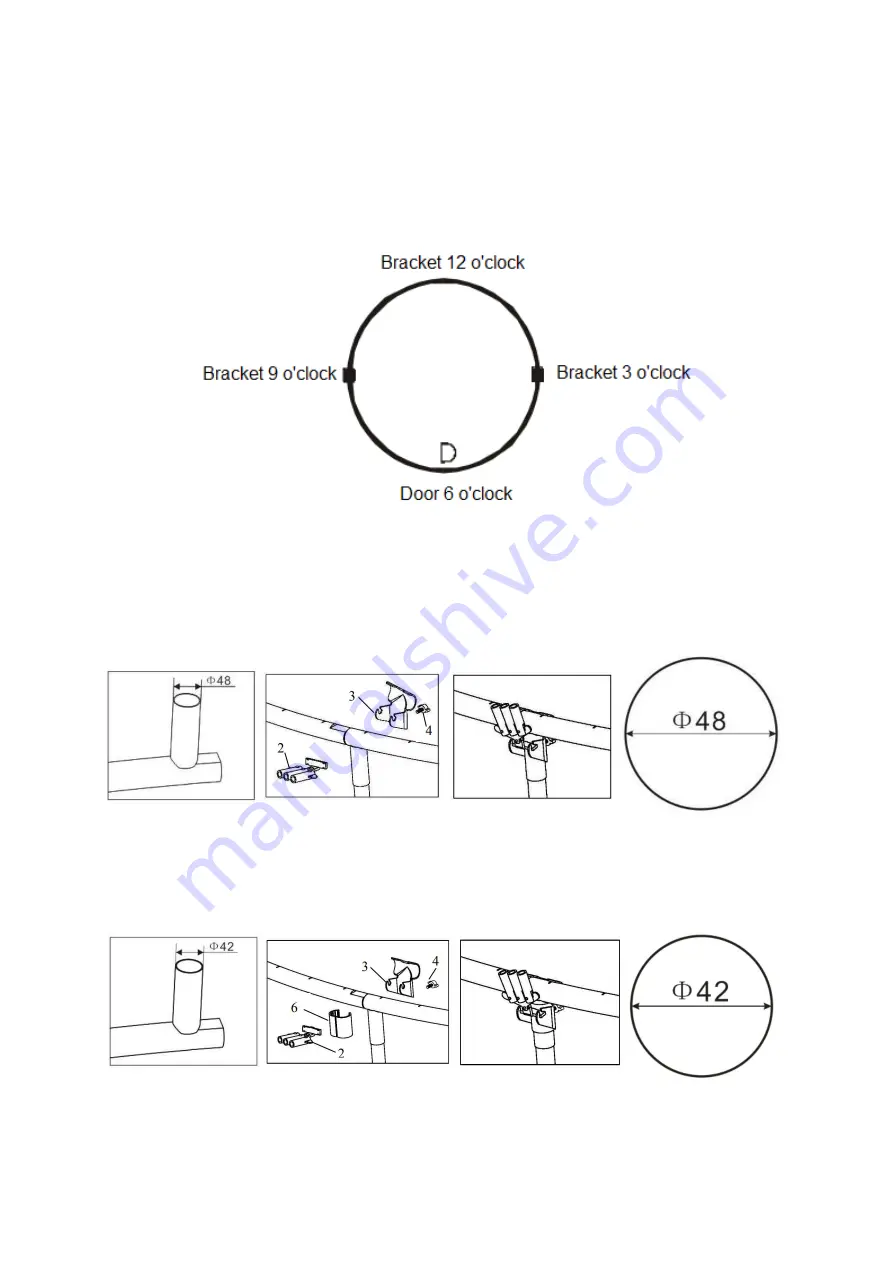
Please check the diameter of trampoline legs 

Φ48, Φ42, Φ38 and refer to correct step.  

Φ48 

Locate  two  opposite  legs  of  the  trampoline.  Place  the  brackets  onto  the  trampoline  frame,  place  the 
curved part onto the frame. Make sure it is placed from inside out and is placed against the trampoline 
leg. Then attach the pole holders to the bracket and connect them with the screw.   


Φ42 

Locate two opposite legs of the trampoline. Place the tubes to thicken the trampoline legs. Place the 
brackets onto the trampoline frame, place the curved part onto the frame. Make sure it is placed from 
inside  out  and  is  placed  against  the  trampoline  leg.  Then  attach  the  pole  holders  to the  bracket  and 
connect them with the screw.   


Summary of Contents for 2043

Page 1: ...USER MANUAL EN IN 2043 2045 Trampoline Tent 224 cm 366 cm...

Page 2: ...2 CONTENTS SAFETY INSTRUCTIONS 3 PARTS LIST 3 ASSEMBLY 4 FOLDING 6 STORAGE 7 ENVIRONMENT PROTECTION 7 TERMS AND CONDITIONS OF WARRANTY WARRANTY CLAIMS 7...

Page 3: ...exposure to the sun and elements especially UV rays will shorten the lifespan of the tent Use trampoline cover Remove the tent when not in use for linger periods of time or during extreme weather con...

Page 4: ...1 Assemble the three fiberglass poles by joining the three sections with connectors on the poles Inside a pole is an elastic cord to keep them together The poles should have the same length Be careful...

Page 5: ...the diameter of trampoline legs 48 42 38 and refer to correct step 48 Locate two opposite legs of the trampoline Place the brackets onto the trampoline frame place the curved part onto the frame Make...

Page 6: ...trampoline leg Then attach the pole holders to the bracket and connect them with the screw STEP 4 Now connect the poles to the brackets After you inserted all poles the tent should cover the whole tr...

Page 7: ...Customer is the legal entity that does not conclude and execute the Contract in order to run or promote his own trade or business activities The Buyer who is not the End Customer is a Businessman that...

Page 8: ...he false Warranty Claim In case the Buyer makes a claim about the Goods that is legally covered by the Warranty provided by the Seller the Seller shall fix the reported defects by means of repair or b...

Reviews: