background image

5

Insignia 32" LED TV

www.insigniaproducts.com

2

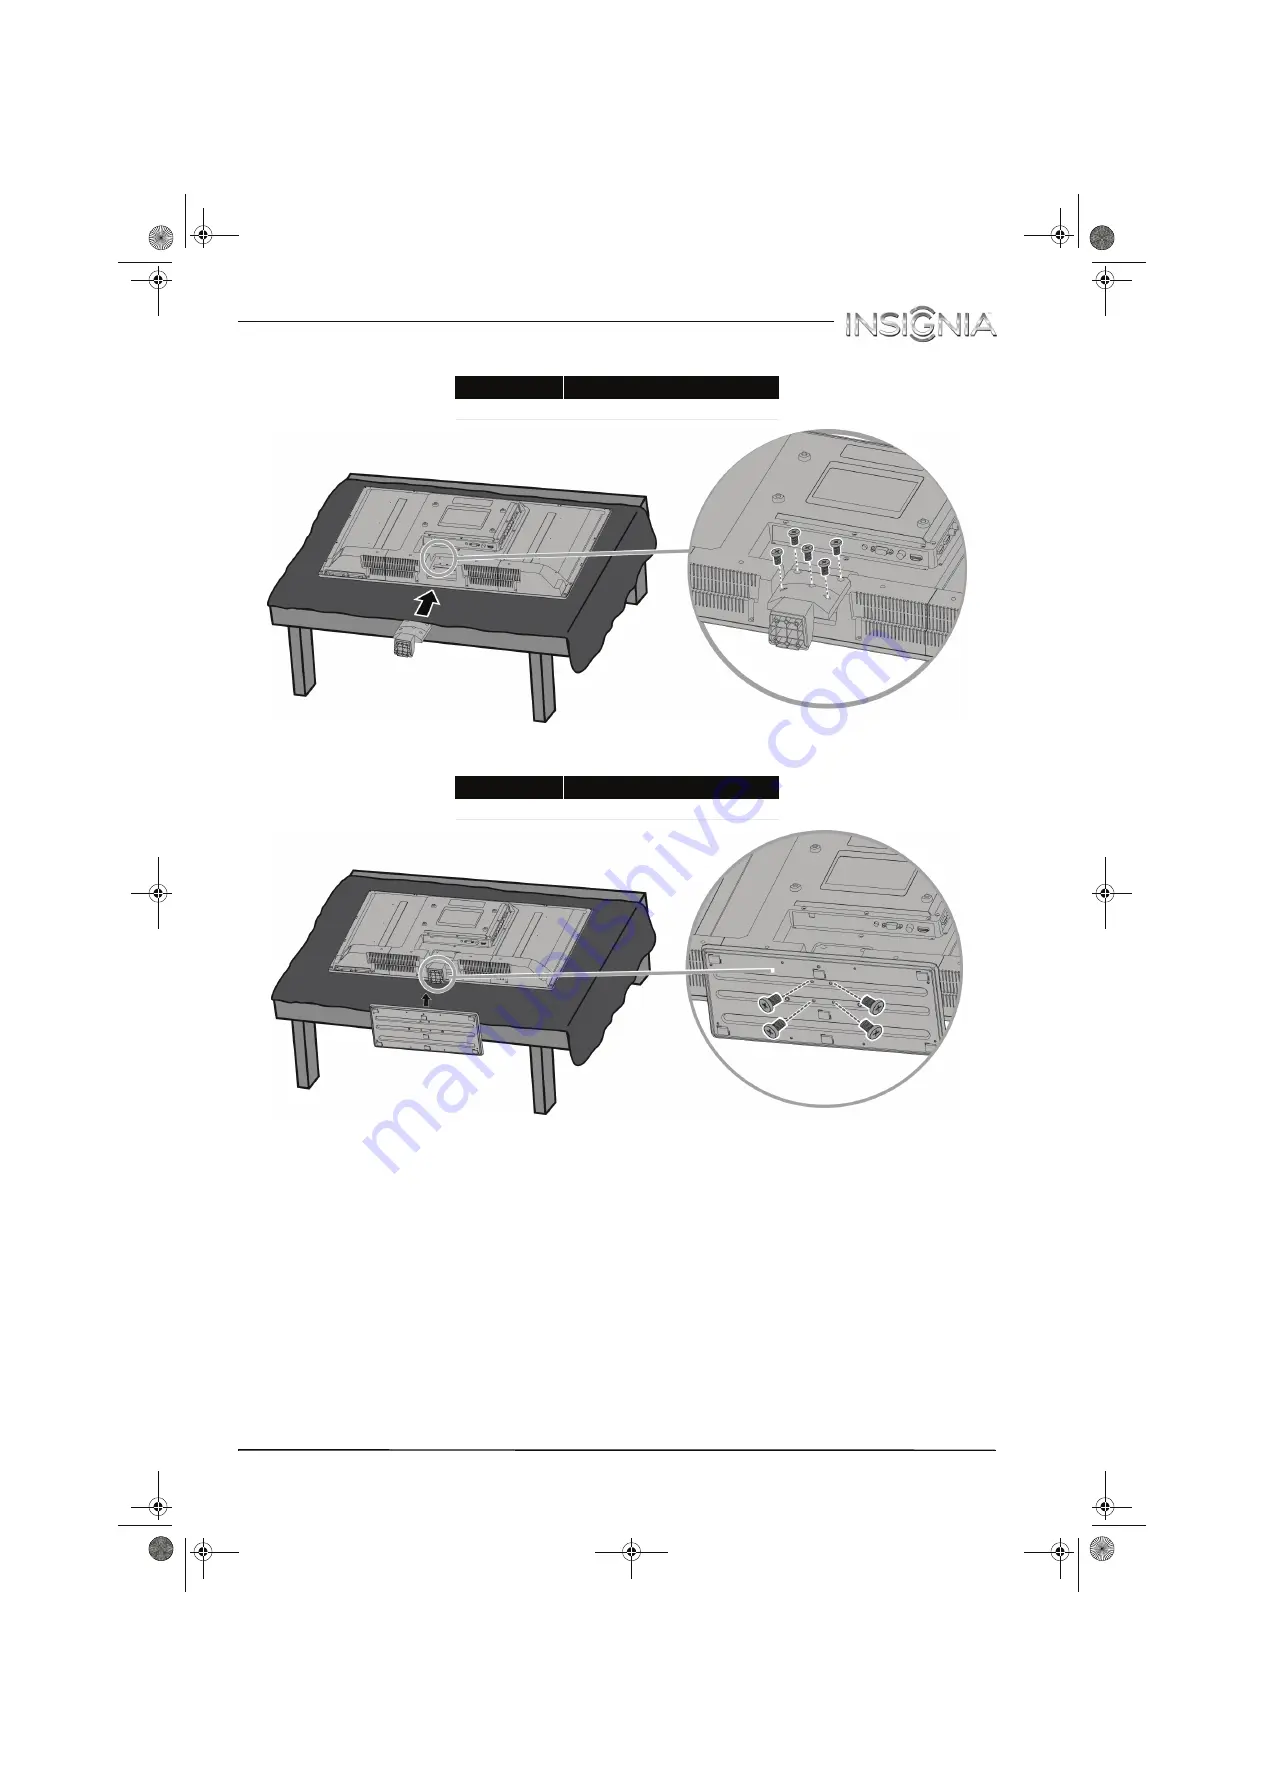
Secure the stand column to your TV with the five provided M4 × 8 mm screws (the short screws).

3

Secure the TV stand to the stand column with the four provided B4 × 18 mm screws (the long screws).

Screw type

Screw length # of screws

M4

8 mm

5

Screw type

Screw length

# of screws

B4

18 mm

4

NS-32D311MX15_14-0207_MAN_V1_ENG.book  Page 5  Friday, March 14, 2014  1:23 PM

Summary of Contents for NS-32D311MX15

Page 1: ...NS 32D311MX15 UserGuide 32 LED TV Before using your new product please read these instructions to prevent any damage NS 32D311MX15_14 0207_MAN_V1_ENG book Page 0 Friday March 14 2014 1 23 PM ...

Page 2: ...llite box 13 HDMI best 13 DVI same as HDMI but requires an audio connection 14 Component video better 15 AV composite video good 16 Coaxial good 17 Connect an antenna or cable TV no box 18 Connect a DVD or Blu ray player 19 HDMI best 19 Component video better 20 AV composite video good 21 Connect an MHL enabled device 22 Connect a game console 23 HDMI best 23 Component video better 24 AV composite...

Page 3: ...ct and use 40 Switch back to a connected device 41 Use INlink 41 Turn INlink on or off 41 Turn Device Auto Power Off on or off 42 Turn TV Auto Power On on or off 42 Turn Audio Receiver on or off 43 Display a list of INlink compatible devices 43 Select an INlink compatible device 44 Open an INlink compatible device s root menu 44 Use a USB flash drive 45 Switch to USB mode 45 Browse photos 45 View ...

Page 4: ...ital closed captioning mode 60 Customize digital closed captioning settings 60 Adjust time settings 61 Set the clock 61 Set the sleep timer 61 Adjust menu settings 62 Select the menu language 62 Label an input source 62 Turn Input Sensor on or off 63 Maintenance 63 Clean the TV cabinet 63 Clean the TV screen 63 Troubleshooting 63 Restore settings to the defaults 63 View system information 64 Updat...

Page 5: ... especially on a larger than life TV Make sure that you place or install the TV where it cannot be pushed pulled over or knocked down Make sure that you route all cords and cables so that they cannot be pulled or grabbed by curious children Wall mounting If you decide to wall mount your TV always remember One size of wall mount does not fit all Use only a wall mount rated for the weight of your TV...

Page 6: ...s filled with liquids such as vases should be placed on the apparatus WARNING Electric shock hazard To reduce the risk of fire or electric shock do not remove any cover or expose the device to rain or moisture No user serviceable parts are inside Refer servicing to qualified service technicians Lightning For added protection for your device receiver during a lightning storm or when it is left unat...

Page 7: ...t size of grounding conductors location of the antenna discharge unit connection to grounding electrodes and requirements for the grounding electrode Note to CATV system installer Article 820 of the National Electrical Code ANSI NFPA No 40 provides guidance for correct grounding Specifically it states that the cable ground must be connected to the grounding system of the building as close to the p...

Page 8: ...mmunicate with each other See page 41 for instructions on how to use INlink DTS Sound DTS Sound delivers clear crisp and natural sound while providing deep enveloping bass Game mode Video games generally require adjustments to the television picture settings to get the maximum experience By simply pressing a button on your remote control your television settings will automatically adjust for video...

Page 9: ...rovided M4 8 mm screws the short screws 3 Secure the TV stand to the stand column with the four provided B4 18 mm screws the long screws Screw type Screw length of screws M4 8 mm 5 Screw type Screw length of screws B4 18 mm 4 NS 32D311MX15_14 0207_MAN_V1_ENG book Page 5 Friday March 14 2014 1 23 PM ...

Page 10: ...t the screen from damages and scratches 2 If the stand is attached remove the five screws that secure the stand column to the TV then remove the stand column Warning This TV is intended to be supported by a UL Listed wall mount bracket with suitable weight load See Miscellaneous on page 72 NS 32D311MX15_14 0207_MAN_V1_ENG book Page 6 Friday March 14 2014 1 23 PM ...

Page 11: ...et for information about how to correctly hang your TV Notes The length of the wall mount screws vary depending on the wall mount bracket you purchased See the instructions that came with the wall mount bracket for screw lengths The mounting holes on the back of your TV take type M6 screws 7 87 in 200 mm 3 94 in 100 mm NS 32D311MX15_14 0207_MAN_V1_ENG book Page 7 Friday March 14 2014 1 23 PM ...

Page 12: ...o open the on screen menu For more information see Navigate the menus on page 39 3 INPUT Press one or more times to select the video input source you want then wait a few seconds Your TV switches to the source you selected For more information see Select the video input source on page 38 In menu mode press to confirm selections 4 VOL VOL Press to increase or decrease the volume 5 CHS CHT Press to ...

Page 13: ...R VIDEO Y The component video and AV composite video jacks are shared You can connect only one component video or AV device at a time Connect the video for a component video device to the VIDEO Y PB and PR jacks For more information see Component video better on page 15 20 or 24 OR Connect the video for an AV composite video device to the VIDEO Y jack For more information see AV composite video go...

Page 14: ...he audio for a DVI device to this jack For more information see DVI same as HDMI but requires an audio connection on pages 14 or 27 3 VGA Connect the video for a computer to this jack For more information see VGA good on page 28 4 ANT CABLE Connect an antenna or cable TV to this jack For more information see Coaxial good on page 17 or Connect an antenna or cable TV no box on page 18 NS 32D311MX15_...

Page 15: ...ss ENTER See Selectthe videoinput source on page 38 13 return Press to return to the previous channel 14 S T W X TV menus Press to navigate in on screen TV menus and toadjust settings 15 home Press toopen a connected MHLdevice s homemenu 16 INFO Press todisplay TV status information such as the channel number channel name ifavailable or signal source See View channel information on page40 17 CCD P...

Page 16: ...posite or coaxial Component video requires an audio connection Better than coaxial AV composite video requires an audio connection Good Coaxial video audio Connection type and jack Cable connectors Optical digital audio output Analog audio input 3 5mm analog audio output VGA computer video and 3 5mm audio Cautions Check the jacks for position and type before making any connections Loose connection...

Page 17: ...the cable in jack on the cable or satellite box 3 Connect an HDMI cable not provided to one of the HDMI jacks on the side of your TV and to the HDMI OUT jack on the cable or satellite box 4 Plug your TV s AC power adapter into a power outlet turn on your TV then turn on the cable or satellite box 5 Press INPUT to open the INPUT SOURCE list 6 Press S or T to highlight HDMI 1 or HDMI 2 then press EN...

Page 18: ...I AUDIO IN jack on the back of your TV and to the AUDIO OUT jacks on the cable or satellite box 6 Plug your TV s AC power adapter into a power outlet turn on your TV then turn on the cable or satellite box 7 Press INPUT to open the INPUT SOURCE list 8 Press S or T to highlight HDMI 2 then press ENTER Note You must use the HDMI 2 ARC DVI jack to connect a cable or satellite box using DVI If you use...

Page 19: ... box 5 Plug your TV s AC power adapter into a power outlet turn on your TV then turn on the cable or satellite box 6 Press INPUT to open the INPUT SOURCE list 7 Press S or T to highlight Component AV then press ENTER Note Cables are often color coded to match color coded jacks Notes The VIDEO Y PB and PR video jacks used to connect a component device share the AUDIO L and R jacks with the Y VIDEO ...

Page 20: ...le or satellite box 5 Press INPUT to open the INPUT SOURCE list 6 Press S or T to highlight Component AV then press ENTER Notes Cables are often color coded to match color coded jacks The yellow video connector on the AV cable connects to the green VIDEO Y jack Notes The VIDEO Y PB and PR video jacks used to connect a component device share the AUDIO L and R jacks with the VIDEO Y jack used to con...

Page 21: ... AC power adapter into a power outlet turn on your TV then turn on the cable or satellite box 5 Press INPUT to open the INPUT SOURCE list 6 Press S or T to highlight TV then press ENTER 7 If you cannot tune to channels you know exist scan for channels See Automatically scan for channels on page 51 Notes Use a coaxial cable to eliminate interference and noise from radio waves Do not bundle the coax...

Page 22: ...the AC power adapter or other cables If the antenna is not installed correctly contact qualified service personnel to correct the problem If the signal level for a channel is weak the picture may be distorted Adjust the antenna or use a highly directional outdoor or set top antenna with a built in amplifier If the picture quality is good on some channels and poor on others the problem may be cause...

Page 23: ... Connect an HDMI cable not provided to one of the HDMI jacks on the side of your TV and to the HDMI OUT jack on the DVD or Blu ray player 3 Plug your TV s AC power adapter into a power outlet then turn on your TV and DVD or Blu ray player 4 Press INPUT to open the INPUT SOURCE list 5 Press S or T to highlight HDMI 1 or HDMI 2 then press ENTER Note An HDMI cable carries both audio and video You do ...

Page 24: ... into a power outlet then turn on your TV and DVD or Blu ray player 5 Press INPUT to open the INPUT SOURCE list 6 Press S or T to select Component AV then press ENTER Note Cables are often color coded to match color coded jacks Notes The VIDEO Y PB and PR video jacks used to connect a component device share the AUDIO L and R jacks with the VIDEO Y jack used to connect an AV composite video device ...

Page 25: ...yer 5 Press INPUT to open the INPUT SOURCE list 6 Press S or T to select Component AV then press ENTER Notes Cables are often color coded to match color coded jacks The yellow video connector on the AV cable connects to the green VIDEO Y jack Notes The VIDEO Y PB and PR video jacks used to connect a component device share the AUDIO L and R jacks with the VIDEO Y jack used to connect an AV composit...

Page 26: ... is turned on press ENTER when a message appears Your MHL enabled device s menu opens OR If your TV is turned off turn on your TV Press home Your MHL enabled device s menu opens Note You must use the purple HDMI1 MHL jack to connect an MHL enabled device Notes You can also switch to MHL mode by Pressing INPUT and selecting HDMI1 MHL ACC Pressing MENU and selecting MHL ACC For instructions on using...

Page 27: ...adapter into a power outlet then turn on your TV 4 Turn on the game console then set it to the correct output mode For more information see the documentation that came with the console 5 Press INPUT to open the INPUT SOURCE list 6 Press S or T to highlight HDMI 1 or HDMI 2 then press ENTER Note An HDMI cable carries both audio and video You do not need to use any audio cables HDMI cable connector ...

Page 28: ...PUT to open the INPUT SOURCE list 6 Press S or T to select Component AV then press ENTER Note Cables are often color coded to match color coded jacks Note Your game console may require a special component video cable See the documentation that came with your game console or check the manufacturer s website The VIDEO Y PB and PR video jacks used to connect a component device share the AUDIO L and R...

Page 29: ...elect Component AV then press ENTER Notes Cables are often color coded to match color coded jacks The yellow video connector on the AV cable connects to the green VIDEO Y jack Note Most game consoles come with a special AV composite video cable See the documentation that came with your game console or check the manufacturer s Web site The VIDEO Y PB and PR video jacks used to connect a component d...

Page 30: ...e of your TV and to the HDMI OUT jack on the computer 3 Plug your TV s AC power adapter into a power outlet then turn on your TV and the computer 4 Press INPUT to open the INPUT SOURCE list 5 Press S or T to highlight HDMI 1 or HDMI 2 then press ENTER 6 Adjust the display properties on the computer if necessary HDMI cable Side of TV HDMI cable connector HDMI jack On your TV NS 32D311MX15_14 0207_M...

Page 31: ...ack on the computer 5 Plug your TV s AC power adapter into a power outlet then turn on your TV and the computer 6 Press INPUT to open the INPUT SOURCE list 7 Press S or T to select HDMI 2 then press ENTER 8 Adjust the display properties on the computer if necessary Note You must use the HDMI2 ARC DVI jack to connect a computer using DVI If you use another HDMI jack you will not hear sound from the...

Page 32: ...AUDIO IN jack on the back of your TV and to the AUDIO OUT headphone jack on the computer 4 Plug your TV s AC power adapter into a power outlet then turn on your TV and the computer 5 Press INPUT to open the INPUT SOURCE list 6 Press S or T to select VGA then press ENTER 7 If necessary adjust the display properties on the computer Audio cable VGA cable Back of TV VGA cable connector Audio cable con...

Page 33: ...t to switch back to the drive press INPUT to open the INPUT SOURCE list press S or T to select USB Photos then press ENTER The PHOTOS menu opens Caution Do not remove the USB flash drive or turn off the TV while using the USB flash drive You may lose data or damage the USB flash drive Note The Photos viewer only supports JPEG format images with jpg file extensions and not all JPEG files are compat...

Page 34: ...e Select the audio out mode on page 51 Warning Loud noise can damage your hearing When using headphones use the lowest volume setting on your headphones that still lets you hear the sound Notes If you connect headphones when your TV is turned off then you turn on your TV the TV speakers are muted and the audio plays through the headphones You can also connect a home theater system sound bar or ext...

Page 35: ... speaker system or sound bar 3 Plug your TV s AC power adapter into a power outlet then turn on your TV 4 Turn on the digital speaker system or sound bar then set it to the correct source For more information see the documentation that came with the digital speaker system or sound bar 5 On your TV set the Digital Audio SPDIF option on the AUDIO menu to PCM See the Digital Audio SPDIF option in Adj...

Page 36: ...nd bar 3 Plug your TV s AC power adapter into a power outlet then turn on your TV 4 Turn on the analog speaker system or sound bar then set it to the correct source For more information see the documentation that came with the analog speaker system or sound bar 5 On your TV set the Headphones Audio Out option on the AUDIO menu to Headphones Audio Out Variable or Audio Out Fixed See the Headphones ...

Page 37: ...r devices for connection information Just remember to use the best connection types available for the best picture and sound For information about connection types see What connection should I use on page 12 DVD or Blu ray player Cable or satellite box AV receiver Game console USB flash drive Computer Antenna or cable TV connected directly to the wall jack NS 32D311MX15_14 0207_MAN_V1_ENG book Pag...

Page 38: ...your TV 2 Connect the other end of the cord to a power outlet Cautions Your TV should only be operated from the power source indicated on the label Always unplug the AC power adapter from the power outlet when you will not be using your TV for an extended period of time NS 32D311MX15_14 0207_MAN_V1_ENG book Page 34 Friday March 14 2014 1 23 PM ...

Page 39: ...sor on the front of your TV For the location of the remote sensor see Front on page 8 Cautions Batteries should not be exposed to excessive heat such as sunshine heat registers or fire Battery chemicals can cause a rash If the batteries leak clean the battery compartment with a cloth If chemicals touch your skin wash immediately Make sure that batteries are disposed of correctly Do not burn or inc...

Page 40: ...ic or Newfoundland then press ENTER MENU or W 8 Press S or T to highlight Daylight Saving then press X to access the setting 9 Press S or T to select On if your viewing area observes Daylight Saving Time or Off if your viewing area does not observe Daylight Saving Time then press ENTER MENU or W 10 If you selected Manual for Mode Press S or T to highlight Year Month or Day then press X to access t...

Page 41: ...cted the cable box to your TV Select HDMI Component or AV then press ENTER if you connected a cable box to your TV using one of these cables Read the message then press ENTER to close the wizard Select Coaxial then press ENTER if you connected a cable box to your TV using a coaxial cable Read the message then press ENTER to start the channel scan VHF channels only Note You can press EXIT to stop t...

Page 42: ...ble select Component AV Understand the basics Turn your TV on or off 1 Make sure that the AC power adapter is connected to a power outlet 2 Press power to turn on your TV The power indicator turns off 3 Press power again to turn off your TV Your TV enters standby mode and the power indicator turns red Select the video input source 1 Turn on your TV 2 If you want to use a device connected to a vide...

Page 43: ...electable are grayed out The screens shown in this manual are for explanation purposes and may vary from the actual screens on your TV Press MENU to open the on screen menu Press the right orleft arrow to move the cursor on the screen or to adjust a selected item Press the up or downarrow to select menu options Press ENTER to confirm a selection or enter a sub menu Press MENU to return to the prev...

Page 44: ...e and resolution Digital channel information Displays the channel number station name channel label broadcast program name TV rating signal type audio information resolution current time signal strength day of the week date and current program start and end times if provided by the broadcaster Analog channel information Displays channel number channel label if present signal type audio information...

Page 45: ...T or ENTER The SETTINGS menu opens 3 Press S or T to highlight INlink then press ENTER The SETTINGS INlink menu opens 4 Press S or T to highlight INlink Control then press ENTER 5 Press S or T to highlight On or Off then press ENTER 6 Press MENU to return to the previous menu or press EXIT to close the menu Note Your device s menu will vary depending on the device and the Apps you have loaded on t...

Page 46: ...your TV then press ENTER 6 Press MENU to return to the previous menu or press EXIT to close the menu Turn TV Auto Power On on or off TV Auto Power On automatically turns on your TV when an HDMI CEC device is turned on if the device has this feature 1 Press MENU The on screen menu opens 2 Press W or X to highlight SETTINGS then press T or ENTER The SETTINGS menu opens 3 Press S or T to highlight IN...

Page 47: ...onnected audio receiver s volume or Off your TV s remote control does not control the connected audio receiver s volume then press ENTER 6 Press MENU to return to the previous menu or press EXIT to close the menu Display a list of INlink compatible devices You can display a list of HDMI CEC devices that are connected to your TV 1 Press MENU The on screen menu opens 2 Press W or X to highlight SETT...

Page 48: ...e previous menu or press EXIT to close the menu Open an INlink compatible device s root menu You can open an INlink compatible device s root menu then use your TV s remote control to control the device if the device has this feature 1 Press INPUT press S or T to highlight the INlink compatible device you want then press ENTER 2 Press MENU The on screen menu opens 3 Press W or X to highlight SETTIN...

Page 49: ...U to open the PHOTOS menu FAVORITE to add or remove a photo from the favorite photo list A heart appears on a photo that has been added to the favorite photo list Press EXIT to close the control bar When a photo is displayed full screen a control bar appears at the bottom of the photo The file name picture resolution size and date are displayed on the bottom of the control bar If you do not press ...

Page 50: ...S menu opens 2 If the photos you want to view are in a folder on the USB flash drive select the folder For information about selecting a folder see Browse photos on page 45 or View favorite photos on page 46 3 Press MENU The PHOTOS menu opens again 4 Press S or T to highlight View Slideshow then press ENTER A slideshow starts with the first photo in the current folder 5 To control the slideshow No...

Page 51: ... MENU The on screen menu opens with the PICTURE menu displayed 2 Press T or ENTER to access the menu 3 Press S or T to highlight an option then press ENTER to access the option You can select Picture Mode Selects the picture mode You can select Vivid a bright and vivid picture Significantly increases the contrast brightness and sharpness This selection is good for video games animation and in brig...

Page 52: ...Resets all picture settings to factory mode 4 Press W or X to adjust the option or press S or T to select a setting 5 Press MENU to return to the previous menu or press EXIT to close the menu Automatically adjust the aspect ratio Auto Aspect Ratio automatically changes how the picture looks on the screen aspect ratio based on the TV program you are viewing 1 Press MENU The on screen menu opens 2 P...

Page 53: ...e that your TV is in VGA mode For more information see Select the video input source on page 38 2 Press MENU The on screen menu opens 3 Press W or X to highlight SETTINGS then press ENTER The SETTINGS menu opens 4 Press S or T to highlight Computer Settings then press ENTER The SETTINGS COMPUTER SETTINGS menu opens 5 Press S or T to highlight an option then press ENTER to access the option You can...

Page 54: ...only through the device connected to the AUDIO OUT jack If you disconnect the device the TV speakers remain turned off Digital Audio SPDIF Sends digital audio to an external audio system You can select RAW to pass through the original digital audio sound PCM to output audio in 2 channel stereo Digital Audio Delay Fine tunes the audio when it is not in sync with the video MTS SAP Analog channels on...

Page 55: ...ANNELS then press T or ENTER The CHANNELS menu opens 3 Press S or T to highlight Audio Only then press ENTER 4 Press S or T to select On 5 Press MENU to return to the previous menu or press EXIT to close the menu Change channel settings Automatically scan for channels When you scan for channels your TV searches for channels with signals and stores the channel information in the channel list When y...

Page 56: ...start the channel scan VHF channels only C If you select Satellite Service a message asks how you connected the satellite box to your TV Select HDMI Component or AV then press ENTER if you connected a satellite box to your TV using one of these cables Read the message then press ENTER to close the wizard Select Coaxial then press ENTER if you connected a satellite box to your TV using a coaxial ca...

Page 57: ...rite channel list 1 Press MENU The on screen menu opens 2 Press W or X to highlight CHANNELS then press T or ENTER The CHANNELS menu opens 3 Press S or T to highlight Favorites then press ENTER The CHANNELS FAVORITES screen opens 4 Press S T W or X to highlight the channel you want to add to the favorites list then press ENTER A check mark appears next to the channel 5 Press MENU to return to the ...

Page 58: ...You can check the digital signal strength to determine if you need to adjust your antenna or digital cable input The higher the signal strength the less likely you are to experience picture degradation 1 Press MENU The on screen menu opens 2 Press W or X to highlight CHANNELS then press T or ENTER The CHANNELS menu opens 3 Press S or T to highlight Channel Strength then press ENTER The Channel Str...

Page 59: ...r press EXIT to close the menu Lock control buttons When the button lock is turned On the buttons on the side of your TV are locked and you can only operate your TV using the remote control 1 Press MENU The on screen menu opens 2 Press W or X to highlight SETTINGS then press T or ENTER The SETTINGS menu opens 3 Press S or T to highlight Parental Controls then press ENTER The Enter password screen ...

Page 60: ...ol levels You can set parental controls for the U S and Canada U S rating levels Some of the age based TV Parental Guidelines ratings also have content based ratings Canadian rating levels U S TV ratings NONE Not rated TV Y All children TV Y7 Suitable for children7 and older TV G General audiences TV PG Parental guidance suggested TV 14 Parental guidance strongly suggested TV MA Mature audiences o...

Page 61: ... Press W or X to highlight Movie Ratings or TV Ratings for USA ratings Canadian English or Canadian French for Canadian ratings 7 Press S or T to select the rating If a rating has sub ratings press W or X to highlight a sub rating 8 Press ENTER to confirm A lock symbol appears when a rating is blocked 9 Press MENU to return to the previous menu or press EXIT to close the menu Canadian French ratin...

Page 62: ... T to highlight RRT5 then press ENTER The SETTINGS PARENTAL CONTROLS RRT5 screen opens The screen that opens may vary depending on the broadcaster 6 Press S T W or X to select the program and content types you want to block then press ENTER The SETTINGS PARENTAL CONTROLS menu opens 7 To reset the RRT5 information to the factory default press S or T to highlight Reset RRT5 8 Press ENTER A box opens...

Page 63: ...ersion of the TV program audio in a small banner The other CC modes display information provided by the broadcaster The Text modes display information in a box that covers half of the screen 1 Press MENU The on screen menu opens 2 Press W or X to highlight SETTINGS then press T or ENTER The SETTINGS menu opens 3 Press S or T to highlight Closed Caption then press ENTER The SETTINGS CLOSED CAPTION ...

Page 64: ...e digital closed captioning settings on page 60 CC1 through CC4 Closed captioning appears in a small banner across the bottom of the screen CC1 is usually the printed version of the audio CC2 through CC4 display content provided by the broadcaster 6 Press MENU to return to the previous menu or press EXIT to close the menu Customize digital closed captioning settings 1 Press MENU The on screen menu...

Page 65: ...ress S or T to select your time zone then press ENTER You can select Eastern Central Mountain Pacific Alaska Hawaii Atlantic or Newfoundland 10 If your viewing area observes Daylight Saving Time press S or T to highlight Daylight Saving then press ENTER 11 Press S or T to select On or Off then press ENTER to close the menu 12 If you selected Manual for Mode Press S or T to highlight Year Month or ...

Page 66: ...rançais or Español 5 Press MENU to return to the previous menu or press EXIT to close the menu Label an input source You can add a label to an input source to make it easier to identify 1 Press MENU The on screen menu opens 2 Press W or X to highlight SETTINGS then press T or ENTER The SETTINGS menu opens 3 Press S or T to highlight Input Labels then press ENTER The SETTINGS INPUT LABELS screen op...

Page 67: ...Clean the cabinet with a soft lint free cloth If the cabinet is especially dirty moisten a soft lint free cloth in a weak detergent solution squeeze the excess moisture from the cloth then wipe the cabinet with the cloth Use a clean cloth to dry the cabinet Clean the TV screen Clean the screen with a soft lint free cloth Troubleshooting Restore settings to the defaults When you restore default set...

Page 68: ...h drive into the USB port on the side of your TV 4 Press MENU The on screen menu opens 5 Press W or X to highlight SETTINGS then press T or ENTER The SETTINGS menu opens 6 Press S or T to highlight System Info then press ENTER The SETTINGS UPDATE FIRMWARE menu opens 7 Press S or T to highlight Update Firmware then press ENTER A message asks if you want to update the TV firmware 8 Highlight Yes the...

Page 69: ...ning mode on page 59 or Select the digital closed captioning mode on page 60 Dark poor or no picture screen is lit but sound is good Try another channel The station may be experiencing problems Make sure that the antenna or cable TV is connected correctly and securely See Connect a cable or satellite box on page 13 or Connect an antenna or cable TV no box on page 18 Adjust the brightness See Adjus...

Page 70: ...stripes appear on the screen Make sure that the antenna or cable TV is connected correctly and securely See Connect a cable or satellite box on page 13 or Connect an antenna or cable TV no box on page 18 If you are using an antenna the digital channel signal may be low To check the digital channel signal strength see Check the digital signal strength on page 54 If you are using an antenna and the ...

Page 71: ...t a time to determine which device is causing interference After you have determined which device is causing interference move it further from the TV to eliminate the interference Problem Solution No output from one of the speakers Adjust the audio balance See Adjust sound settings on page 50 Make sure that the audio cables are connected correctly and securely to your TV After images appear Do not...

Page 72: ...s are not blocked See Set parental control levels on page 56 Make sure that the channels are not hidden The channel may have been deleted from the channel list You can tune to the channel by pressing the number buttons or you can add the channel back to the channel list See Hide channels on page 53 If you are using a cable or satellite box use the remote that came with that box to change channels ...

Page 73: ...cult to identify It may look like a micro USB to HDMI cable because the cable connectors are the same but the cable itself is thinner The cable also may not be labeled MHL Try adjusting the picture settings on your TV Some Apps may not work on your TV depending on how the App developer programmed the App My TV is displaying the video from the connected device but is not playing the audio Make sure...

Page 74: ...atible with your TV My TV s remote control does not control the device Make sure that there are no obstructions between the remote control and the remote control sensors on your TV and the device Depending on the device all the buttons may not work Make sure that the INlink feature is turned on See Turn INlink on or off on page 41 If you are trying to control the volume on an HDMI CEC audio receiv...

Page 75: ...select Root Menu on the INlink menu The device may not support this feature See the documentation that came with the device for more information Note If the problem is not solved by using these troubleshooting instructions turn off your TV then turn it on again Without stand 29 1 3 2 17 4 in 73 9 8 1 44 3cm 13 lbs 5 9 kg With stand 29 1 6 3 19 4 in 73 9 16 49 3 cm 14 5 lbs 6 6 kg Problem Solution ...

Page 76: ...20V AC 60Hz 5A OSD languages English French Spanish INlink Yes MHL enabled Yes HDMI1 MHLjack Game Mode Yes ENERGY STAR qualified Yes Internet connectable No TVbase screws Standcolumn to TV M4type 8 mm length 5 pcs TV stand to stand column B4type 18mm length 4pcs V Chip version 2 0 Yes Sleep timer Yes Channel labeling Yes VESA mount mm horizontal vertical 200 100 VESA mount screws M6 type Note The ...

Page 77: ...itions 1 this device may not cause interference and 2 this device must accept any interference including interference that may cause undesired operation of the device This equipment complies with IC radiation exposure limits set forth for an uncontrolled environment Dolby License Notice and Trademark Acknowledgement Manufactured under license from Dolby Laboratories Dolby and the double D symbol a...

Page 78: ... warranty covering the repairs of a specific defect as well as all related parts used for it will be in force for the rest of the Product warranty period or for a period of 90 ninety days starting on the date of repair of the Product or the installation of replacement parts whichever is greater During the warranty period to repair the defective Product the Customer may take it to the Best Buy stor...

Page 79: ...___ Name _____________________________________________________ Serial number _____________________________________________________ Address _____________________________________________________ Store No that made the sale _____________________________________________________ Colony _____________________________________________________ Date of purchase and receipt To include at the time of sale City...

Page 80: ...some countries DistributedbyBest Buy ImportsS De R l De C V Avenida Santa FeNo 440 Piso 2 Ofna 202Y 203 P3Y P4 Colonia Santa Fe Cuajimalpa C p 05348 Delegación Cuajimalpa De Morelos Mexico DistritoFederal 2014 Best Buy All rights reserved Made in China V2 ENGLISH 14 0207 NS 32D311MX15_14 0207_MAN_V1_ENG book Page 1 Friday March 14 2014 1 23 PM ...

Reviews: