32
Connection
The treadmill must be plugged into an
earthed socket.
If there is an error or failure in the treadmill’s
circuitry, an earthed connection reduces the
risk of electric shock.
The treadmill is equipped with an earthed
plug. The plug must be plugged into a legally
installed earthed socket.
The plug must not be modi� ed in any way. If
it does not � t into the socket, have the socket
replaced by a quali� ed electrician.
The plug must not be connected using an
adapter.
DANGER! If the treadmill is connected to an
non-earthed socket there is a risk of electric
shock!
Consult a quali� ed electrician if you are
uncertain whether the treadmill is installed
correctly.
Functional check before use
Before the treadmill is connected to the
power, you must check that the belt can
move unhindered and without noise on the
rollers.
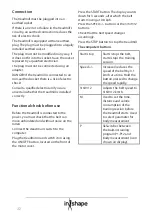
Connect the dead man’s switch to the
computer.
Plug the treadmill in and switch it on using
the ON/OFF button, located on the front of
the motor cover.
Press the START button. The display counts
down for 3 seconds, after which the belt
starts moving at 0.8 kph.
Press the SPEED +/- buttons or the 3/6/9/12
buttons.
Check that the belt speed changes
accordingly.
Press the STOP button to stop the treadmill.
The computer’s buttons
Start/stop
Starts/stops the belt,
starts/stops the training
session.
Speed +/-
Increases/reduces the
speed of the belt by 0.1
km/h at a time. Hold the
button pressed to change
the speed rapidly.
3/6/9/12
Adjusts the belt speed to
3/6/9/12 km/h.
M
Used to set the time,
distance and calorie
consumption of the
training session before
the treadmill starts. Used
to select parameter for
body measurement
P
SkSwitches between
the built-in training
program P1-P12 and
body measurement (icon
shown on display).


