background image

NOTE: DIAGRAMS & ILLUSTRATIONS NOT TO SCALE.

4

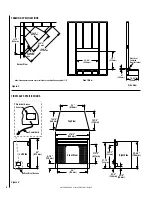
FRAMING SPECIFICATIONS

37-5/8"

(954 mm)

24 "

(610 mm)

14-7/8"

(378 mm)

5-1/8 "

(130 mm)

36 "

(914 mm)

2-1/4 "

(55 mm)

29-3/4 "

(754 mm)

32 "

(812 mm)

Front View

Top View

Right Side

Left Side

Electrical Access

13-3/4"

(350 mm)

5-1/4 "

(134 mm)

24-1/2"

(

622 mm

)

 27-1/2 "

(

700 mm

)

21-1/8 "

(537 mm)

Electrical Access

Cover

Power Cord

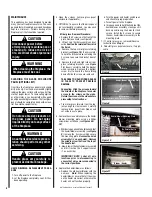
FIREPLACE SPECIFICATIONS

Front View

Side View

37-1/2 "

(945 mm)

26-1/2 "

38-5/8 "

(668 mm)

(981 mm)

52-3/4 "

(1339 mm)

32 "

(812 mm)

4 "

(102 mm)

15-1/8 "

(384 mm)

Corner View

Electrical

(left side)

Junction

box

Electrical

Junction

box

38-3/4 "

(984 mm)

Figure 2

Figure 3

Note: Framing dimensions are calculated for a nailing flange depth of 1/2"

Summary of Contents for Capella 36

Page 1: ...IGNMENT INSTALL THIS FIREPLACE IN A SqUAREANDPLUMbCONDITION USINGSHIMSASNECESSARy AT SIDES THIS APPLIANCE IS MOUNTED ON RUbbER FEET TO ENSURE ADEqUATE AIR CIRCULATION bENEATH FIREPLACE DO NOT bLOCK AIRFLOW AT THE bOTTOM AIR INTAKES INSTALLER DO NOT DISCARD THIS MANUAL PLEASE LEAVE FOR THE HOMEOWNER FOR yOUR SAFETy DO NOT STORE OR USE GASOLINE OR OTHER FLAMMAbLE VAPORS AND LIqUIDS IN THE VICINITy O...

Page 2: ...THIS APPLIANCE OUT DOORS DO NOT EXPOSE FIREPLACE TO THE ELEMENTS SUCH AS RAIN ETC THIS APPLIANCE IS NOT INTENDED FOR USE IN BATHROOMS LAUNDRY AREAS OR SIMILAR INDOOR LOCA TIONS NEVER LOCATE THIS APPLI ANCE WHERE IT COULD FALL INTO A BATHTUB OR OTHER WATER CON TAINER DO NOT RUN ELECTRICAL WIRING OR POWER CORD UNDER CARPETING OR COVER WITH THROW RUGS RUNNERS OR SIMILAR MATERIALS FOR 120 VAC POWER CO...

Page 3: ...power consumption rating See Table 1 240 Volt 60 Hz 3000 Watt ref Page 10 Use three conductor non metallic sheath cable with ground wire total four wires for the incoming power supply The wire used must conform to local and national electrical codes for the specified power consumption rating See Table 1 Wall Switch or Wall Thermostat Kits optional kits see Page 17 Low voltage wire is provided for ...

Page 4: ...cess 13 3 4 350 mm 5 1 4 134 mm 24 1 2 622 mm 27 1 2 700 mm 21 1 8 537 mm Electrical Access Cover Power Cord FIREPLACE SPECIFICATIONS Front View Side View 37 1 2 945 mm 26 1 2 38 5 8 668 mm 981 mm 52 3 4 1339 mm 32 812 mm 4 102 mm 15 1 8 384 mm Corner View Electrical left side Junction box Electrical Junction box 38 3 4 984 mm Figure 2 Figure 3 Note Framing dimensions are calculated for a nailing ...

Page 5: ...her applicable regulations to reduce the risk of fire electrical shock and injury to individuals IMPORTANT Any electrical re wiring of this appliance must be done by a qualified electrician WARNING Do not use this fireplace if any part of it has been underwater Immediately call a qualified servicetechniciantoinspectthe fireplace and replace any part of the electrical system which has been under wa...

Page 6: ...down covering the outlet or glass enclosure panel optional kit There are a wide variety of finished looks for these fireplaces from formal wall decor with elaborate mantels to rustic wood paneling or warm brick facings Accent Trim Installations An optional accent trim kit is available from your dealer see Page 17 These options give the appliance an attractive finished look Hearth An aesthetically ...

Page 7: ... to activate the lights Note If the flame does not come on imme diately adjust brightness and intensity buttons E K 4 Toincreasethebrightness pressandrelease the light brighten button see E Each time you press this button you will hear a beep andthebrightnesswillincreaseslightlyuntil the maximum brightness is achieved To decrease the brightness press and release the light dimming button see D Each...

Page 8: ...ass panel Do not spray liquids directly onto any surface of the fireplace 3 Open the screens remove glass panel enclosure if applicable 4 OPTIONAL To ensure that the brick panel isn t accidentally scratched you may wish to remove it before proceeding Mirror glass Removal Procedure a Remove the 2 screws on the front of the grate Remove Grate see Figure 8 b Lift out Log Ember assembly and set aside ...

Page 9: ...sfireplacethroughaswitchwiredinthe120VACor 240VACcircuits Theonlyapproved wiring for a switch is through the low voltage circuit 24 VAC as shown on Page 13 HOME POWER SUPPLy 120 VAC FIREPLACE WIRE HARNESS See Power Supply Specifications on Page 3 N L1 GROUND yELLOW AND GREEN ORANGE bLACK bLUE bLUE WHITE N L1 N1 N2 L2 120 V 1600 W 120 V AC GROUND G IF THE APPLIANCE IS TO bE HARD WIRED IN THE POWER ...

Page 10: ...SUPPLy 240 VAC 120 V L1 120 V L2 240 V FIREPLACE WIRE HARNESS HOME POWER SUPPLy 240 VAC 120 VAC 120 VAC WHITE bLACK ORANGE bLUE bLUE yELLOW AND GREEN GROUND N L1 L2 240 V 3000 W GROUND N L1 L2 N1 N2 See Power Supply Specifications on Page 3 WARNING Donotinstalloroperatethisfireplacethroughaswitchwiredinthe120VACor 240VACcircuits Theonlyapproved wiring for a switch is through the low voltage circui...

Page 11: ...RAMS optional kits see Page 17 When using the manual control panel power on off switch the outside power on off switch optional wall switch kit must be in the OFF position When using the outside power on off switch optional wall switch the manual control panel power on off switch must be in the OFF position When using the remote control optional kit the manual control panel power on off switch and...

Page 12: ... the following information 1 Turn off circuit breaker 2 Remove cover plate located on the left side of appliance 3 Locate the the black and white wires and pull out the length needed to reach wall thermostat 15 feet max 4 Connect the wires to the wall thermostat as shown in Figure 25 Follow instructions provided with wall switch kit Figure 25 Wall Thermostat black 5 V Left Side of Fireplace White ...

Page 13: ...Switch per instructions provided with kit and per the following information 1 Turn off circuit breaker 2 Remove cover plate located on the left side of appliance 3 Locate the 2 red wires and pull out the length needed to reach wall switch 15 feet max 4 Connect the red wires to the wall switch as shown in Figure 26 Follow instructions provided with wall switch kit Red Red Figure 26 Red 5V Red Red R...

Page 14: ...be defective qualified service technician Inspect all wiring for loose connec tions Ifthewireconnectionsaregood replace the flame motor 3 Fflame sputters Flame motor is defective qualified service technician Replace flame motor 4 Remote controfl does not work Low batteries Unit switch and or wall switch in on position Homeowner Replaceaabatteriesinremotecontrol If problem persists there may have b...

Page 15: ... 9 FCA3336 flame Cylinder Assembly LED models H9109 1 10 Flame Motor H 9112 1 11 12 Log Ember bed 36 H9114 1 13 Panel bottom Front H1635 1 14 Panel Flame Cover H1636 1 15 Panel Louver Upper Front H1637 1 16 Panel Upper Frame Top H1638 1 17 Electrical Outlet Cover Plate H1639 1 18 Screen Set Pull H1640 1 19 Switch Toggle 1 Each H1641 1 20 Transformer Assembly H1642 1 21 Wire Harness 33 and 36 H9116...

Page 16: ...6 REPLACEMENT PARTS COMPONENT DIAGRAMS MPE36 2 ERT3036 Capella 36 8b 23 14 16 1 4 2 5 6 6 7 8a 12 13 15 19 17 Front View 22 20 3 11 9 18 FLAME bLUE yELLOW POWER ON OFF ON OFF DISPLA Dimmer righter EM ERS HEATER ON OFF TEMP CONTROL HIgH MED LOW ...

Page 17: ...Wall Switch Kit Trim Kit Glass Enclosure Kit A 41 1041 mm b 31 7 8 810 mm C 34 3 8 872 mm D 36 914 mm E 2 1 2 64 mm A b C D These glass enclosure panels are a one piece panel which have a bi fold look as shown below This kit contains trim panels used to finish the gaps between the wallboardand the fireplace providing the appliance a finished built in look E Cat No Model Description H3606 FFEP 36M ...

Page 18: ...NOTE DIAGRAMS ILLUSTRATIONS NOT TO SCALE 18 NOTES ...

Page 19: ...the right to make changes at any time without notice in design materials specifications prices and also to discontinue colors styles and products Consult your local distributor for fireplace code information 1508 Elm hill Pike Suite 108 Nashville TN 37210 Innovative Hearth Products ...

Reviews: