16575003_ed1
EN-2
EN
Disassembly of the Motor
1. Pull the Flange (23) and Flow Ring (22) off the front of the
Motor Housing (9).
2. Grasp the Rotor Pinion (28) and pull the assembled
Motor out of the Motor Housing. Remove the two Rear
Rotor Bearing Spacers (14) from the bottom of the
Housing.
3. Remove the Vanes (17) from the Rotor (16).
4. Grasp the Rotor in copper-covered vise jaws with the
Rotor Pinion upward. Using a 1/2" wrench, unscrew and
remove the Pinion.
5. If the Front Rotor Bearing (21) must be replaced, support
the Front End Plate (18) between two blocks on the table
of an arbor press. Place the blocks as close to the body
of the Rotor as possible and press the Rotor from Bearing
and End Plate. Remove the Front End Plate Spacer (19)
and Front Seal Cup Assembly (20) from the hub of the
Rotor.
6. If the Rear Rotor Bearing (13) must be replaced, use
snap ring pliers to remove the Rear Rotor Bearing
Retainer (15).
7. Using a bearing puller, pull the Rear Rotor Bearing off the
hub of the Rotor.
Disassembly of the Inlet and Throttle
1. Using a 15/16" wrench or six point socket, unscrew and
remove the Inlet Assembly (1).
2. Remove the Inlet Seal (3) and Inlet Screen (2) from the
Inlet.
3. Remove the Throttle Valve Spring Seat (4), Throttle Valve
Spring (5) and Throttle Valve (6) from the Motor Housing
(9).
4. If the Throttle Valve Seat (7) must be replaced, insert a
hooked tool through the central opening of the Seat and
catching the underside of the Seat, pull it from the
Housing.
5.
For TDS Models,
if the Throttle Valve Case (7A) must be
replaced, insert two hooked tools through the central
opening of the Case approximately 180 degrees apart
and pull it from the Housing.
6. Press the Throttle Lever Pin (11) from the Housing and
remove the Throttle Lever (10). Remove the Throttle
Valve Plunger (12).
Assembly
General Instructions
1. Always press on the
inner
ring of a ball-type bearing
when installing the bearing on a shaft.
2. Always press on the
outer
ring of a ball-type bearing
when pressing the bearing into a bearing recess.
3. Whenever grasping a tool or part in a vise, always use
leather-covered or copper-covered vise jaws. Take extra
care not to damage threads or distort housings.
4. Always clean every part and wipe every part with a thin
film of oil before installation.
5. Check every bearing for roughness. If an open bearing
must be cleaned, wash it thoroughly in
clean
solvent and
dry with a clean cloth.
Sealed or shielded bearings
should not be cleaned
. Work grease into every open
bearing before installation.
6. Apply a film of O-Ring lubricant to every O-Ring before
installation.
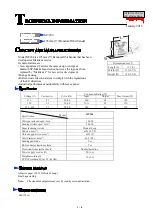
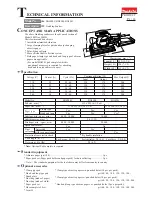
7. Unless otherwise noted, always press on the stamped
end of a needle bearing when installing a needle bearing
into recess. Use a bearing inserting tool similar to the one
shown below.
(Dwg. TPD786)
Assembly of the Throttle and Inlet
1. Insert the Throttle Valve Plunger (12) into the Motor
Housing (9).
2. Position the Throttle Lever (10) on the Motor Housing and
using an arbor press, press the Throttle Lever Pin (11)
into the Housing and Lever. The Lever will retain the
Plunger in the Housing.
3.
For TDS Models,
if the Throttle Valve Case (7A) was
removed, lubricate the outside and the throttle stem end
of the Case with O-Ring lubricant. Using a wooden
dowel, push the Case, open end trailing, into the Motor
Housing.
4. If the Throttle Valve Seat (7) was removed, use a 5/8"
wooden dowel with a flat end to push the Seat into the
Motor Housing.
5. Push the small end of the Throttle Valve Spring (5) onto
the end of the Throttle Valve (6) with the short stem until
the Spring snaps into position around the hub and
remains there. Install the dish end of the Throttle Valve
Spring Seat (4) onto the large end of the Throttle Valve
Spring.
6. Holding the Housing with the Lever downward, make
sure the Plunger is out of the way and insert the
assembled Throttle Valve, long stem end leading, into the
housing recess.
7. Push the Inlet Screen (2), closed end leading, into the
bushing of the Inlet Assembly (1). After moistening the
Inlet Seal (3) with O-Ring lubricant and being careful not
to nick the Seal on the threads of the Inlet, install the Seal
on the Inlet.
8. Thread the Inlet Assembly into the Housing and tighten it
between 20 to 25 ft.-lb. (27.1 to 33.9 Nm) torque.
Assembly of the Motor
1. If the Rear Rotor Bearing (13) was removed, stand the
Rotor (16) upright on the table of an arbor press with the
threaded end downward. Place the threaded rotor hub
into a hole drilled into a flat, smooth block so that the
Rotor rests against the large rotor body. Press the Rear
Rotor Bearing onto the hub of the Rotor.
2. Install the Rear Rotor Bearing Retainer (15) in the groove
on the hub of the Rotor.
3. Install the Front End Plate (18), counterbored end trailing,
onto the threaded hub of the Rotor. Using finger
pressure, press the Front Seal Cup Assembly (20), felt
end trailing, onto the end of the Front End Plate Spacer
SHOULDER TO
REGULATE DEPTH
PILOT TO FIT I.D. OF BEARING.
LENGTH OF PILOT TO BE
APPROXIMATELY 1/8''
LESS THAN LENGTH OF
BEARING
Needle Bearing Inserting Tool


