background image

Reports 


Terminal User Guide 


70 


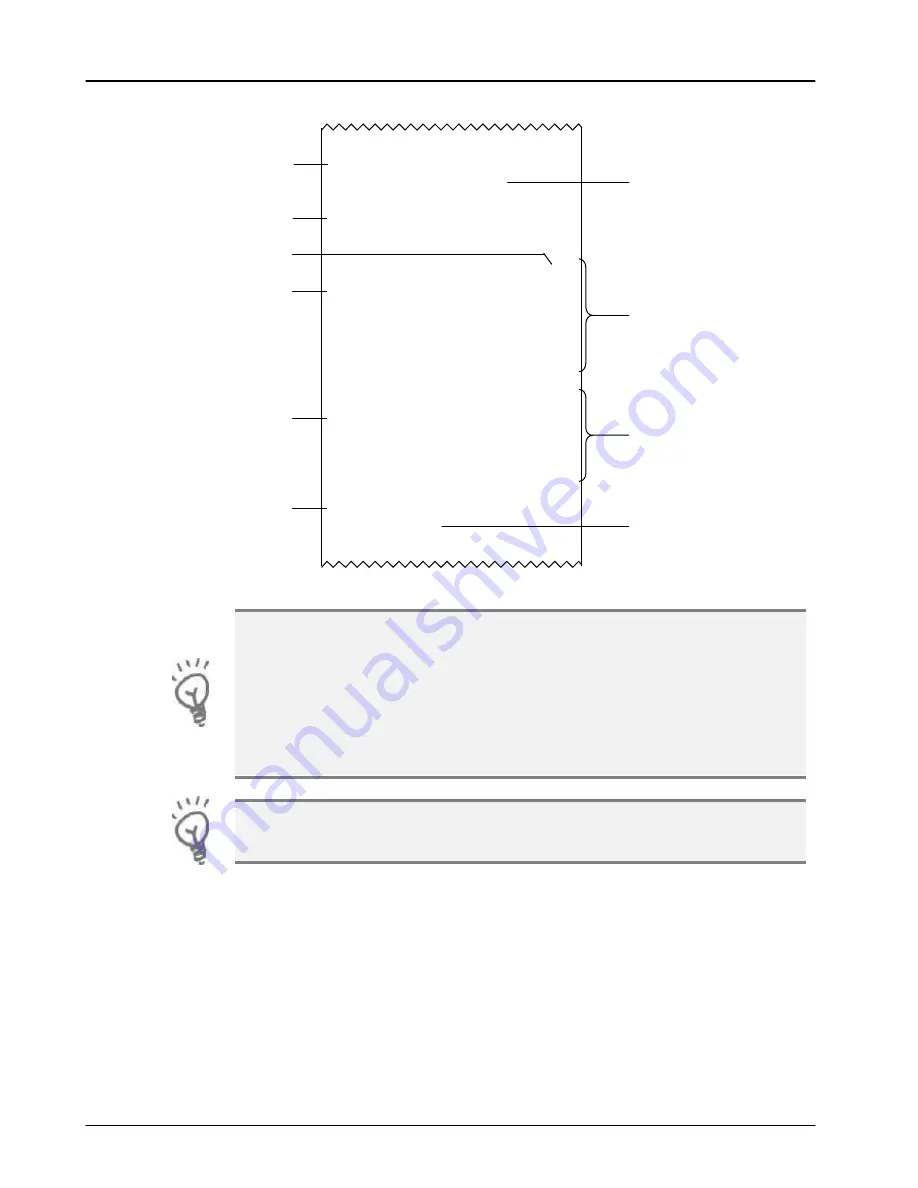
Example Banking report continued (Acquirer 2) 

--==++oooo++==-- 

ACQUIRER 2 
TOTALS UNCONFIRMED 

01/01/11 23:55 
M:87654321 
TID:22160001 
 
CURRENT SESSION:       2 
TXN NOs        0039-0042 
Sales       1     £10.00 
Refunds     1     £20.00 

TOTAL       CR    £10.00 

 
PREVIOUS SESSION: 
TXN NOs        0025-0038 
Sales       8    £827.19 
Refunds     1     £40.00 
TOTAL       DR   £787.19 
 
TXN 0046 
DIAG 828282 

--==++oooo++==-- 


TOTALS  UNCONFIRMED

  means  that  the  totals  were  in  balance 

after  the  last  online  transaction  so  are  probably  correct,  but 
they  have  not  been  checked  during  the  reconciliation because, 
in  this  case,  a  communications  error  (see  the  section  entitled 

Diagnostic  Codes

  for  more  details).  If  the  reconciliation  is 

attempted  again  and  the  terminal  again  fails  to  contact  the 
acquirer, the report will indicate 

CANNOT CONFIRM TOTALS


This acquirer has only one issuer, so no breakdown by issuer is 
shown. 


Previous Session 

The breakdown of totals for the 
previous banking session 


Acquirer

 Name 

Acquirer Result 

TOTALS UNCONFIRMED 
The totals were not checked 
for this acquirer 

Transaction Range 

Current Session - relates to  

the Transaction breakdown  

on the Z Balance Report


Current Session 

The breakdown of totals for the current 
banking session. Combining the 
Current Session totals for all acquirers 
should match the Grand Total on the Z 
Balance Report 


Merchant ID 

Current Session Number


Transaction Range 

Previous Session


Transaction


Number


Diagnostic Code 

DIAG 828282 indicates that the acquirer was 
unable to be reached due to three 
communications errors (82) 

Summary of Contents for iWL200 Series

Page 1: ...iWL200 Series...

Page 2: ...19 Selecting a Wi Fi Connection Profile 20 Editing a Wi Fi Connection Profile 20 Removing a Wi Fi Connection Profile 21 Loading a Paper Roll 21 Reading Cards 22 Magnetic Stripe Reader 22 Chip Card Rea...

Page 3: ...py PIN Transactions 56 Merchant Copy Contactless Transactions 58 Customer Copy 59 Declined and Void Receipts 62 Transaction Referencing 64 5 Reports 65 End of Day Report 66 Banking Report 67 X Balance...

Page 4: ...he terminal i e the Enter key in this case THIS IS A SHORTCUT TO A MENU OPTION This is a piece of important advice Keeping Records Copies of all transaction receipts and your corresponding End of Day...

Page 5: ...ls detecting any interruption to these seals your terminal will enter a tampered state In this state the terminal will repeatedly flash the message Alert Irruption and further use of the terminal will...

Page 6: ...hange of this password is required before you process any transactions If you wish to do this before performing a transaction you should refer to the section entitled Supervisor Password for informati...

Page 7: ...der is correct Your Merchant Number is correct No acquirers such as American Express or Diners that you requested are missing Set up your terminal in a convenient location and familiarise yourself wit...

Page 8: ...shown below Your terminal comes pre installed with A rechargeable battery pack A paper roll A SIM card mobile terminals only This User Guide iWL200 Payment Terminal iWL200 Base Unit UK Power Supply Un...

Page 9: ...rminal with PSTN and IP communications Mobile terminal with GSM GPRS communications Wi Fi terminal with Wi Fi communications This User Guide covers all variants so you should read this guide carefully...

Page 10: ...n a convenient location close to a power source and for Bluetooth terminals either a telephone socket and or an Ethernet socket as required To open the base unit cover located on the bottom of the bas...

Page 11: ...hernet socket on your base unit the other end should be connected to a corresponding socket on your LAN router Finally connect the UK Power Supply Unit into the power socket on your base unit and to t...

Page 12: ...hat connector is inserted correctly so that the red wire is closest to the side of your terminal To remove the battery pack press the moulded catch in and pull away the connector 2 If the terminal dis...

Page 13: ...battery as soon as possible Flashing Battery icon The battery charge is critical you should charge the battery immediately Flashing Battery icon Battery is not installed or installed incorrectly norm...

Page 14: ...example you may need to enter letters as well as number Where you see the F4 123 graphic on screen you can toggle the input mode by pressing F4 key To enter uppercase letters use the ABC input mode a...

Page 15: ...tooth Terminals Fig 2 iWL251 Mobile Terminals Time Bluetooth Status Signal Communication Status Terminal Status Handset Number LAN Status Fig 3 iWL258 Wi Fi Terminals Date Time Wi Fi Network Status Si...

Page 16: ...e screen of your terminal The battery icon indicates the power left in the battery The coloured bars indicate the health of the battery with red being the lowest charge and green the highest The anima...

Page 17: ...nal as appropriate with red being the weakest signal and green being the strongest Your terminal may not be able to communicate if the signal is very poor For Bluetooth terminals the last eight digits...

Page 18: ...provided your terminal can only use the telephone and Ethernet connections when it is paired to the base unit To associate your terminal to a Bluetooth base press the menu key twice then choose SUPERV...

Page 19: ...y again Type in the PSTN prefix typically 9 followed by the enter key MENU MENU F3 password ENTER F3 F3 If your telephone line is shared with other equipment such as a telephone or fax machine then yo...

Page 20: ...to ensure that the SIM card is inserted in the correct manner the chip should be facing downwards with the cut out corner of the SIM card as shown DO NOT use any tools when installing or removing you...

Page 21: ...to type your current supervisor password and confirm this by pressing the enter key Press the menu key choose SHORT CUT by pressing the F1 key press the menu key once more and choose WIFI SETUP by pre...

Page 22: ...the required Wi Fi network name and press the enter key Security Type Home Security 0000 Enterprise Security The security type associated with the chosen Wi Fi network will be automatically selected...

Page 23: ...n profile has been selected Selecting Automatic will allow the most appropriate Wi Fi network to be used based on availability and the priority weighting associated to each Wi Fi connection profile Ed...

Page 24: ...paper roll 1 Hold your terminal securely in one hand with the other hand and by using two fingers lift the printer cover release as shown Fully open the printer cover and remove the old roll of paper...

Page 25: ...n as illustrated run the edge of the card along the bottom of the card swipe slot on the right of your terminal You should swipe the card in one continuous movement and at an even speed If you see the...

Page 26: ...rely the transaction will be cancelled Chip cards can hold the details for more than one payment application for example MasterCard and Maestro If the SELECT APPLICATION screen is displayed after the...

Page 27: ...pted to do so on the screen and the first status light is lit steadily The card should be presented towards the contactless logo shown on the screen at the centre of the contactless card read zone Whe...

Page 28: ...turn to the idle screen Contactless card transactions are performed by this method and when the transaction value is under the contactless card limit e g 30 00 Your terminal will only prompt for a car...

Page 29: ...o will be displayed on your terminal for all transactions rather than just those under the contactless card limit e g 30 00 Acceptance of normal contactless cards for transactions below the 30 limit w...

Page 30: ...PRESENT ONLY ONE CARD If more than one card is presented the card read will fail An alert tone will sound and the customer will be prompted to re present the card In both cases the terminal will cont...

Page 31: ...34 Enter PIN If a PIN is requested the customer must enter their PIN code followed by the enter key PIN OK RETURN TERMINAL DO NOT REMOVE CARD After the customer has entered their PIN they will be prom...

Page 32: ...sale amount in pence e g 2134 for 21 34 and press the enter key Amount 21 34 Enter PIN If a PIN is requested the customer must enter their PIN code followed by the enter key The terminal will continu...

Page 33: ...hts will be lit in turn A confirmation tone and message will be displayed The card can be removed from the card read zone CONNECTING If required the terminal will connect to the acquirer for authorisa...

Page 34: ...tion has been authorised then an auth code will be displayed Printing The terminal will print the merchant copy for you to retain The customer must sign this copy Signature OK F1 NO YES F4 Check the s...

Page 35: ...uity mode is enabled in this manner the merchant copy will allow the customer to fill in with any gratuity and the final transaction amount This is unaffected by the method of entering the gratuity fo...

Page 36: ...Gratuity 0 00 F1 NO TIP If a gratuity is to be added they must enter the amount of the tip in pence e g 200 for 2 00 and press the enter key Amount 23 34 Enter PIN The final amount will be shown If a...

Page 37: ...ignature Printing The terminal will print the customer copy to give to the customer for them to retain The terminal will return to the idle screen NEVER ask the customer to divulge their PIN Code Cust...

Page 38: ...er Final Amount 0 00 F1 NO TIP Enter the final amount of the sale in pence e g 2334 for 21 34 2 00 tip and press the enter key Amount 23 34 Enter PIN PRESS CANCEL ENTER The final amount will be shown...

Page 39: ...ignature Printing The terminal will print the customer copy to give to the customer for them to retain The terminal will return to the idle screen NEVER ask the customer to divulge their PIN Code Cust...

Page 40: ...ure Press F1 for an invalid signature or Press F4 for a valid signature Enter Final Amount 0 00 F1 NO TIP Enter the final amount of the sale in pence e g 2334 for 21 34 2 00 tip and press the enter ke...

Page 41: ...e displayed insert or swipe the customer s card Enter Sale 0 00 Enter the sale amount in pence e g 2134 for 21 34 and press the enter key Cashback F1 NO YES F4 If cashback is allowed for the customer...

Page 42: ...be split equally between multiple customers but allows for one person to pay per couple VARIABLE SPLIT Allows the bill to be split unequally between multiple customers Surcharging Your terminal is no...

Page 43: ...Enter Refund 0 00 Enter the refund amount in pence e g 2134 for 21 34 and press the enter key 21 34 Touch Insert or Swipe Here Confirm that the amount is correct and touch insert or swipe the card Ple...

Page 44: ...to give to the customer for them to retain The terminal will return to the idle screen DO NOT remove the card until the terminal has prompted you to You MUST retain the merchant copy for your records...

Page 45: ...re is a four digit Card Security Code printed on the front of the card any numbers on the signature strip should be ignored To use AVS checking you will be prompted to input the numerical digits only...

Page 46: ...for SALE MAILORDER SALE Key Card No _ Key in the customer s card number and press the enter key Expires MMYY _ If you see this prompt enter the card s expiry date in an MMYY format and press the enter...

Page 47: ...2134 for 21 34 and press the enter key Please Wait The terminal will connect to the acquirer for authorisation AUTH CODE xxxxx DATA MATCHED F1 VOID CONFIRM F4 If the transaction has been authorised th...

Page 48: ...cks are not mandatory for some acquirers therefore if you do not wish to enter a value for or do not know the CSC or for the Postcode Numbers or Address Numbers then you can press the enter key withou...

Page 49: ...s then choose ACC VERIFY by pressing the F3 key MENU MENU MENU F3 INSERT OR SWIPE CUSTOMER CARD Insert swipe or key the customer s card The terminal will continue as per a normal sale with the excepti...

Page 50: ...for PREAUTH or Press F4 for COMPLTE A Pre Authorisation PREAUTH transaction proceeds as for a Sale transaction If the customer s card number is keyed in then you will be asked to confirm if the custom...

Page 51: ...successfully performed the original transaction and the Reversal will not appear on the customer s bank statement The original transaction and the Reversal will appear on your Banking and X Z Balance...

Page 52: ...mode enabled on your terminal please contact the terminal Helpdesk READY Handset 01 The idle screen will be displayed press the menu key once F1 MAILORDER F2 REFUND F3 CASH F4 SALE Select the CASH me...

Page 53: ...uthorisation Only transaction is done the available credit on the customers bank account will be reduced by the amount authorised Authorisation Only transactions may be submitted to the acquirer throu...

Page 54: ...the acquirer Transactions with an inserted Chip card may be declined by the card without the terminal contacting the acquirer s host system You should advise the customer to contact their card issuer...

Page 55: ...n the card at all other times you should only remove the card when prompted to do so by your terminal If the transaction is authorised by the authorisation centre your terminal will prompt you to ente...

Page 56: ...a valid authorisation code before performing a Forced Transaction To perform a forced transaction press the menu key three times then choose FORCE TRANS by pressing the F2 key You will be asked to typ...

Page 57: ...1 ICC SALE AMOUNT 21 34 TOTAL 21 34 SIGN BELOW PLEASE DEBIT MY ACCOUNT 01 01 11 12 00 AUTH CODE 123ABC TXN 0002 DIAG 8282 MERCHANT COPY PLEASE RETAIN RECEIPT Merchant ID Sequence Number Terminal ID Tr...

Page 58: ...RATUITY TOTAL SIGN BELOW PLEASE DEBIT MY ACCOUNT 01 01 11 12 04 AUTH CODE 123ABC TXN 0003 DIAG 4141 MERCHANT COPY PLEASE RETAIN RECEIPT Merchant ID Sequence Number Terminal ID Transaction Referencing...

Page 59: ...MOUNT 21 34 TOTAL 21 34 PIN VERIFIED PLEASE DEBIT MY ACCOUNT 01 01 11 12 11 AUTH CODE 123ABC TXN 0004 DIAG 8241 MERCHANT COPY PLEASE RETAIN RECEIPT Merchant ID Sequence Number Terminal ID Transaction...

Page 60: ...UITY 2 00 TOTAL 23 34 PIN VERIFIED PLEASE DEBIT MY ACCOUNT 01 01 11 12 13 AUTH CODE 123ABC TXN 0005 DIAG 8282 MERCHANT COPY PLEASE RETAIN RECEIPT Merchant ID Sequence Number Terminal ID Transaction Re...

Page 61: ...ALE AMOUNT 1 23 TOTAL 1 23 NO CARDHOLDER VERIFICATION 01 01 11 12 30 AUTH CODE 123ABC TXN 0006 DIAG 52 MERCHANT COPY PLEASE RETAIN RECEIPT Merchant ID Sequence Number Terminal ID Transaction Referenci...

Page 62: ...1 11 12 32 AUTH CODE 123ABC TXN 0007 DIAG 8241 CUSTOMER COPY PLEASE RETAIN RECEIPT For security reasons the full card number is not shown on the customer copy Merchant ID Sequence Number Terminal ID T...

Page 63: ...1 11 12 11 AUTH CODE 123ABC TXN 0004 DIAG 8241 MERCHANT COPY PLEASE RETAIN RECEIPT For security reasons the full card number is not shown on the customer copy Merchant ID Sequence Number Terminal ID T...

Page 64: ...e full card number is not shown on the customer copy Only the merchant copy is printed during a contactless transaction If the customer requires a receipt then the customer copy can be printed by pres...

Page 65: ...CHANT COPY PLEASE RETAIN RECEIPT For security reasons the full card number is not shown on the customer copy The Pre Paid Card available balance is shown only on the customer copy Merchant ID Sequence...

Page 66: ...N E D THANKYOU FOR YOUR CUSTOM 01 01 11 12 40 NOT AUTHED TXN 0008 DIAG 41 CUSTOMER COPY PLEASE RETAIN RECEIPT For security reasons the full card number is not shown on the customer copy If you have h...

Page 67: ...Tables location The labels for these references are completely customisable for your needs so you could have Room Number in a Hotel or Invoice ID in an office based business or maybe Customer ID Plea...

Page 68: ...your merchant account If you do not complete an End of Day report there will be a delay in you receiving funds If you have had any voided transactions you must perform an End of Day report to ensure...

Page 69: ...ervisor password then press enter choose END OF DAY by pressing the F1 key MENU MENU F1 password ENTER F1 Reports performed by the End of Day function will look exactly the same as if they were done s...

Page 70: ...ESSION on today s reports will be the same as the CURRENT SESSION on yesterday s report and so on If these totals do not match then you may be doing your report outside of the acquirer s specified ban...

Page 71: ...g the F1 key You will be asked to type your supervisor password then press enter choose BANKING by pressing the F2 key followed by the F4 key to choose SINGLE Press F4 repeatedly for NEXT until the ac...

Page 72: ...e Acquirer Result TOTALS CONFIRMED The totals were agreed for this acquirer Transaction Range Current Session relates to the Transaction breakdown on the Z Balance Report Issuer Breakdown Current Sess...

Page 73: ...attempted again and the terminal again fails to contact the acquirer the report will indicate CANNOT CONFIRM TOTALS This acquirer has only one issuer so no breakdown by issuer is shown Previous Sessi...

Page 74: ...1 REPORT COMPLETE Merchant ID Acquirer Name Acquirer Result TOTALS NOT AGREED The terminal totals did not match the host s totals for this acquirer Disputed Totals Only shown when totals are not agree...

Page 75: ...ions done since the last Z Balance was completed is also shown The totals within the terminal will not be reset after printing an X Balance To perform an X Balance report press the menu key twice then...

Page 76: ...Balance To perform a Z Balance report press the menu key twice then choose REPORTS by pressing the F1 key You will be asked to type your supervisor password then press enter choose Z BALANCE by press...

Page 77: ...TAL DR 519 23 oooo Print Date Time Grand Totals Summarises all transactions performed since the last Z Balance Report was printed Terminal ID Issuer Breakdown The breakdown of all transactions perform...

Page 78: ...nce Report was printed Transaction Log Detail of all transactions performed since the last Z Balance Report was printed For each transaction the Sequence Number of the transaction S together with the...

Page 79: ...menu key twice then choose REPORTS by pressing the F1 key You will be asked to type your supervisor password then press enter press the menu key once more choose STORED by pressing the F1 key followed...

Page 80: ...be set into a NOT READY state and will not be usable until the file has been downloaded If your terminal displays the NOT READY status message then your terminal is not initialised Press menu once an...

Page 81: ...r more digits will be a valid Supervisor password The Supervisor password allows entry into the Refund option on the terminal To change your Supervisor password press the menu key twice then choose SU...

Page 82: ...ew password and press the enter key Parameter Saved A confirmation will be shown if the two entries match and the password has been changed The terminal will continue as normal refer to the instructio...

Page 83: ...n choose SUPERVISOR by pressing the F3 key You will be asked to type your current supervisor password and confirm this by pressing the enter key MENU MENU F3 password ENTER Once you have access to the...

Page 84: ...the terminal Do not use this feature unless instructed to do so by the terminal Helpdesk Second Supervisor Menu Screen press menu once SHORT CUT F1 Allows access to advanced configuration options Ente...

Page 85: ...so by the terminal Helpdesk UPGRADE F4 Immediately sets off a software upgrade call to the Terminal Management System TMS Do not use this feature unless instructed to do so by the terminal Helpdesk Fo...

Page 86: ...o Some Supervisor functions MUST only be used when instructed to do so by the terminal Helpdesk Password Menu Screen DELETE ACQ F1 Deletes all datasets for one or all acquirers from the terminals memo...

Page 87: ...EMV F1 Prints EMV data loaded on the terminal Do not use this feature unless instructed to do so by the terminal Helpdesk PRINT CERTS F2 Prints Certificates loaded on the terminal Do not use this feat...

Page 88: ...Menu Screen CONTACTLESS F1 Configures the internal external Contactless Reader support Do not use this feature unless instructed to do so by the terminal Helpdesk PINPAD F2 Configures the external PI...

Page 89: ...housing or printer roller is damaged you should contact the terminal Helpdesk Q What should I do if I have forgotten my Supervisor password You should first try the default password of 01483 if this i...

Page 90: ...pdate If the problem persists you should contact the terminal Helpdesk If there is no number displayed then power off the terminal and the base unit Power back on the base unit and then place the term...

Page 91: ...ations supplier Q My totals on the Z Balance and Banking reports do not match what do I do The Z Balance report totals give you a total of all transactions done across all acquirers The Banking report...

Page 92: ...may come across a number of screen messages Some indicate an error whereas others offer information Below is a list of some of the messages that you may see on your terminal BAD MAC The security pass...

Page 93: ...ould ask for another means of payment If the card is in date check the date and time on the terminal SORRY FOR DELAY RETRYING The terminal is unable to contact the acquirer due to a communications err...

Page 94: ...enabled by the acquirer NOT AUTHORISED The card card issuer or acquirer has declined to authorise the transaction you should ask for another means of payment TRY AGAIN The card was removed too soon a...

Page 95: ...e terminal If the problem persists contact the terminal Helpdesk quoting the diagnostic code 22 No dial tone Check the telephone line and retry the transaction If the problem persists contact the term...

Page 96: ...Merchant has indicated an invalid signature This is not an error and is for information only 73 Terminal and host totals do not agree Do a Banking report and contact the acquirer if advised to do so...

Page 97: ...PREAUTH CONFIG PRINT EMV HOTEL COMPLTE LOGON PRINT CERTS SHORT CUT CONTACTLESS PSTN PREFIX FORCE TRANS TIPS PINPAD GSM N W TEST MAILORDER OP MODE EPOS INTERF SEL GSM N W ACC VERIFY REFUND CALL TMS BL...

Page 98: ...ds EN 60950 1 2006 95 EC EN 55022 2004 108 EC EN 55024 A2 2004 108 EC EN 301489 1 3 7 17 89 336 EEC EN 301511 1999 5 EC EN 62311 2008 1999 519 EEC EN 300328 v1 4 2 1999 5 EC EN 301357 1 2 1999 5 EC EN...

Page 99: ...nico UK Ltd This User Guide v1 1048 relates to terminal software APACS 40 97 11 01 Whilst every effort has been made to ensure that the content of this document is accurate Ingenico will not accept re...

Page 100: ...Ingenico Ridge Way Donbristle Industrial Park Dalgety Bay Fife KY11 9JU Part Number DIV434675C_COVER...

Reviews: