background image

MOUSE-E-MOTION


is especially designed to be applied with the 

commonly used type 2 mouse cages. Usage of the device and 

the metal holder in connection with this cage type will exclude 

false  detections  of  movements  outside  the  cage. If  you  are  in 

doubt with your special location, perform a test in place.

For type 2 mouse cages the supplied stainless steel metal holder 

can be used. Press the rubber feet into the 4 pre-drilled holes 

of the metal holder. Place the metal holder on top of the cage. 

The lateral straps fit into the gaps of the cage. Ensure that the 

side with the screw faces the front side of the cage. Place 

the 

device with the sensor directed to the bottom 

onto the rubber feet 

of the metal holder. Pay attention to the metal holder‘s screw: to 

ensure  proper  positioning  of  the  device  above  the  cage  it  has 

to  fit  exactly  into  the  little  hole  on  the  bottom  front  side  of  the 

device.

Objects placed on top of  the cage (e.g. food, water bottles) may 

hinder a correct motion detection and cause false values.

6.1 Usage on top of a cage 


Page - 8 -

6.2  Stand-alone usage

The device is capable of monitoring all kinds of motion occuran-

ces that can be detected by a passive infrared sensor. In general, 

all  living  things  and  nearly  all  material  objects  having  a  tem-

perature different from their surrounding will trigger a detection 

signal.

The infrared sensor‘s range is about 5m with a detection angle of 

about 30 degrees (also see 8.0). The area covered has a rectan-

gular shape.

Objects whose temperature is not significantly different from the 

surrounding, or objecs moving very slowly (e.g. snails), are not 

suited to be monitored with

 MOUSE-E-MOTION

.

6. USAGE

6.3 Usage with external sensor

The device may be applied to detect motion within the detection 

area of an internal or an additionally applicable external motion 

sensor. The external motion snesor has to be plugged in at the 

9-pin connector at the side of the device. If you want to exclusi-

vely use the external sensor you can disable the internal sensor, 

so that only data of the external sensor will be noticed. For this 

purpose move the red switch (accessible by opening the battery 

compartment) to the OFF position. (Do not forget to move it back 

to the ON position if you want to use the internal sensor again.) 

If an external sensor is connected and the internal sensor is not 

switched off, the signals of both sensors are noticed and it is not 

possible to differentiate the origin of the resulting data.

Summary of Contents for MOUSE-E-MOTION

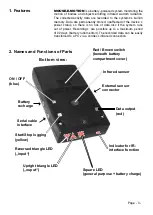
Page 1: ...E MOTION Mobile infrared activity data logger with integrated clock MOUSE E MOTION Operating Instructions Hagendeel 33 D 22529 Hamburg Tel 0173 6 13 91 85 Fax 0 41 93 75 45 59 e mail contact infra e motion de www infra e motion de GmbH ...

Page 2: ...4 2 Start data logging 4 3 Stop data logging 4 4 Data transmission 4 5 Erase stored data 5 DEVICE STATUS 6 USAGE 6 1 Usage on top of a cage 6 2 Stand alone usage 6 3 Usage with external sensor 7 CONNECTION TO PC 8 TECHNICAL SPECIFICATIONS Page 2 Mobile infrared activity data logger with integrated clock MOUSE E MOTION 3 3 4 5 6 7 8 9 10 ...

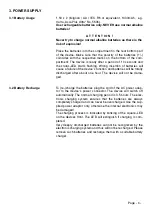
Page 3: ...e motion of bodies and objects emitting infrared warmth radiation The collected activity data are recorded to the systems s built in memory Data are permanently stored unaffected of the device s power status so there is no risk of data loss if the system runs out of power Recordings are possible up to a maximum period of 22 days battery runtime limit The recorded data can be easily transferred to ...

Page 4: ... device s function and batteries will be totally discharged after about one hour The device will not be dama ged To re charge the batteries plug the cord of the AC power adap tor to the device s power connector The device will switch off automatically The normal charging period is 3 5 hours The elec tronic charging system ensures that the batteries are always completely charged and can never be ov...

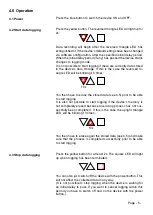
Page 5: ...t is also not possible to start logging if the device s memory is not completely erased because an erasing process has not suc cessfully been completed If this is the case the upright triangle LED will be blinking 10 times You then have to erase again the stored data see 4 5 and make sure that the process is completed successfully prior to be able to start logging Press the yellow button for at le...

Page 6: ...nsmission has been completed the device returns to standby mode Press the red and the yellow button simultaneously until the tri angle LEDs begin to blink alternately When the blinking has stopped the device s memory is prepared to store new data You won t be able to erase stored data if not data output has been commited at least once This will be indicated by blinking of the square LED for 10 tim...

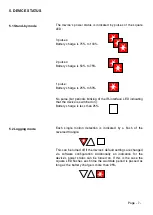
Page 7: ...nterface LED indicating that the device is switched on Battery charge is less than 25 Each single motion detection is indicated by a flash of the reversed triangle This can be turned off if the device s default settings are changed via software configuration Additionally an indication for the device s power status can be turned on If this is the case the square LED flashes each time the waitstate ...

Page 8: ...curan ces that can be detected by a passive infrared sensor In general all living things and nearly all material objects having a tem perature different from their surrounding will trigger a detection signal The infrared sensor s range is about 5m with a detection angle of about 30 degrees also see 8 0 The area covered has a rectan gular shape Objects whose temperature is not significantly differe...

Page 9: ... transceiver face for best performance distance should be not more than 10cm Start the MOUSE E MOTION software refer to the MOUSE E MOTION software documentation on how to install and use the software Click on the AutoDownload button to automatically download data with the preset default parame ters or click on the Data Download button if you want to manually download data and define certain param...

Page 10: ...ries 1 5V x 2 Mignon AA IEC R6 or equivalent 1400 1600mAh e g Varta AccuPlus Ultra No 5606 Charging period 3 5 hours Charging current 0 5A Accumulators with higher capacity may be used but 100 charge is not guaranteed as the electronic charging system ter minates charging after 3 5 hours High capacity accumulators may not be fully charged after this period Minimum operating time using fully charge...

Reviews: