background image

Adding Paper and Replacing Print Cartridges

110

6

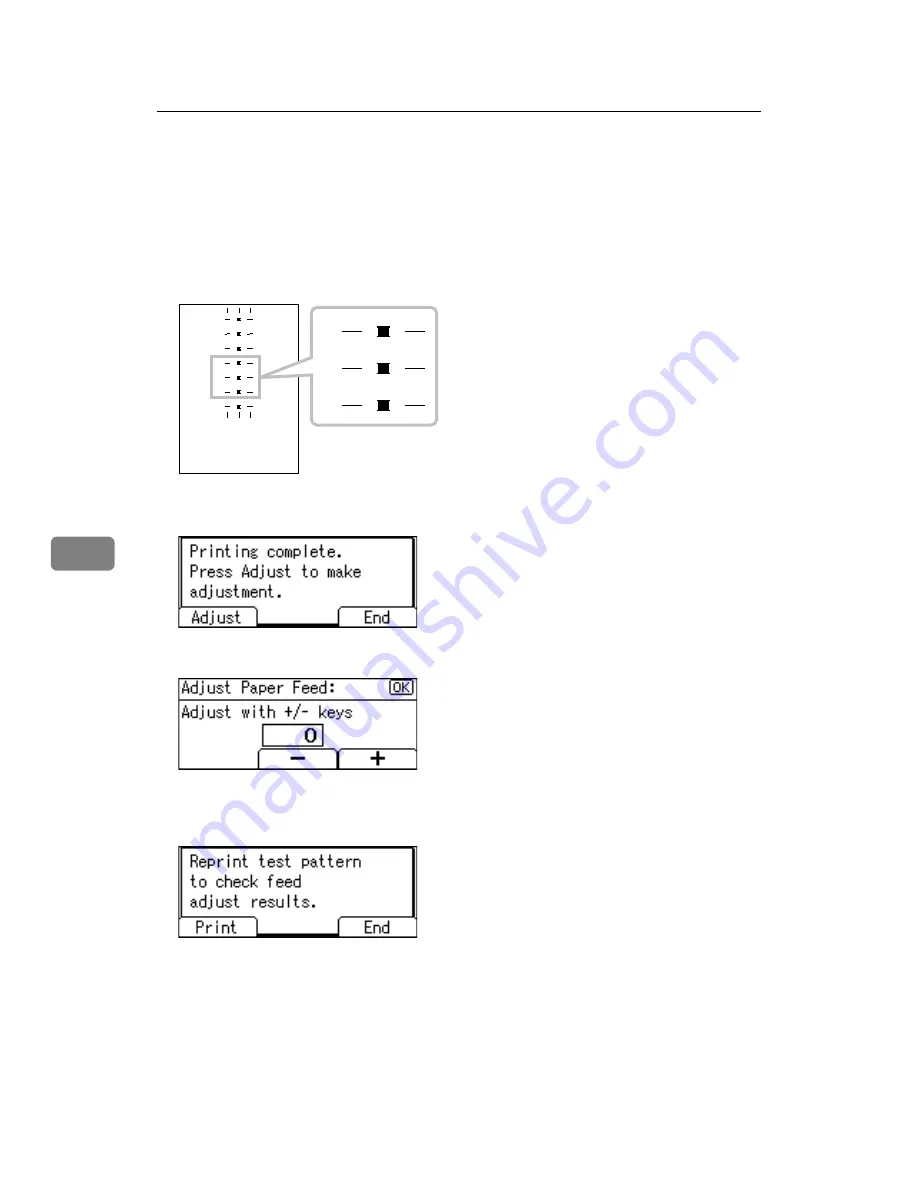
• If the horizontal lines on the both sides of the faintest square are mis-

aligned, determine an adjustment value based on a pattern that is above or
below, whose horizontals are misaligned in the opposite direction. For ex-
ample, “+2” square is faintest and the horizontals on both sides of “+6” are
in the opposite direction to “+2”, so the adjustment value is between 

[

+3

]

and 

[

+5

]

 depending on the degree of misalignment. After completing the

adjustment, adjust the paper feed again to check if the optimal adjustment
value is set.

G

Press 

[

Adjust

]

.

H

Enter the adjustment value with 

[

n

]


[

o

]

, and then press the 

{

OK

}

 key. 

I

Press 

[

End

]

.

After a few seconds, the settings screen appears.

-14

-6

-2

0

+2

+6

0

+2

+6

+14

AML007S

Summary of Contents for ISC 615 G

Page 1: ...ety Information in About This Machine before using the machine When the Machine Does Not Operate as Wanted Troubleshooting When Using the Copy Function Troubleshooting When Using the Facsimile Function Troubleshooting When Using the Printer Function Troubleshooting When Using the Scanner Function Adding Paper and Replacing Print Cartridges Clearing Misfeeds Remarks 1 2 3 4 5 6 7 8 ...

Page 2: ...ense that might result from the use of parts other than genuine parts from the supplier with your office products Power Source 220 240V 50 60Hz 2A or less Please be sure to connect the power cord to a power source as shown above For details about power source see p 121 Power Connection Trademarks Microsoft Windows and Windows NT are registered trademarks of Microsoft Corporation in the United Stat...

Page 3: ...or administrators of the machine It explains security func tions that the administrators can use to protect data from being tampered or prevent the machine from unauthorized use Also refer to this manual for the procedures for registering administrators as well as setting user and administrator authentication Copy Reference Explains Copier functions and operations Also refer to this manual for exp...

Page 4: ...Scanner Guide PostScript3 Supplement UNIX Supplement Manuals for DeskTopBinder Lite DeskTopBinder Lite Setup Guide DeskTopBinder Introduction Guide Auto Document Link Guide Note Manuals provided are specific to machine types Adobe Acrobat Reader Adobe Reader must be installed in order to view the manuals as PDF files ...

Page 5: ...1 When a Message Appears 24 When You Cannot Send or Receive Fax Messages as Wanted 30 When Memory is Full 34 If an Error Report is Printed 35 Turning Off the Main Power In the Event of Power Failure 36 When an Error Occurs Using Internet Fax 37 Error Mail Notification 37 Error Report E Mail 37 Server Generated Error E mail 37 4 Troubleshooting When Using the Printer Function When a Message Appears...

Page 6: ...o the Paper Tray 1 71 Loading Paper into the Tray 2 and 3 73 Changing the Paper Size 76 Changing the Paper Size in Tray 1 76 Changing a Paper Size in the Tray 2 3 85 Handling Print Cartridges 90 Replacing Print Cartridges 91 Sending Fax Messages When Ink has Run Out 92 Ink 92 Maintenance 94 Nozzle Check Pattern 94 Clean Printheads 97 Flush Printheads 99 Adjustment 101 Replacing the Transmission St...

Page 7: ...g the machine and explanations of likely causes of paper misfeeds damage to originals or loss of data Be sure to read these explanations This symbol indicates information or preparations required prior to operating Indicates supplementary explanations of the machine s functions and instruc tions on resolving user errors This symbol is located at the end of sections It indicates where you can find ...

Page 8: ...2 ...

Page 9: ...ion explains symbols displayed when the machine requires the user to remove misfed paper add paper or other perform other procedures x Misfeed indicator Appears when a misfeed occurs See p 115 Clearing Misfeeds B Add Paper indicator Appears when paper out condition occurs See p 71 Loading Paper G Add Ink indicator Lit when ink is running low See p 90 Handling Print Cartridges ...

Page 10: ...Problem Cause Solution Documents and reports do not print out There is no copy paper left Add more paper See p 71 Load ing Paper An error has occurred There is a problem with the func tion whose key is lit red Record the code number shown in the display and contact your service representative See When A Message Displayed of each chapter Other functions are available normally The machine is unable ...

Page 11: ...and the User Tools screen is dis played but the User Tools menu has items missing Functions other than the copier function are not yet ready Time required varies by function Functions appear in the User Tools menu when they become ready for use Wait a little longer The display is difficult to see Screen contrast is not adjusted Set the screen contrast knob to the light position to see the display ...

Page 12: ... been loaded If you load paper of an unrecog nizable size specify the paper size in Paper Size See Tray Paper Size Tray1 Tray Paper Size Tray2 3 General Settings Guide and Copy Paper About This Machine Misfeeds occur fre quently You may have loaded paper of a size not shown on the paper size selector Use Tray Paper Settings to set the paper size See Tray Paper Set tings General Settings Guide An e...

Page 13: ... screen is displayed Users are restricted by user man agement Enter the user code up to eight digits and then press q The Authentication screen appears Basic Authentication Windows Authentication LDAP Authenti cation or Integration Server Au thentication is set Enter your login user name and user password See When the Authentication Screen is Dis played About This Machine The Temperature Alert Tur...

Page 14: ...eys to proceed to a subsequent job 1 means that another job will automatically start after the current job is fin ished Mode after you select Copy Facsimile Printer Scanner Transmission Operation Transmission Reception Receive Data Print Mode before you select Using the control panel Copying Scanning An Original for Memory Transmission Memory Transmission Immediate Transmission Memory Reception Pr...

Page 15: ...parallel reception any subsequent job is suspended until reception is com pleted Note If the machine is capable of executing multiple functions simultaneously specify which function should have priority in Print Priority This setting is factory preset to Display mode For setting of Printing Priority Function see Print Priority General Settings Guide While printing is in progress scanning a documen...

Page 16: ...When the Machine Does Not Operate as Wanted 10 1 ...

Page 17: ...ficult to de tect Copy Reference Cannot detect original size Original is not placed Place your originals Check original orientation Original is not placed in a proper orientation Change the orientation of the original Check paper size Improper paper size is set If you press the Start key copy will start onto the selected paper Rotate Sort is unavailable with this paper size A size of paper for whi...

Page 18: ...scanning and then press Stop You do not have privileges to use this func tion The use of this function is restrict ed to authentified users only Contact the administrator Authentication failed The entered login user name or login password is not correct Inquire the user administrator for the correct login user name and login password Authentication failed Cannot access the authentication server wh...

Page 19: ...ly according to the type of paper you have loaded When printing on enve lopes lower the envelope lever If printed images are unclear even when printing on non envelope paper lower the envelope lever See When copying onto enve lopes Copy Reference Printed images contain blots or are patchy The ink may be dry or the nozzles of the printheads may be clogged preventing effective discharge If the machi...

Page 20: ... cleaning if neces sary See p 94 Maintenance The image is too dark or too light The expiration date of the print cartridge has passed Open the print cartridge and use it before the expiration date The image is too dark or too light The correct paper type settings are not made Check if paper loaded on the pa per tray bypass tray or One Sheet Bypass Tray matching the paper type set on the control pa...

Page 21: ... correctly Set originals correctly See Copy Paper About This Machine Parts of images are not copied The correct paper size is not se lected Select the proper paper size Images appear only partially coloured The paper is damp Use paper that has been stored in the recommended temperature and humidity condition See Copy Paper About This Ma chine Coloured lines appear The exposure glass or scanning gl...

Page 22: ...xposure glass Place the print on the exposure glass in either of the following ways Place an OHP transparency on the exposure glass and then place the print on top of the OHP transparency Place the print on the expo sure glass and then place two or three sheets of white paper on top of it Leave the expo sure glass cover ADF or ARDF open when copying Problem Cause Solution ...

Page 23: ...temperature and humidity condition See Copy Paper About This Ma chine Misfeeds occur frequently The paper is too thick or too thin Use recommended paper See Copy Paper About This Ma chine Misfeeds occur frequently The copy paper is wrinkled or has been folded creased Use recommended paper Use paper that has been stored in the recommended temperature and humidity condition See Copy Paper About This...

Page 24: ... The front cover is open Make sure the right and lower right covers are properly closed Problem Cause Solution When using Combine parts of the image are not copied You specified a reproduction ra tio that does not match the sizes of your originals and copy paper When you specify a reproduction ratio using Manual Paper Select mode make sure that the ratio matches your originals and the copy paper S...

Page 25: ... in Tray Paper Settings in System Settings Set the tray to On in Tray Paper Settings in System Settings See System Settings General Set tings Guide Copies are not in du plex order You placed the originals in the in correct order When placing a stack of originals in the ADF or ARDF the last page should be on the bottom If you place an original on the ex posure glass start with the first page to be ...

Page 26: ...ory The scanned originals exceeds the number of pages that can be stored in memory Press Print to copy scanned orig inals and cancel the scanning da ta Press Clear to cancel the scanning data and not copy Press Resume to scan and copy remaining origi nals The machine checked if the re maining originals should be cop ied after the scanned original has been printed To continue copying remove all cop...

Page 27: ...lowing sounds that the machine makes On Hook Mode Heard when the On Hook Dial key is pressed At Transmission Heard when immediate transmission is performed At Reception Heard when the machine receives a document At Dialing Heard after pressing the Start key until the line connects to the destination At Printing Heard when a received document is printed A Press the User Tools Counter key B Select F...

Page 28: ...st Sound Volume using U or T and then press the OK key E Select the item you want to adjust using U or T and then press the OK key F Select the volume using W or V and then press the OK key Press the Escape key to cancel setting and the display returns to that of step E G Press the User Tools Counter key The standby display appears AMA049S ...

Page 29: ...djust the On Hook volume when you press the On Hook Dial key See On Hook Dial Facsimile Reference If the extended security function prevents you changing this setting con tact the administrator You can set the volume level to between 1 and 7 ...

Page 30: ...with the fax Record the code number shown in the display and contact your service representative Other functions can be used Cannot send fax as scanner is in use by another function The machine is scanning an orig inal under another function Before sending the fax cancel the current scan job under the other function To do this press the Clear Stop key on the control panel to display the message Cl...

Page 31: ...has failed Try the operation once more If the message is still shown the network may be crowded Check the information of System Set tings See System Settings General Settings Guide Specified group contains some invalid dest Do you want to se lect only valid dest The specified group contains some destinations for sending by e mail and some destinations for sending by Scan to Folder To select destin...

Page 32: ...Help Contact the administrator Check whether there are any network prob lems 13 18 Cannot access SIP server Use your Web Image Monitor to check the SIP server ad dress is correctly pro grammed See the Web Image Monitor s Help Contact the administrator Check whether there are any network prob lems 14 01 Cannot find the DNS server SMTP Server or folder for for warding Check that the DNS server IPv4 ...

Page 33: ... the Web Image Monitor s Help Check that the user ID and password for the computer in which the folder for forward ing is specified are correctly programmed Check that the folder for for warding is correctly specified Check that the computer in which the folder for forward ing is specified is correctly op erated Contact the administrator Check whether there are any network prob lems 14 33 No machi...

Page 34: ...e File Transfer Settings Gen eral Settings Guide You can also use the Web Image Mon itor for confirmation See the Web Image Monitor s Help Check whether there are any network prob lems 15 11 Cannot find the DNS server or POP3 IMAP4 server Check that the DNS server IPv4 address is correctly pro grammed using Web Image Monitor See the Web Image Monitor s Help Check that the DNS server is correctly p...

Page 35: ...ceive documents as usual even if the message appears on the display You can turn this function on or off with Pa rameter Settings See Parameter Setting General Settings Guide Check whether there are any network prob lems 15 12 Cannot log on to the POP3 IMAP4 server Check that the user name and password of the E mail Ac count are correctly pro grammed from File Transfer under System Settings See Fi...

Page 36: ...Maximum E mail Size General Settings Guide When using On Hook Dial or Manual Dial Receiving appears and transmis sion is not allowed If the machine fails to detect the size of the original when the Start key is pressed it performs a receiving operation Press Original Size select the scan area and then resend the document If you use On Hook Dial or Manual Dial frequently it is recommended that you ...

Page 37: ...ailed to print received fax docu ments If this happened when the Re ceive File indicator was lit low paper may have caused printing to stop Load paper into the tray See SubstituteReception Facsimile Reference The machine failed to print received fax docu ments When B is lit Load paper into the tray See p 71 Loading Paper Receiving is impossible though transmission is possible The ink has run out R...

Page 38: ...at has been already printed onto See Copy Paper About This Ma chine Copy paper becomes creased The paper is damp Use paper which has been stored at the right temperature and hu midity condition See Copy Pa per About This Machine Copy paper becomes creased The paper is too thin Use recommended paper See Copy Paper About This Ma chine Images appear only partially coloured The paper is damp Use paper...

Page 39: ...settings are not made Check if paper loaded on the pa per tray bypass tray or One Sheet Bypass Tray matching the paper type set on the control pan el See Copy Paper About This Machine The image is too dark or too light Using print cartridges not recom mended by the supplier or refill ing the print cartridge may degrade the print quality or cause a malfunction Use only print cartridges recom mended...

Page 40: ...Lock Substitute Reception and Auto Document When about one hour passes af ter power to the machine is turned off all fax documents stored in memory are lost If any documents have been lost for this reason a Power Failure Report is automatically printed when the machine is turned on If fax documents stored for Memo ry Transmission have been lost check the destinations and resend the documents If fa...

Page 41: ...error occurs during reception ask the sender to resend the document Note If an error happens frequently contact your service representative The Page column gives the total number of pages The Page not sent or Page not received column gives the number of pages not sent or received successfully You can display a destination with the User Parameters See Parameter Set tings General Setting Guide You c...

Page 42: ...e data loss Keep the machine plugged in and the main power switch on for about 24 hours after the power loss Even if the main power switch is turned off the contents of the machine memory for example programmed numbers will not be lost However if power is lost for about one hour because the main power switch is turned off there is a power cut or the power cable is removed contents of the Fax memor...

Page 43: ...See Pa rameter Settings General Setting Guide If Error Mail Notification cannot be sent the Error Report E Mail is printed by the machine If an error occurs when an e mail is received via SMTP the SMTP server sends an error e mail to the originator of the document Error Report E Mail The Error Report E Mail is printed by the machine when it is unable to send an Error Mail Notification Server Gener...

Page 44: ...Troubleshooting When Using the Facsimile Function 38 3 ...

Page 45: ...ows 2000 and Windows NT 4 0 A On the Start menu point to Settings and then click Printers B Double click the Add Printer icon C Follow the instructions in Add Printer Wizard If the printer driver is on a CD ROM the location of the RPCS printer driver is either DRIVERS RPCS WIN9X_ME DRIVERS RPCS WIN2K_XP or DRIVERS RPCS NT4 If the installer starts click Cancel to quit Windows XP Professional Window...

Page 46: ...e procedure under Windows XP Home Edition A On the Start menu click Printers and Faxes B Click Add a Printer C Follow the instructions in Add Printer Wizard If the printer driver is on a CD ROM the location of the RPCS printer driver is DRIVERS RPCS WIN2K_XP If the installer starts click Cancel to quit ...

Page 47: ...nting The machine is printing Wait a while Waiting The machine is waiting for the next data to print Wait a while Offline The machine is offline To start printing switch the ma chine online by pressing Online Key Please wait This message may appear for a few seconds It means the machine is initializing replenishing ink or execut ing maintenance operations Wait a while Resetting Job The machine is ...

Page 48: ...ain power switch and back on again If the message appears again contact your sales or service representative USB Error An error has occurred in the USB interface Turn off the main power switch and back on again If the message appears again contact your sales or service representative Ethernet Board Error An error has occurred in the Eth ernet board Turn off the main power switch and back on again ...

Page 49: ...or Log using U or T and then press the OK key An error log is printed Note The most recent 30 errors are stored in the error log If a new error is added when there are 30 errors already stored the oldest error is deleted However if the earliest error is a Sample Print Locked Print Hold Print or Stored print er ror it is not deleted The error is stored separately until the number of those er rors r...

Page 50: ... Interface cable was connect ed after the machine was pow ered Connect the interface cable before turning on the machine Printing does not start The Interface cable is not connect ed correctly Connect the interface cable se curely If it has a fastener fasten that securely as well See Con necting to the Interfaces Gener al Settings Guide Printing does not start The appropriate Interface cable is no...

Page 51: ...t start The login user name login pass word or driver encryption key is invalid Check the login user name login password or driver encryption key is correct Data in lamp does not blink or light up If the data in lamp is unlit or not flashing even after performing Print the machine has not re ceived the data When the machine is connect ed to a computer via a cable check the computer print port sett...

Page 52: ...the Print to the following port s list confirm the correct port is selected Windows XP A Click the Start button and then click Printers and Faxes B Click the icon of the machine On the File menu click Properties C Click the Ports tab D In the Print to the following port s list confirm the correct port is selected Windows Server 2003 A Click the Start button point to Settings and then click Printer...

Page 53: ...ting on thick paper in the by pass tray PCL 5c 6 and PostScript 3 Select Thick in the Type list on the Paper tab RPCS Select Thick in the Paper type list on the Print Set tings tab Printed images contain blots or are patchy The print heads can scratch paper that is too thick or thin resulting in ink bleed Printing on coarse paper or treated pa per can result in faint print image Use supplier recom...

Page 54: ...paper or replace it See Copy Paper About This Machine Printed images contain blots or are patchy The paper is too thick curled or the print density is too high Lower the envelope lever for printing Image blurs or double lines ap pear The printheads are misaligned Adjust the head positions If they are still misaligned print the nozzle check test pattern and then perform head cleaning if necessary S...

Page 55: ...printer See Setting Up the Printer Driver Printer Reference Print result dif fers from the dis play Data transmis sionfailed orwas cancelled during printing Check whether there is failed or cancelled data remain ing See Checking the Error Log Printer Reference Characters and colours differ from the display The colour set tings have not been correctly adjusted The display uses a different method of...

Page 56: ...tings dialog box on the Misc tab select Print as bitmap See the printer driver Help Some characters arenotprintedor appear strange The correct print er driver settings are not made In the Change User Settings dialog box on the Misc tab select Change methods to extract TrueType fonts On the Misc tab select Spool data in EMF format In the Change User Settings dialog box on the Misc tab select Print ...

Page 57: ...he compu ter s display With certain functions such as enlargement and reduction image layout might be differ ent to that on the computer dis play In the application change the layout character size and character settings The printed im age is different from the image on the compu ter s display You might have selected to re place TrueType fonts with ma chine fonts in the printing process To print a...

Page 58: ...nly partially coloured The paper is damp Use paper that has been stored in the recommended temperature and humidity condition See Copy Pa per About This Machine White lines ap pear A nozzle might be misfiring Print the test pattern to check whether a nozzle is misfir ing Perform head cleaning if necessary See p 94 Maintenance Garbled charac ters are printed The correct print er language might have...

Page 59: ...ons on Advanced on Layout tab in the printing prefer ences dialog box Windows NT 4 0 File on Advanced on Document Defaults tab in the printing preferences dialog box Mac OS 9 x Printer Specifications in the print dialog box Mac OS X Set 3 tab in Printer Features in the print dialog box If you use Windows select PostScript optimize for speed Windows 95 98 Me PostScript output format on the PostScri...

Page 60: ...o ken lines Dither patterns do not match Make the following settings with the printer driver Change the Dithering setting on the Image Adjust ments tab in the Change User Settings dialog box on the Print Quality tab in the RPCS printer driver See the printer driver Help Optional compo nents connected to the machine are not recog nized when us ing Windows 95 98 Me Win dows 2000 XP Windows Server 20...

Page 61: ...ontact the administrators No transmission when using 1394 interface connec tion Interface con nection has not been made The correct computer set tings are not made Check using the following procedure A Confirm the IEEE 1394 interface cable is connected securely B Restart the computer If the error occurs even after executing the above operation proceed to the fol lowing steps C Unplug the IEEE 1394...

Page 62: ...i rect Print PDF files are password pro tected To print password protected PDF files enter the pass word in the PDF Menu or on Web Image Monitor For details about PDF Menu see PDF Menu Gen eral Settings Guide For details about Web Image Monitor see the Web Image Monitor Help PDF files do not print out cannot perform PDF Di rect Print PDF files cannot be printed if they are print disa bled via PDF ...

Page 63: ...might have occurred Occurrenceof interference from IEEE802 11b wireless LAN devices affect com munication speed Bluetooth transmission speeds are not high Reduce the number of jobs Remove the machine from close proximity with IEEE802 11b wireless LAN devices If there are active IEEE802 11b wireless LAN devices or other Bluetooth devices nearby relocate the ma chine or deactivate those devices Prob...

Page 64: ...he machine back on When the machine is fully booted up reconnect the USB cable When two or more dig ital cameras are con nected the second and subsequentcamerasare not recognized You have connected multiple digital cameras Connect one digital camera only Do not connect multiple cameras Printing is disabled The number of originals exceeds the maximum number of pages that can be printed at a time Th...

Page 65: ...not pressed flat against the exposure glass Make sure that the original is pressed flat against the exposure glass The scanned image is upside down The original was placed upside down Place the original in the correct orientation See Placing Origi nals Copy Reference No image results from scanning The original was placed with the front and back reversed When the original is placed di rectly on the...

Page 66: ...ery function failing to operate Problem Cause Solution The network cannot be browsed when specify ing the destination fold er The following machine settings may not be correct IPv4 address Subnet Mask Check the settings See Network Settings General Settings Guide Problem Cause Solution The Scanner Properties dialog box cannot be displayed Advanced encryption has been specified in the extended secu...

Page 67: ...on Updating desti nation list Re select destination s or sender s name later The destination list is being up dated from the network using SmartDeviceMonitor for Admin Depending on the number of des tinations to be updated there may be some delay before you can resume operation Opera tions are not possible while this message is displayed Wait until the message disap pears Do not switch off the pow...

Page 68: ...tion once more Try the operation once more If the message is still shown the network may be crowded Check the information of System Set tings See System Settings General Settings Guide LDAP server auth has failed Check the settings The user name and password dif fer from those set for LDAP Au thentication Make settings correctly for the user name and the password for LDAP server authentication Des...

Page 69: ...is still shown the network may be crowded Check the information of System Set tings See System Settings General Settings Guide Specified group contains some invalid dest Do you want to se lect only valid dest The specified group contains some destinations for sending by e mail and some destinations for sending by Scan to Folder To select destinations for sending by e mail press Select for the mess...

Page 70: ...ing e mail Send e mail after specifying the send er s name Exceeded max E mail size Send ing E mail has been cancelled The maximum e mail size has been exceeded Increase the size of Max E mail Size Set Divide Send E mail to On per page or On per max size See Send Settings General Set tings Guide Sending failed Check settings and check Scanned File Status While a file was being sent a net work erro...

Page 71: ... rect Confirm the destination compu ter and the path and then enter it again Exceeded max data size per file Cannot scan The scanned data will be deleted The number of files exceeded the maximum number possible Reduce the number of files and send them again Original is be ing scanned by another func tion The machine is using another function such as copying Retry scanning after the opera tion with...

Page 72: ...heck resolution and Start The scanned data exceeded max imum data capacity Specify the scan size and resolu tion again Note that it may not be possible to scan very large origi nals at a high resolution See Re lationship between Resolution and File Scanner Reference Exceeded max page capacity Do you want to send the scanned data The number of scanned pages ex ceeded maximum page capacity Select wh...

Page 73: ...y Winsock from the operating system CD ROM The name is al ready in use Check the regis tered names You tried to register a name that is already in use Use another name Cannot detect the paper size of the origi nal Specify the scanning size The set original was misaligned Place the original correctly Specify the scan size When placing an original di rectly on the exposure glass the lifting lowering...

Page 74: ...scanner The machine is not connected to the network correctly Check whether the machine is connected to the network correct ly No response from the scanner The network is crowded Wait for a while and then try to reconnect Error has oc curred in the scanner The application specified scan conditions have exceeded the set ting range of the machine Check whether the scanning set tings made with the ap...

Page 75: ...tead XXX and YYY indicate a scanner name The main power switch of the previously used scanner is not set to On The machine is not connected to the network correctly Check whether the main pow er switch of the scanner used for the previous scan is turned off Check the previously used scanner is connected to the network correctly Deactivate the personal fire wall of the client computer Use an applic...

Page 76: ... restart scan ning Memory is insufficient Close all the unnecessary ap plications running on the cli ent computer Uninstall the TWAIN Driver restart the computer and then reinstall the TWAIN Driver No User Code is registered Con sult your system administrator Access is restricted with user codes Contact the administrator Any of Login User Name Login Password or Driver Encryp tion Key is in correct...

Page 77: ...you do not misfeeds might occur Straighten curled or warped paper before loading For paper types and sizes see Recommended Paper Sizes and Types About This Machine To load paper in the bypass tray See Using the Bypass Tray Copy Refer ence Loading Paper into the Paper Tray 1 This section explains how to load paper into the paper tray A Gently pull the paper tray all the way out B Press the release ...

Page 78: ...eck that the top of the stack is not higher than the limit mark inside the tray E Position the end fence flush against the paper F Gently push the paper tray all the way in Note For details about loading paper of a size not selectable with the paper size selectors in Paper Trays 1 2 and 3 see Changing the Paper Size Reference p 76 Changing the Paper Size AMH002S AMH008S AMH009S ...

Page 79: ... B Press the release lever and without letting go of the lever slide the end fence C Make sure the edges of the deck of paper are flush and load the paper face down Check that the top of the stack is not higher than the limit mark inside the tray D Position the end fence flush against the paper E Gently push the paper tray all the way in AMH003S AMH007S AMH011S ...

Page 80: ...ow the origi nals and paper are placed Select On Always in Letterhead Setting under Copier Features and then place the original and paper as shown below See Letterhead Settings General Settings Guide When printing with the printer function placing orientation is the same Original Orientation 1 When using Combine Series by setting Always Specify for Orientation specify for the original orientation ...

Page 81: ... down copies However if you load paper in the bypass tray upside down copies are in the correct orientation 3 When printing on the front page Note In System Settings specify Letterhead for Paper Type of the paper tray you want to use See Tray Paper Settings General Settings Guide Paper loading Paper tray Bypass tray 2 Copy mode Paper orientationK 1 sided copy 2 sided copy 1 3 Paper orientationL 1 ...

Page 82: ...ot misfeeds might occur Fan the paper before loading Straighten curled or warped paper before loading For details about paper sizes and types see Tray Paper Settings General Settings Guide Changing the Paper Size in Tray 1 Use the following procedure when changing the paper in Tray 1 to paper of a different size A Make sure the paper tray is not being used for copying and then gently pull the pape...

Page 83: ...ght side of the side fence lock to release the fence E Press the release lever and without letting go of the lever adjust the side fences according to the size of paper to be loaded F Press the metal plate down until it clicks AMH014S AMH015S AMH002S ...

Page 84: ...of paper are flush and load the paper face down Make sure the paper stack is flush against the right side fence Check that the top of the stack is not higher than the limit mark inside the tray H Press down the left side of the side fence lock to lock the fence AMH008S AMH017S AMH023S ...

Page 85: ...ize selector in the paper tray according to the paper size K Gently push the paper tray all the way in L Check the paper size on the control panel Note When setting small quantities of copy paper be careful not to squeeze in the side fence too much or paper will not feed in properly AMH018S AMH019S ...

Page 86: ... User Tools Counter key B Select System Settings using U or T and then press the OK key C Select Tray Paper Settings using U or T and then press the OK key D Select Paper Size for the paper tray of which paper size will be changed using U or T and then press the OK key E Select the paper size using the scroll keys and then press the OK key AMA049S ...

Page 87: ...ing the Paper Size 81 6 F Press the User Tools Counter key G Remove the end fence from the paper tray H Place it in the corner pocket on the left I Remove any paper in the paper tray AMA049S AMH004S AMH013S ...

Page 88: ...own the right side of the side fence lock to release the fence K Press the release lever and without letting go of the lever adjust the side fences according to the size of paper to be loaded L Press the metal plate down until it clicks AMH032S AMH033S AMH039S ...

Page 89: ...heck that the top of the stack is not higher than the limit mark inside the tray N Press down the left side of the side fence lock to lock the fence O Set the paper size selector in the paper tray to p P Gently push the paper tray all the way in Q Check the paper size on the control panel AMH040S AMH041S AMH042S ...

Page 90: ...elector A Set the paper size selector to p B Press the User Tools Counter key C Select System Settings using U or T and then press the OK key D Select Tray Paper Settings using U or T and then press the OK key E Select Paper Size for the paper tray of which paper size will be changed using U or T and then press the OK key F Select the paper size using the scroll keys and then press the OK key AMA0...

Page 91: ...ded in Paper Tray 1 see Tray Paper Size Tray1 General Settings Guide Changing a Paper Size in the Tray 2 3 This section explains how to change the size of paper loaded in Paper Trays 2 and 3 A Make sure the paper tray is not being used for copying and then gently pull the paper tray all the way out B Remove any paper in the paper tray C Press the release lever and without letting go of the lever s...

Page 92: ... Cartridges 86 6 D Press down the right side of the side fence lock to release the fence E Press the release lever and without letting go of the lever adjust the side fences according to the size of paper to be loaded AMH020S AMH022S ...

Page 93: ...er face down Make sure the paper stack is flush against the right side fence Check that the top of the stack is not higher than the limit mark inside the tray G Press down the left side of the side fence lock to lock the fence H Position the end fence flush against the paper AMH007S AMH011S AMH021S ...

Page 94: ... K Check the paper size on the control panel Changing to a Size Other Than Indicated on the Paper Size Selector This section explains how to change to a paper size not indicated on the paper size selector A Set the paper size selector in the paper tray to p B Press the User Tools Counter key C Select System Settings using U or T and then press the OK key AMH025S AMA049S ...

Page 95: ...and then press the OK key F Select the paper size using the scroll keys and then press the OK key G Press the User Tools Counter key H Load the paper and then gently push the paper tray all the way in I Check the paper size on the control panel Note For details about the type of paper that can be loaded in Paper Trays 2 and 3 see Tray Paper Size Tray2 3 General Settings Guide AMA049S ...

Page 96: ... necessary for replacing print cartridges When you see the See in structions in Front Cover then replace the Ink Cartridge mes sage appear on the control panel replace corresponding colour print cartridges Note Use the Supplies display of Enquiry to display the ink names and the tele phone number for order placement All four colour cartridges can be replaced using the same method For details about...

Page 97: ...dge during the validity period stated on their packaging Do not open the print cartridge pack immediately before replacement Do not touch the ink jet area of the print cartridge Do not shake the print cartridge Doing so can result in leakage Do not disassemble the print cartridge Do not turn off the power during the replacement procedure and do not dis connect the power plug from the wall outlet O...

Page 98: ...en perform transmission operation The error message disappears Note Reports produced during sending are not printed If the fax screen does not appear in step A press the Facsimile key Ink This section contains advice and cautions for handling and storing ink Handling Ink R CAUTION Use only manufacturer recommended print cartridges Recommended cartridg es have been safety evaluated and will not dam...

Page 99: ...e Used Print Cartridges Print cartridge cannot be re used If ink comes into contact with your eyes rinse immediately in running water For other symptoms consult a doctor If ink is ingested induce vomiting by drinking a strong saline solution Con sult a doctor immediately If your skin comes into contact with ink wash the affected area thoroughly with soap and water ...

Page 100: ...esults of the test pattern proceed to step 5 Important Make sure the envelope lever has been raised Otherwise you will be unable to print Check that A4L or 81 2 11 L size paper is loaded in Tray 1 If paper is not loaded the test pattern does not print During printing the test pattern do not conduct any other operations A Press the User Tools Counter key B Select Maintenance using U or T and then p...

Page 101: ...ring In the test pattern K1 C M Y and K2 correspond to Black 1 Cy an Magenta Yellow and Black 2 of the machine s Flush Print heads and Clean Print heads functions respectively User Tools Counter Maintenance To correct non firing nozzles in K1 of the test pattern select Maintenance or Black 1 of Flush Print heads and then flush the nozzles AML001S AML002S ...

Page 102: ...rtridges 96 6 F Press End If the printing is blurred or unclear press Continue to perform head cleaning G Press the User Tools Counter key Note For details about head cleaning see Clean Print heads Reference p 97 Clean Printheads AMA049S ...

Page 103: ...during head cleaning Head cleaning is not possible if even one colour has run out Cleaning may be incomplete if ink in a cartridge gets too low or runs out dur ing cleaning A Press the User Tools Counter key B Select Maintenance using U or T and then press the OK key C Select Clean Print heads using U or T and then press the OK key D Select the colour of which head you want to clean using U or T a...

Page 104: ...eated head cleaning several times and the nozzle is still failing to fire per form flushing If flushing also fails to reactivate the nozzle turn the machine s power switch to Off and leave it at least eight hours before switching the machine back on This should resolve the problem Do not turn the main power off If you do the ink in the print head may dry up and make printing even worse For details...

Page 105: ... firing nozzle Perform this function on a colour basis Important Flushing consumes ink Perform flushing only when necessary Perform no other operations during flushing Flushing is not possible if even one colour has run out Flushing may be incomplete if ink in a cartridge gets too low or runs out dur ing flushing A Press the User Tools Counter key B Select Maintenance using U or T and then press t...

Page 106: ...ush using U or T and then press the V key E Press the OK key F Press Yes Flushing is begins G Press Exit To check the results of flushing select Nozzle Check Pattern to print the test pattern H Press the User Tools Counter key Note For details about the Check Pattern see Nozzle Check Pattern AMA049S ...

Page 107: ...achine The test pattern differs depend ing on the resolution To check the print results of the test pattern proceed to step 7 Important Make sure the envelope lever has been raised Otherwise you will be unable to print Check that A4L or 81 2 11 L paper is loaded in Tray 1 If this size of pa per is not loaded the test pattern is not printed Perform no other operations while the test pattern is prin...

Page 108: ...elect the item of which head position you want to adjust using U or T and then press the OK key The item you should select differs depending on the write mode you want to adjust Select 2 Printer High Speed if you selected Plain and fast mode 300 dpi for the printer Select 1 Standard if you selected other items F Press the Start key The Head Position Adjust test pattern is printed ...

Page 109: ...the square pattern that has faintest colour closest to grey and aligned verticals on both sides If the value in column A is 2 the adjustment value of A is 2 H Press Adjust I Select the item you want to adjust and then press the OK key J Enter the adjustment value checked in Step G and then press the OK key The display returns to that of Step I AML003S ...

Page 110: ...ults of the test pattern proceed to step 7 Important Make sure the envelope lever is raised You cannot print if it is down Make sure A4L or 8 1 2 11 paper is loaded in the tray you want to adjust If this size of paper is not loaded the test pattern is not printed To specify this setting for the bypass tray load a sheet of A4L paper in the bypass tray Perform no other operations while the test patt...

Page 111: ...ance using U or T and then press the OK key C Select Adjustment using U or T and then press the OK key D Select Registration using U or T and then press the OK key E Select the tray of which print position you want to adjust using U or T and then press the OK key AMA049S ...

Page 112: ...lacing Print Cartridges 106 6 F Press the Start key The test pattern is printed G Check the optimal adjustment value based on the print results of the test pattern Fold the paper lengthwise by aligning its corners AML004S ...

Page 113: ... calibration marking the ad justment value of Sub Scan is 1 0 Fold the paper widthwise in the same manner and then check the adjust ment value of Main Scan The adjustment values of Main Scan and Sub Scan are in increments of 0 1 H Press Adjust I Select an item you want to adjust and then press the OK key J Enter the adjustment value with n o and then press the OK key The display returns to that of...

Page 114: ...or izontals or image surface irregularities occur To check the print results of the test pattern proceed to step 6 Important Make sure the envelope lever has been raised Otherwise you will be unable to print Check that A4L or 81 2 11 L paper is loaded in Tray 1 If this size of pa per is not loaded the test pattern is not printed Perform no other operations while the test pattern is printing A Pres...

Page 115: ...e OK key E Press the Start key The test pattern is printed F Check the optimal adjustment value based on the print results of the test pattern The optimal adjustment value is the number next to the square pattern that has the faintest colour closest to grey and aligned horizontals on both sides If the value on the left of the pattern is 2 the adjustment value is 2 14 6 2 0 2 6 0 2 6 14 AML006S ...

Page 116: ...r ex ample 2 square is faintest and the horizontals on both sides of 6 are in the opposite direction to 2 so the adjustment value is between 3 and 5 depending on the degree of misalignment After completing the adjustment adjust the paper feed again to check if the optimal adjustment value is set G Press Adjust H Enter the adjustment value with n o and then press the OK key I Press End After a few ...

Page 117: ...is function resets the Head Position Adjust Registration and Adjust Pa per Feed values to their defaults A Press the User Tools Counter key B Select Maintenance using U or T and then press the OK key C Select Adjustment using U or T and then press the OK key AMA049S AMA049S ...

Page 118: ...using U or T and then press the OK key E Press Yes F Press Exit G Press the User Tools Counter key Note For details about settings see Head Position Adjust Registration and Adjust Paper Feed Reference p 101 Head Position Adjust p 104 Registration p 108 Adjust Paper Feed AMA049S ...

Page 119: ...This stamp cartridge is used for facsimile and scanner functions Do not add ink to the cartridge by yourself Neglecting this can cause ink leakage Be sure not to dirty your fingers with ink from the cartridge Use the cartridge specified for this machine A Open the ADF or ARDF unit B Opens the stamp cover C Pull out the old stamp cartridge AMH006S AMH010S ZEXH080J ...

Page 120: ...aper and Replacing Print Cartridges 114 6 D Insert the new stamp cartridge Insert the cartridge until the metal parts are no longer visible E Close the stamp cover F Close the ADF or ARDF unit AMI002S ZEXH100J ...

Page 121: ...original has jammed follow the instructions on the rear of machine s front cover to clear the jam A letter indicating the location of the jam is displayed on the control panel More than one misfeed may be indicated When this happens check all the areas indicated Connect the machine only to the power source described on the inside front cover of this manual Connect the power cord directly into a wa...

Page 122: ...Clearing Misfeeds 116 7 When A is lit When B is lit When C is lit AMI003S AMI004S AMI005S ...

Page 123: ...Removing Jammed Paper 117 7 When P is lit ADF When P is lit ARDF When Y is lit AMI006S AMI011S AMI007S ...

Page 124: ...Clearing Misfeeds 118 7 When Z1 is lit When Z2 is lit When Z3 Z4 is lit AMI008S AMI009S AMI010S ...

Page 125: ... 32 C 89 6 F Humidity 15 80 temperature to be 27 C 80 6 F at 80 A strong and level base The machine must be level within 5 mm 0 2 inches both front to rear and left to right To avoid possible buildup of ozone make sure to locate this machine in a large well ventilated room that has an air turnover of more than 30 m3 hr person Keep the machine away from humidity and dust Otherwise a fire or an elec...

Page 126: ...ug to avoid damaging the cord thereby reduc ing the risk of fire or electric shock Close all covers and trays including the front cover and bypass tray Keep the machine level and carry it carefully taking care not to jolt or tip it Rough handling may cause a malfunction or damage the hard disk or mem ory resulting in loss of stored files Protect the machine from strong shocks Impact can damage the...

Page 127: ... an extension cord Do not damage break or make any modifications to the power cord Do not place heavy objects on it Do not pull it hard nor bend it more than necessary These actions could cause an electric shock or fire If the power cord is damaged exposure of the core disconnection etc contact your service representative to change a new one Operating the ma chine with a damaged power cord may cau...

Page 128: ...ays check if the noz zles are clogged by printing a nozzle check test pattern Clean the print heads as necessary and then begin printing If you do not use the printer for a long period of time printing may not be per formed normally even if head cleaning is performed multiple times If this happens turn the power off and leave the printer alone for eight hours or longer If the machine has not been ...

Page 129: ...ur Do not clean parts other than those explicitly specified in this manual Other parts should only be cleaned by your service representative How to maintain Cleaning the machine Wipe the machine with a soft damp cloth and then wipe it with a dry cloth to remove the water Cleaning the Exposure Glass This section explains how to clean the exposure glass and scanning glass Clean 1 and 2 Fire and brea...

Page 130: ...marks 124 8 Cleaning the Exposure Glass Cover This section explains how to clean the exposure glass cover Cleaning the ADF ARDF This section explains how to clean the ADF or ARDF Clean 1 and 2 1 2 AMH012S ...

Page 131: ...void 120 Error Mail Notification 37 Error Report E Mail 37 F Flush Printheads 99 H Handling Ink 92 Head Position Adjust 101 How to Read This Manual 1 I If an Error Report is Printed 35 Indicators 3 Ink 92 L Letterhead 74 Loading Paper 71 Loading Paper into the Paper Tray 1 71 Loading Paper into the Tray 2 and 3 73 M Machine Environment 119 Maintaining Your Machine 123 Maintenance 94 Misfeed indica...

Page 132: ...ayed on the Client Computer 67 When a Message is Displayed on the Control Panel 62 When an Error Occurs Using Internet Fax 37 When Memory is Full 20 34 When Not Used for a Long Time 122 When PictBridge Printing Does Not Work 58 When Scanning is Not Done as Expected 59 When the Function Status Indicator Lights Up in Red 4 When the Network Delivery Function Cannot be Used 60 When the TWAIN Driver Ca...

Page 133: ...In accordance with IEC 60417 this machine uses the following symbols for the main power switch a means POWER ON b means POWER OFF Copyright 2005 ...

Page 134: ...Operating Instructions Troubleshooting Type for MP C1500 Aficio MPC1500 ISC 615G AE AE B229 7758 ...

Reviews: