infobit iCam P30 User Manual Download Page 4

                                                                                                              User Manual


1


Note 


Electric Safety 

Installation  and  operation  must  accord  with 
electric safety standard. 


Use Caution to Transport 

Avoid stress, vibration or soakage in transport, 
storage and installation. 


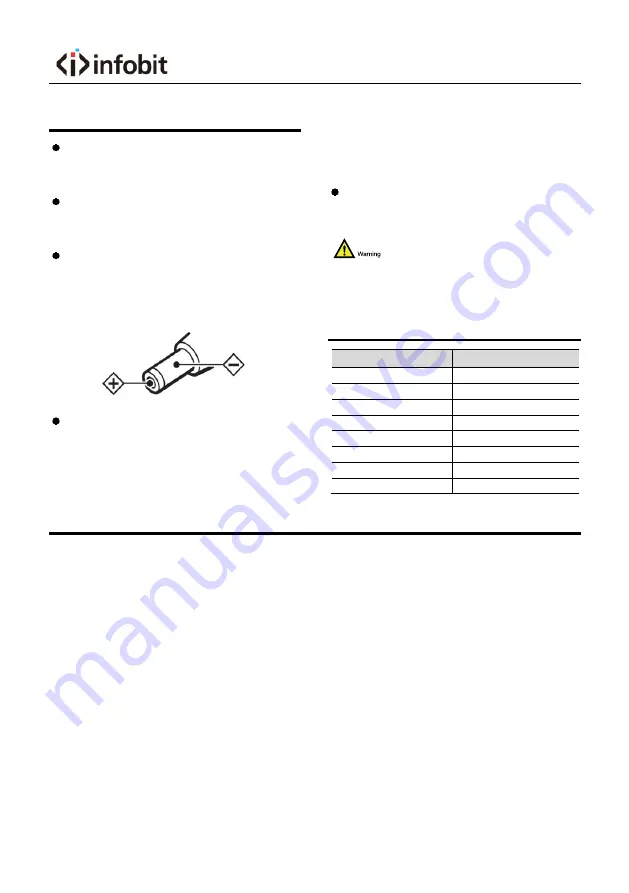
Polarity of Power Supply 

The power supply of this product is +12V, the 
max  electrical  current  is  2A.  Polarity  of  the 
power supply plug drawing shows as below. 


Installation Precautions 

Do not grasp the camera lens when carrying it. 
Don’t touch camera lens by hand. Mechanical 
damage may be caused by doing so. 
Do  not  use  in  corrosive  liquid,  gas  or  solid 

environment  to  avoid  any  cover  (plastic 
material)  damage.  Make  sure  there  is  no 
obstacle within rotation range. 
Please  never  power  on  before  installation  is 
completed. 


Do not Dismantle the Camera 

We  are  not  responsible  for  any  unauthorized 
modification or dismantling. 


Specific  frequencies  of  electromagnetic  field 
may affect the image of the camera! 

Packing List 

Name 

Quantity 

Camera 

Power Adaptor 

Power Cable 

RS232 Cable 

Remote Control 

Lens Protective Cap 

3P Phoenix Head 

User Manual 

Quick Start 

1)  Please check connections are correct before starting. 

Summary of Contents for iCam P30

Page 1: ...User Manual iCam P30 4K60 PTZ Conference Camera User Manual English V1 0...

Page 2: ...ol 7 5 GUI Settings 8 5 1 MENU 8 5 2 EXPOSURE 8 5 3 COLOR 9 5 4 IMAGE 10 5 5 P T Z 10 5 6 NOISE REDUCTION 11 5 7 SETUP 11 5 8 COMMUNICATION SETUP 12 5 9 RESTORE DEFAULT 12 6 Network Function 13 6 1 Op...

Page 3: ...Media Player Monitor 15 6 6 Camera Parameter Setup 16 6 6 1 Homepage Introduction 16 6 6 2 Video Settings 18 6 6 3 Image Settings 19 6 6 4 Audio Settings 19 6 6 5 System Settings 20 6 6 6 Network Set...

Page 4: ...and Mechanical damage may be caused by doing so Do not use in corrosive liquid gas or solid environment to avoid any cover plastic material damage Make sure there is no obstacle within rotation range...

Page 5: ...User Manual INFOBIT AV www infobitav com info infobitav com...

Page 6: ...nterface and it can output 4 channels of high definition digital signals at the same time Low Light The application of 2D and 3D noise reduction algorithm greatly reduces image noise Even under the co...

Page 7: ...1200Kbps Bit Rate Type Variable Rate Fixed Rate Frame Rate 50Hz 1fps 50fps 60Hz 1fps 60fps Audio Compression AAC Audio Bit Rate 96K 128K 256K Protocols TCP IP HTTP RTSP RTMP RTMPS ONVIF DHCP SRT Multi...

Page 8: ...es and Buttons Item Name 1 Restore Button 2 Network Interface 3 RS232 IN Interface 4 RS485 Interface 5 LINE IN Interface 6 HDMI Interface 7 3G SDI Interface 8 USB 3 0 Interface 9 DC 12V Interface 10 P...

Page 9: ...taneously press L R Set 1 STD set the Pan Tilt turn the same direction as the L R Set Simultaneously press L R Set 2 REV set the Pan Tilt turn the opposite direction as the L R Set 9 Focus Key Used fo...

Page 10: ...eset image Freeze By the OSD Menu Image Freeze to set recalling the preset image freeze function After the function is opened the screen will stay in before Recalling the Preset when Recalling the Pre...

Page 11: ...HOME button to enter the corresponding sub menu MENU Exposure Color Image P T Z Noise Reduction Setup Communication Setup Restore Default Home Enter Menu Exit 5 2 EXPOSURE Move the main menu cursor to...

Page 12: ...r Optional items Average Center Smart Top Iris Aperture value optional items F1 8 F2 0 F2 4 F2 8 F3 4 F4 0 F4 8 F5 6 F6 8 F8 0 F9 6 F11 0 Close Effective only in Manual AAE mode Shutter Optional items...

Page 13: ...u Back Luminance Brightness adjustment optional items 0 14 Contrast Contrast adjustment optional items 0 14 Sharpness Sharpness adjustment optional items Auto 0 15 Flip H Image flipped horizontally op...

Page 14: ...3D noise reduction optional items Off Auto 0 7 5 7 SETUP Move the main menu cursor to SETUP and press HOME key enter the setup page as shown in the following figure SETUP Language EN DVI Mode HDMI Vid...

Page 15: ...ocol V_AddrFix Optional items On Off When set to On useless in 88 30 01 FF Command P_D_Address Optional items 0 254 Effective only in Auto PELCO D protocol P_P_Address Optional items 0 31 Effective on...

Page 16: ...e data indicator orange will flash indicating that the physical connection of the camera has been completed 6 3 Internet Connection There are two main ways to connect video conference camera Connect b...

Page 17: ...onfig dialog of upgrade applets Step 4 Change the IP address netmask and gateway then click Set Step 5 Finish 6 4 2 Visit Access Camera Input http 192 168 100 88 to IE better with IE web browser other...

Page 18: ...name to camera setup the parameter then dynamic DNS can access camera Access link http hostname port number For example setup host computer name youdomain f3322 org the camera port number is 89 the ac...

Page 19: ...Audio control buttons can adjust the volume or set silent mode 3 Full screen switch button B PTZ Setup 1 Pan and Tilt Control Up Down Left and Right arrows and the home button allow you to manually dr...

Page 20: ...ow Method 1 Type a number into the Preset box Preset Optional items 0 254 Method 2 Type the name into the Presets Information Click Set button when PTZ turn to other position click Call button or clic...

Page 21: ...e However the configuration of the bit rate needs to be combined with the network bandwidth When the network bandwidth is narrow and the bit rate is configured larger the video stream cannot be transm...

Page 22: ...4 Sharpness Sharpness 0 15 slider control on the right shows the corresponding numerical Default value is auto 5 Hue Hue 0 14 slider control on the right shows the corresponding numerical Default valu...

Page 23: ...dress is 192 168 100 88 the MAC address cannot be modified 2 Port Settings A HTTP Port IP address identifies the network device the device can run multiple web applications each network program using...

Page 24: ...92 168 100 138 and port default value is 1234 9 NTP Settings Turn On Off NTP time sync main time show and sub time show Setting NTP server address time interval main stream position and sub stream pos...

Page 25: ...e is no video image in IE Browser Please visit VLC website http www videolan org vlc download and install the 32 bit VLC media player after it installed visit video conference camera will have normal...

Page 26: ...Remote control cannot control 1 Check and replace the new battery for the remote controller 2 Check whether the camera working mode is correct 3 Check whether the address of remote control can match...

Reviews: