34
35
ZEROING MENU > ZERO DISTANCE SUBMENU
Select, or customize, a
preset zero distance
1. In the Zeroing Menu,
rotate the
Control
Turret
to select a
zero distance option.
2. Short press the
Control Turret
to
enter the submenu
for the selected zero
distance.
3. In the submenu for
the selected zero
distance, you may:
a. Enter the reticle zeroing interface to adjust the
X/Y position of the reticle at the selected zero distance. See
Reticle Zeroing
below.
b. Customize the selected preset zero distance
, if desired.
ZEROING MENU > ZERO DISTANCE SUBMENU >
RETICLE ZEROING
Adjust the reticle
position of the selected
zero distance.
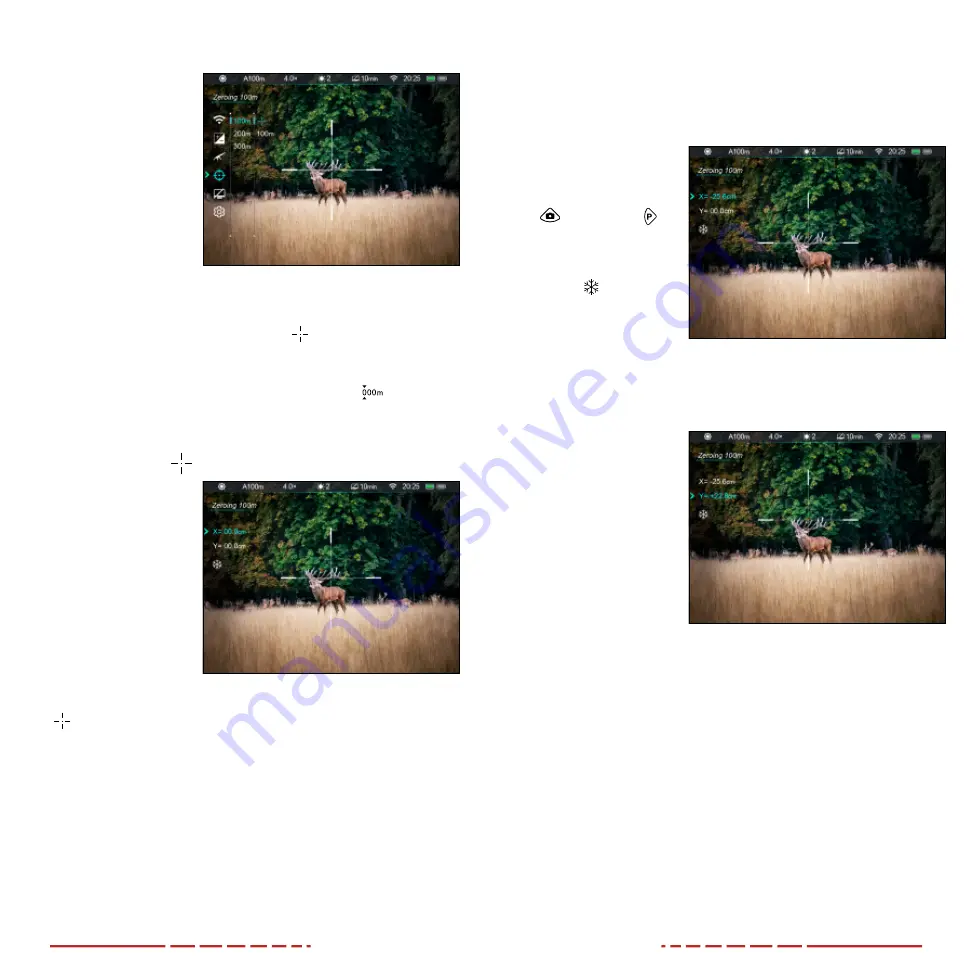
In the reticle zeroing
interface, the X/Y position
of the reticle may be
adjusted to match the
point of impact. See
information.
1. In the submenu for the selected zero distance, the reticle zero
menu item is selected by default. Short press the
Control
Turret
to select and enter the reticle zeroing interface.
2. The reticle zeroing interface has the following features:
1 X: Horizontal point of impact change (in cm or inches).
2 Y: Vertical point of impact change (in cm or inches).
3 Freeze Icon: Indicates that the image is frozen.
4 Reticle: Shows the new reticle position.
5 White Dot: Indicates center of initial reticle position.
NOTE: The red “X” indicates the point of impact. It is shown in the
figure for illustration purposes, and is not an interface element.
To zero your BOLT TD50L, either with a preset zero distance or a
customized zero distance (see next section for instructions):
1. Aim and shoot at your target.
2. Keep the reticle
centered on the
aiming point and
long press the
Photo
and
Palette
Buttons
at the same
time to freeze the
image. The image
freeze icon will
appear below the
X/Y coordinates
in the upper-right
corner.
3. Select the axis (X or Y) along which to move the cursor:
a. Short press the
Control Turret
to switch between
X
and
Y
.
The selected
axis is back-
highlighted blue.
The X-Axis is
selected by
default.
b.
X
(horizontal) is
the windage and
Y
(vertical) is the
elevation.
4. Adjust the X/Y
position of the reticle
until the reticle
matches the point of impact.
a. Rotate the
Control Turret
counterclockwise
to move in the
positive direction: X= Right and Y= Up.
b. Rotate the
Control Turret
clockwise
to move in the negative
direction: X= Left and Y= Down.
c. Rotate one click to move the reticle in the corresponding
direction by 1 pixel. One full rotation (20 clicks) is equivalent
to 20 pixels.
d. When adjusting your zero at a distance of 50 yards, one
click will change the impact point by 0.40” as shown in the
X and Y coordinate displays. At 100 yards that same click
moves 0.80”. At 200 yards one click moves 1.60”.


