


Chapter 4 - Configuring Impulse with Application Developer
4-9
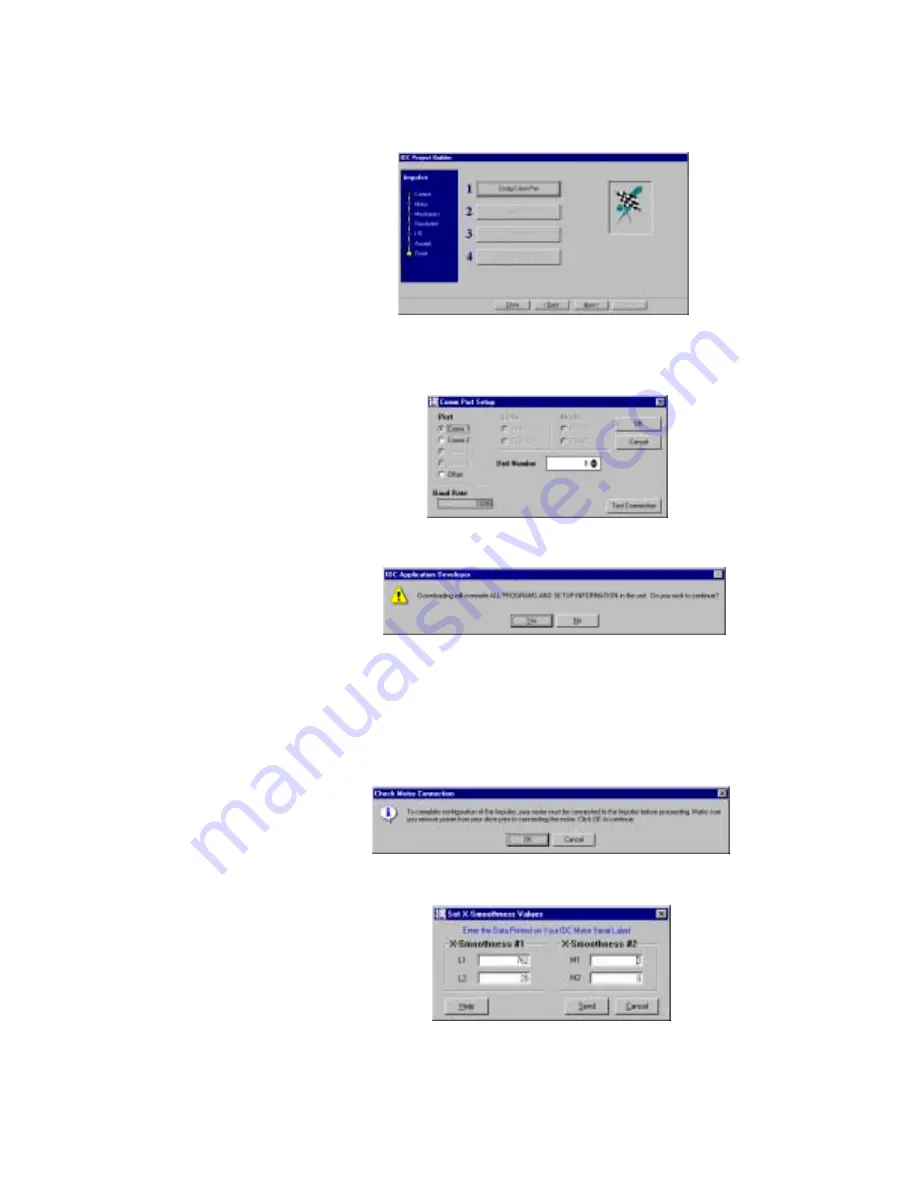
7.
Your basic project file has now been configured but the four “Finish” steps must be completed
in order to send the project file to the drive and probe the motor.
•
Click on
Config. Comm Port
(#1)
and select the Port to which you are connecting the
Impulse. Next, select a Unit Number (from 1 - 99) for the Impulse being configured. To test
communication using the current setup, click on Test Connection. Click OK.
•
Click on
Send All (#2)
to send the project setup parameters to the drive.
•
Click on
Probe Motor (#3)
. Pressing this button tells the drive to execute an electronic
probe of the motor to determine a host of proprietary, internal settings for use in the anti-
resonance/stall detect features. Any time the drive is connected to a different type of motor,
or if a new motor file is selected, the motor must be re-probed. When the drive is probing
the attached motor, a 1 kHz tone will be heard emanating from the motor. Depending on
motor type, this tone may persist for up to 15 seconds. Motor probe is not required each
time the Impulse is powered on. .
•
Click on
Set Tuning Values (#4)
and enter the values from your IDC motor label.
•
The project file has been sent to the drive and your application can now be fine-tuned using
the
Axis Setup
menu (starting on the next page).
Summary of Contents for Impulse PCW-5181
Page 2: ......
Page 4: ......
Page 8: ...Chapter 1 Overview 1 2 This page intentionally left blank...
Page 10: ...Chapter 2 Shipping Contents 2 2 This page intentionally left blank...
Page 24: ...Chapter 3 Connecting and Installing Your Impulse 3 14 This page intentionally left blank...
Page 90: ...Chapter 6 Hardware Reference 6 14 This page intentionally left blank...
Page 94: ...Chapter 7 Troubleshooting Your Impulse 7 4 This page intentionally left blank...
Page 98: ...Appendix A Recommended Wiring Practices A 2...
Page 119: ...Do Not Print This Page Inserted as Placeholder...