


GB
9
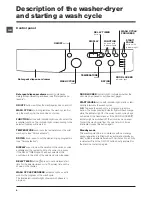
Setting the temperature
Turn the TEMPERATURE knob to set the wash temperature (see
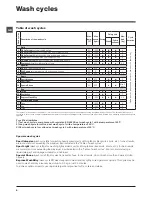
Table of wash cycles
).
The temperature may be lowered, or even set to a cold wash . The washer-dryer will automatically prevent you from selec-
ting a temperature which is higher than the maximum value set for each wash cycle.
Setting the drying cycle
Turn the DRYING knob to select the desired drying option.
There are two options:
A
- Based on time: From
40
minutes to
180
.
B
- Based on the desired laundry dryness level:
Iron dry
: suitable for clothes which will need ironing
afterwards. the remaining dampness softens creases,
making them easier to remove.
Hanger dry
: ideal for clothes which do not need to be
dried fully.
Cupboard dry
: suitable for laundry which can be put back in a cupboard without being ironed.
If your laundry load to be washed and dried is much greater than the maximum stated load
(see adjacent table)
, perform the
wash cycle, and when the cycle is complete, divide the garments into groups and put some of them back in the drum. At this
point, follow the instructions provided for a “
Drying only
” cycle. Repeat this procedure for the remainder of the load.
Drying only
Use the cycle selector knob to select a drying cycle (
11-12
) in accordance with the type of fabric. The desired drying level or
time may also be set using the DRYING knob.
Functions
The various wash functions available with this washer-dryer will help to achieve the desired results, every time.
To activate the functions:
1. Press the button corresponding to the desired function;
2. the function is enabled when the corresponding indicator light is illuminated.
Note: If the indicator light flashes rapidly, this signals that this particular function may not be selected in conjunction with the
selected wash cycle.
Delay timer
To set a delayed start for the selected programme, press the corresponding button repeatedly until the required delay period
has been reached. When this option is enabled, the symbol lights up on the display. To remove the delayed start option
press the button until the text “OFF” appears on the display.
!
This option is enabled with all programmes.
Selecting this option enables you to suitably adjust drum rotation, temperature and water to a reduced load of lightly soiled
cotton and synthetic fabrics (refer to the
“Table of wash cycles”
). “
” enables you to wash in less time thereby saving
water and electricity. We suggest using a liquid detergent suitably measured out to the load quantity.
!
This function may not be used in conjunction with cycles 1, 5, 6, 7, 8, 9, 10, 11, 12, 13, , ,
.
The
function saves energy by not heating the water used to wash your laundry - an advantage both to the
environment and to your energy bill. Instead, intensified wash action and water optimisation ensure great wash results in the
same average time of a standard cycle.
For the best washing results we recommend the usage of a liquid detergent.
!
This function may not be used in conjunction with wash cycles 5, 6, 8, 9, 10, 11,12, 13, , ,
.
Personalisation
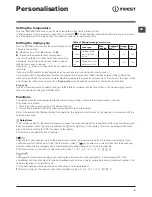
Table of Drying times
(guideline values)
Fabric
type
Load type
Max.
load (kg)
Cupboard
dry
Henger
dry
Iron
dry
Cotton
Clothing of diffe-
rent sizes, Terry
towels
5
180
170
140
Synthe-
tics
Sheets, Shirts, Py-
jamas, socks, etc.
3
140
120
100