Inada Chair HCP-9101A Operating Instructions Manual Download Page 8

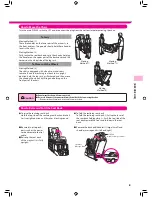
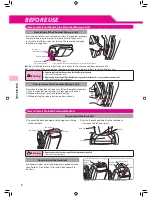
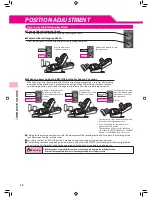
This product is shipped with the reclining seat folded down. Before use, be sure to raise the seat back to its 

upright position until it makes a locking sound.

Do not expose the chair to sudden bursts of heat. If the room where the chair is to be used is cold, turn the heat 

up slowly. If the chair is moved from a cold place into a heated room, wait one hour before using the chair.

Condensation could occur in the moving parts of the chair, which may compromise performance.
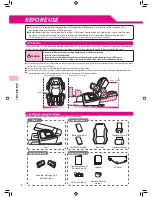
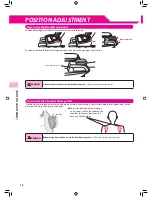
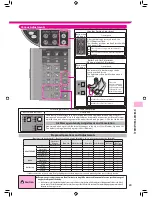
Installation

Allow for at least 16 inch clearance behind the chair and 12 inch in front of the chair when installing, so as to be able to 

recline the seat back fully without obstruction. Keep at least 8 inch clearance to the left and right of the chair.

Caution

Do not install the chair in an area of high humidity, such as a bathroom or sauna.

Install on a flat, level surface only.

Do not use in areas of high debris or dust content. Do not use where ambient temperature is 104°F or over.

Do not install the chair where it can come into contact with direct heat, such as direct sunlight or a radiator.

To avoid damaging floor surfaces and to cut down on the noise of the chair, it may be better to install the chair on a carpeted surface or to lay a piece of carpet under 

the chair. (Do not use an electric blanket.)

The chair is very heavy, so please be careful when unloading it so as not to damage floor surfaces.

Install the chair at least 39 inch away from TVs, radios, and/or other audio or video equipment. Otherwise they may make noises affected by the operation of the chair.

The load to the floor per 0.16 inch

²

 is approximately 5.0 lb, with a person weighing 220 lb sitting on the chair.

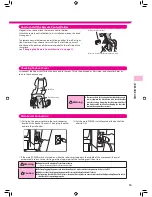
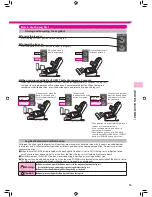
Checking the Supplied Items

Check that the chair and the other items are all in the package.

Buffer Pad (thin)

Headrest (small)

Buffer Pad (thick)

Back Pad

Headrest (large)

Supplied Items 

Supplied Items  

Supplied Items 

Chair

Left and Right Clearance

Front and Rear Clearance

Approx. 8 inch

Approx. 12 inch

Approx. 16 inch

[B

EF

O

RE

 U

SE

]

BEFORE USE

Chair

Shoulder Massage Unit 

(left and right)

Operating Manual 

(this document)

Leaflets

AC Cord

Shiatsu Pad B x 2

Remote Control 

Holder

120 inch

Summary of Contents for HCP-9101A

Page 1: ...NTS DESCRIPTION 5 BEFORE USE 7 POSITION ADJUSTMENT 11 AFTER USE 16 PROGRAMS SELECTION 17 PRESET PROGRAMS 19 MANUAL SELECTION 21 TROUBLESHOOTING 25 REGULAR MAINTENANCE 26 FOR SAFETY FAQ 27 CARE AND STO...

Page 2: ...including inflammation of the hypodermis Persons with suspected acute neck sprain whiplash injury RequiredAction Persons with any of the following conditions should seek medical advice before using th...

Page 3: ...for repairs Keep the cord away from heated surfaces May result in electric shock short circuit or combustion Children and those who are unable to express intention should not use the chair It is advi...

Page 4: ...ny abnormality stop the chair immediately and turn the main POWER switch to OFF to prevent an accident Unplug the power plug from the wall outlet Contact the vendor for inspection or repairs Electric...

Page 5: ...ms and wellbeing programs allow you to select the optimal program according to your purpose Quick programs allow you to refresh yourself in a short period of time And the manual selection mode allows...

Page 6: ...ck Folding Clasp Reclining Seat Back Hand Massage Unit left Cord Connector Power Cord Plug Shoulder Massage Air Cushion x 4 Headrest large Headrest small Rollers Storage roller position is inside the...

Page 7: ...topped in an emergency EMERGENCY STOP Button Use this button to shut the chair off immediately in an emergency or if there is a malfunction during operation of the chair The rollers will stop immediat...

Page 8: ...r Do not install the chair where it can come into contact with direct heat such as direct sunlight or a radiator To avoid damaging floor surfaces and to cut down on the noise of the chair it may be be...

Page 9: ...ack To fold the reclining seat back Pull up the lever of the seat back folding clasp Push the top side of the seat back toward the front and fold down the seat back BEFORE USE To Carry Moving Method 1...

Page 10: ...ft that projects from the shoulder massage unit into the hole on the side of the seat back and fully push it in Install so that the air inlet is at the top There are left and right shoulder massage un...

Page 11: ...left side at the same time See Changing the Remote Control Position on page 11 Remote Control Holder Remote Control Holder Installation Area Main Power Connection 1 First plug the power cord into the...

Page 12: ...ide By following the procedure below you can change the remote control position to the left side 1 Turn over the first cloth between the leg rest and the seat 2 Lay out the remote control cable 3 Retu...

Page 13: ...ach to the cloth with the velcro Shiatsu Pads A and B and the Shiatsu Sheet can be freely combined Use them together as you like Remove them if you feel that the stimulation is too intense How to Use...

Page 14: ...to lower the reclining seat back Release Release Press Press Press the button to start the operation Release the button to stop the operation When you press and hold a RECLINE button for approx 2 seco...

Page 15: ...he leg rest by hand Caution Do not place anything other than legs and feet on the leg rest To raise the leg rest Press the top LEG REST button to raise the leg rest To lower the leg rest Press the bot...

Page 16: ...POSITION ADJUSTMENT Adjust the position of the massage unit air bags so that they contact the shoulder joint areas between the neck and the shoulder How to Use the Hand Massage Unit The hand massage...

Page 17: ...power cord Unplug the chair from the wall outlet Caution Be sure to set the main POWER switch to OFF after every use and to unplug the chair from the wall outlet Accident or injury may result if child...

Page 18: ...Full Body Program This program is recommended for persons who feel symptoms such as lack of energy or fatigue Shoulder Program Lower Back Program Stretch Hi Program This program is recommended for pe...

Page 19: ...th Program This massage is focused on the lower half of the body in particular the area around the pelvis and buttocks This program is recommended for persons who want to relax This program takes its...

Page 20: ...me time to change courses because the air bags for the BACK 3 D function must be deflated before changing the course Switching from One Preset Program in Progress to Another When one preset program bu...

Page 21: ...uttons flash The rollers move up while this button is pressed The rollers move down while this button is pressed Various Adjustments Program Operations and Adjustments Operates can be adjusted Does no...

Page 22: ...is pressed Shiatsu 1 Shiatsu 2 or stop can be selected Shiatsu 1 Shiatsu 2 Air Massage Operation Button Action Indication Intensity Adjustment Shoulder Massage Air massage to the shoulders Hand Air m...

Page 23: ...k stop using and contact the vendor May result in injury if you continue use with high stimulation under such circumstances Do not place hands or feet into the roller tracks into the space between the...

Page 24: ...d Tapping Shiatsu Tapping Shiatsu or stop can be selected Tapping is shown in the example above Full Part Rolling Selection Press the button 1st time Press the button 2nd time Press the button 3rd tim...

Page 25: ...utes keeping appropriate intervals between each massage session MANUAL SELECTION Roller Position Adjustment Buttons and Indicators Description When full rolling is selected Changes between up and down...

Page 26: ...after about 5 seconds See P10 Sit further back in the chair so that your head rests firmly on the headrest Or you can adjust the shoulder position with the ROLLER buttons immediately after the shiatsu...

Page 27: ...the main POWER switch set to ON The power cord has been cracked or scratched The power cord or plug becomes abnormally hot The chair produces a burnt smell abnormal sound or vibration The auto timer...

Page 28: ...houlder units are removed No Although for structural reasons they can be removed and reattached if massage is performed while the units are removed it will result in air leaks and affect the other air...

Page 29: ...main POWER switch located at the back right of the chair to OFF Unplug the chair from the wall outlet After performing the above contact the vendor for assistance The remote control panel has come off...

Page 30: ...nd Covers Soak a piece of soft cloth in lukewarm water in which a small amount of mild detergent has been added Then thoroughly wring it out before cleaning off any spots or grime Caution The fabric c...

Page 31: ...rouble status 6 Proof of purchase If the warranty is valid A service charge may apply subject to the nature of the trouble and or repair according to the terms of the warranty See the warranty for ful...

Page 32: ...rox 37 kPa Auto Timer Approx 15 minutes preset programs vary in duration Leg Rest Adjustment Range Approx 9 8 inch Reclining Angle Approx 120 170 from floor level continuous motion Automatic reclining...

Reviews: