background image

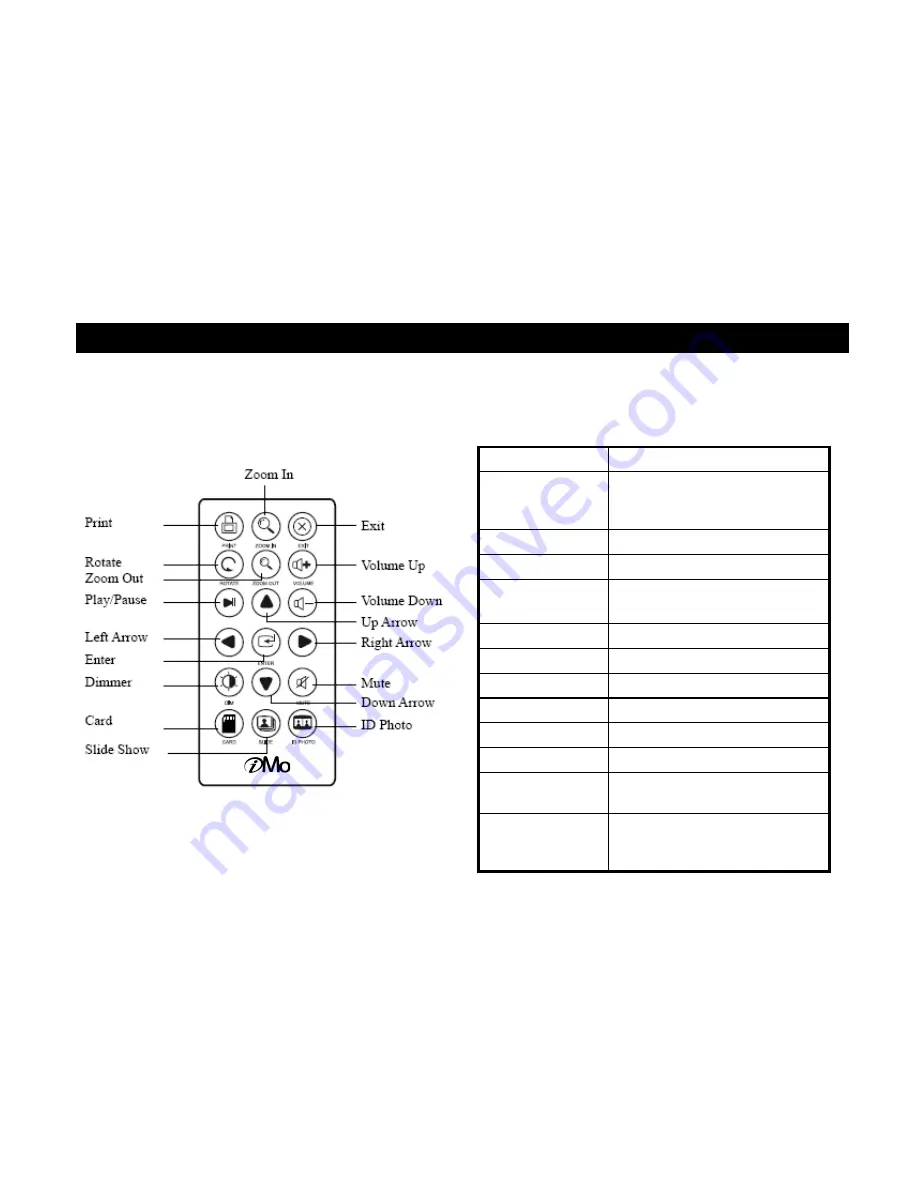
2. Remote Control &Instruction 

 Remote Control button Functions 

Buttons 

Description


Zoom In/Out 

Increase/ Decrease the current p
hoto.     
Available in ID Photo only. 

Exit 

Exit current operation/window 

Volume Up/Down 

Adjust the volume as desired. 

Up/Down/ 
Left/Right Arrow 

Move your selection up, down, le
ft and right 

Mute 

Switch the sound off. 

ID Photo 

Display ID Photo menu 

Card 

Switch to select card page 

Slide Show 

Start Slideshow 

Dimmer 

Dim the screen until blackout. 

Enter 

Enter your selection. 

Play/Pause 

Play/pause music and video clips

Rotate 

Rotate photos 90 degrees each  
                                       clockwi
se. 

11 

 Remote Control 

Instructions 

Summary of Contents for Foto Frame Printer

Page 1: ...Photo Frame Printer User Manual 1...

Page 2: ...sunlight or high temperatures which can damage or shorten its life Do not place the unit near heat sources such as radiators heat registers or other appliances that generate heat Orient the Photo Fram...

Page 3: ...uld be routed away from foot traffic and contact with other objec ts Do not route the power cord under rugs or carpeting The cord should never be severely bent pinched or twisted Periodically inspec t...

Page 4: ...stalling and Removing Cartridges 7 Connecting the Power Cord 9 Using Memory Cards 10 2 Remote Control Instruction 11 Remote control button functions 11 Replacing battery 12 3 System Setup 13 Setup 13...

Page 5: ...nt All images 24 Print single image 25 6 Update Firmware 26 7 Troubleshooting 27 8 Maintenance of Printer 28 9 Technical Specifications and Recycling 29 Technical Specification 29 CE Disclaimer 29 FCC...

Page 6: ...efore first use Failing to follow these warnings could result in personal injury or damage to the d evice Also remember to keep this User s Manual in a convenient location for future reference Outstan...

Page 7: ...areas of medical and dental facili ties oxygen rich environments or industrial areas CAUTION Do not use sharp objects such as a knife or scissors to open the ribbon cartridge package You could damage...

Page 8: ...the film is not even it could be damaged during installation Open the cartridge door Insert the cartridge in the direction as illustrated Push the cartridge until it is locked by black lever Make sur...

Page 9: ...ON Do not disassemble the printer when the printer is turned on There is danger of electric shock 1 Connect the end of the power adapter to the printer 2 Connect the power cord to the power adapter 3...

Page 10: ...f memory card that is available with your printer Do not attempt to insert a non supported memory card into the printer Do not attempt to insert a memory card that has dust or dirt on its surface This...

Page 11: ...wn Adjust the volume as desired Up Down Left Right Arrow Move your selection up down le ft and right Mute Switch the sound off ID Photo Display ID Photo menu Card Switch to select card page Slide Show...

Page 12: ...1 Turn back the remote control 2 Push the lever right 3 Slide the battery tray then release the lever to open the battery tray 4 Remove the battery To install the battery 1 Make sure the polarity is...

Page 13: ...ss the Right button on the remote control or the OK button on the Photo Frame Printer to enter 4 Press the Exit button to finish Set up Set up Main Menu First Submenu Second Submenu Third Submenu Slid...

Page 14: ...Auto Slide Off 5 seconds 10 seconds 30 seconds 60 seconds Slide Effect All Curtain Shutter Wipe Background Sound Off On Audio Setup Set Beep Sound Off Small Large Speaker Sound Turn Off Turn On Print...

Page 15: ...ench Greek Italian Korean Portuguese Russian Spanish Memory Format Quick Format Format internal storage Yes No Format Format internal storage Yes No Setup Initialize Setup Initialize Yes No File Manag...

Page 16: ...ss tint You can dim the screen until blackout in any mode when the unit is powered on to suit your environment 100 90 80 70 60 Blackout White Black 30 40 50 16 Set up Main Menu First Submenu Second Su...

Page 17: ...ursor to select the file name you want to copy Press Enter button on the file name which you want to copy To cancel the file selection Press Enter again Swing the Up and Down on the Unit or Press Up a...

Page 18: ...select the folder which you want to copy Press Enter to select folder To cancel the folder selection Press Enter again Press Enter to select additional folders to copy Press button to copy all the fi...

Page 19: ...r again Press button to delete the selected file Press Yes at pop up Delete selected file s The selected file is deleted Delete files in External memory is exhibited 2 Delete the folders including all...

Page 20: ...Photo on Select Mode 2 Swing the L and R buttons on the Photo Frame Printer to select Photo on Select Mode 3 Press the Enter button on the Photo Frame Printer to access Thumbnail of all the pictures s...

Page 21: ...Photo Frame Pr inter to select ID Photo Select a size using the direction arrows on the remote control or swing the Left Right Up and Down Press the Enter button on the Photo Frame Printer or on the r...

Page 22: ...elect Music Press the Enter button to select music to play Press the on the remote control to select a music file to play Press the Play Pause button continually to playback the music and pause Press...

Page 23: ...ht on the Photo Frame Printer to select Video Press Enter button to select video to play Press the on the remote control to select a video file to play Press the Play Pause button to playback and paus...

Page 24: ...Insert an Memory Card on page 10 2 Swing Left and Right buttons on the unit or and buttons on the remote control to SD MMC 3 Then press Enter button to enter the chosen memory card 3 Press Print butto...

Page 25: ...right buttons to select an image or and on the remote control to a ccess 2 Press Enter button to selected photo 3 Press Print button to view full screen 4 Swing up and down on the unit or button on t...

Page 26: ...u Firmware Update select Yes 7 During F W update do not power off During F W update the LCD display blink RED and Black 8 After completing the F W update The set reboot automatically 9 And then the se...

Page 27: ...sed up 1 Replace a cartridge 2 Check paper and ribbon in the cartridge If they are used up replace new ones No sound 1 Volume is set at 0 2 Mute button is pressed 1 Press button to increase the volume...

Page 28: ...er off and disconnect the power adapter 2 Clean the outside of the printer using a soft cloth 3 Do not use a soaps as they may cause damage to the print head NEVER immerse any part of the Photo Frame...

Page 29: ...s with part 15 of the FCC rules Operation is subject to the following two conditions 1 this device may not cause harmful interference and 2 this device must accept any interference received including...

Page 30: ...ich the receiver is needed Consult the dealer or an experienced radio TV technician for help Shielded cable must be used with this unit to ensure compliance with the Class B FCC limits Under the envir...

Page 31: ...Remote Control Instruction p11 File delete p19 S G Slide Show Mode p15 Getting Started p6 Setup p13 I T Important Safety Instruction p2 Table of Contents p4 Installing and Removing Cartridge p7 Troubl...

Reviews: