


2) Synchronize the beats of the music piece to
which crossfading is desired to the beats of
the current music piece with the buttons
PITCH BEND (22): As long as the button
+
or
-
is kept pressed, the replay of the title will be
faster or slower. Thus, the beats will be dis-
placed with respect to the beats of the current
music piece.
3) The beats will also be displaced when the jog
wheel (16) is turned.
5.11 Effects
5.11.1 Scratch effects
For creating scratch effects (corresponding to
manual turning of a turntable platter), press the
button SCRATCH (6) and turn the jog wheel (16)
back and forth accordingly. The LED of the but-
ton will light up and the text line (O) will show
“SCRATCH”. To deactivate the effect, press the
button SCRATCH once again.
5.11.2 Droning effects
If the function Master Tempo (constant pitch)
has been activated [indication “MT” (S) on the
display], deactivate it with the button MT (24).
Turn the jog wheel (16) back and forth to
increase or decrease the replay speed alter-
nately. This will create a droning effect.
5.11.3 Stutter effects
The Cue points stored with the buttons CUE
(18), CUE 1 and CUE 2 (11) [
chapter 5.8]
can also be used to create interesting stutter
effects: When one of these buttons is shortly
pressed several times, a stutter effect will be cre-
ated. The more suitable the Cue point (e. g. start
of an instrument or beginning of a word), the
more impressive the effect.
5.11.4 Replaying a continuous loop
A certain section of a title can be repeated as a
seamless continuous loop as many times as
desired.
1) Switch to replay with the button
(20).
When the desired starting point of the loop is
reached (point a in fig. 6), shortly actuate the
button A (19).
Fig. 6 Replaying a continuous loop
Hint:
To define the starting point with the precision
of 1 frame, first set the unit to pause with the button
, precisely select the spot with the jog wheel (16),
then press the button A.
2) When the desired end of the section is
reached (point b in fig. 6) while the replay is
continued, press the button B / EDIT (19). The
section between the points will be continu-
ously repeated. As long as a continuous loop
is replayed, the display indicates “RELOOP”
(J).
3) To displace the end point or to define it with
the precision of 1 frame, press the button B/
EDIT during replay of the loop. The time indi-
cation (P) will now show the time index of the
end point. Displace the end point with the jog
wheel (16) and confirm the end point with the
button B / EDIT.
4) The loop section can also be divided or be
multiplied many times over. While the loop is
replayed, select the change of length with the
button
or
(21). The text line (O) shows
the adjustment:
TRIM:
1
⁄
32
,
1
⁄
16
,
1
⁄
8
,
1
⁄
4
,
1
⁄
2
,
1
⁄
1
,
2
⁄
1
,
4
⁄
1
,
8
⁄
1
,
16
⁄
1
,
32
⁄
1
5) To exit the loop and to continue the title
replay, press the button RELOOP / EXIT (19).
To restart the loop, press the button
RELOOP / EXIT again.
Fig. 7 Exit and restart of a continuous loop
Note:
A stored loop is deleted as soon as the next title
is reached or another title is selected with the button
or
(21) while replaying.
Section with a fraction or multiple of a beat length
For titles in
4
⁄
4
time, the length of a section for the
loop replay may be adjusted exactly to a fraction
or a multiple of the beat length:
1
⁄
32
,
1
⁄
16
,
1
⁄
8
,
1
⁄
4
,
1
⁄
2
,
1
⁄
1
,
2
⁄
1
,
4
⁄
1
,
8
⁄
1
,
16
⁄
1
,
32
⁄
1
1) Keep the button MEMO / AUTO (9) pressed
and adjust the length with the jog wheel (16).
The length is indicated in the text line (O),
e. g. “AUTO 2 / 1” = two beat lengths. After
this adjustment the button MEMO
/
AUTO
lights up to indicate that the end point of a
loop section is automatically set.
2) Define the starting point with button A (19).
Thus, the continuous loop is started at the
same time and the end point is set according
to the length adjustment.
3) The length of the loop section can also be
changed subsequently, as described above
(step 3 or 4).
5.12 Compiling your personal title
sequence
To replay only selected titles in a certain order, a
sequence of 99 titles as a maximum can be pro-
grammed.
5.12.1 Storing and replaying a title
sequence
1) If a title is replayed, first set the unit to pause
with the button
(20).
2) Switch to the programming mode with the
button PROG (13). The time indication (P) is
switched to the indication of the first storage
location “P- 01”. The indication “PG” (R)
flashes quickly.
Note:
To exit this mode immediately, keep the but-
ton PROG pressed until the display shows the play-
ing time (P) again.
3) Select the first title to be stored with the but-
ton
or (21)
[
chapter 5.1, steps 4
and 5].
4) To confirm the title selection, press the button
PROG. The next memory location “P- 02” is
indicated.
5) Repeat the steps 3 and 4 until all titles of the
title sequence will be stored. If you try to store
another title after 99 titles have been stored,
the message “FULL” will appear.
6) To replay the title sequence, press the button
. The indication “PG” (R) flashes more
slowly. The titles are replayed depending on
the operating mode selected (
chapter
5.4.1). To select other titles of the title se -
quence, press the button
or
(several
times).
7) To switch back to the standard replaying
mode, set the unit to pause with the button
and keep the button PROG pressed until the
indication “PG” (R) stops flashing.
To replay the title sequence once again,
set the unit to pause and press the button
PROG so that the indication “PG” flashes
again. Start the title sequence with the button
.
Note:
As long as the indication “PG” flashes or con-
stantly lights up, the title sequence can be called. It is
deleted e. g. when switching off the unit.
5.12.2 Checking a title sequence
1) If a title is replayed, first set the unit to pause
with the button
.
2) If the indication “PG” flashes now, press the
button PROG once. If the indication “PG”
lights constantly, press the button PROG
twice.
3) Select the storage locations (P- 01 … P- 99)
successively with the button
or . The title
stored in each case is indicated in the text line
(O).
4) To replay the title sequence, press the button
.
5.12.3 Completing or deleting a title sequence
1) If a title is replayed, first set the unit to pause
with the button
.
2) If the indication “PG” flashes, keep the button
PROG pressed until “PG” stops flashing.
3) Shortly press the button PROG so that “PG”
flashes quickly and the time indication (P) is
switched over to the indication of the next
free storage location “P- …”.
4) To delete the title sequence, press the button
PROG until the display indicates the playing
time (P) again. To complete the title se
-
quence, select another title with the button
or
and confirm with the button PROG. To
replay the completed title sequence, press
the button
.
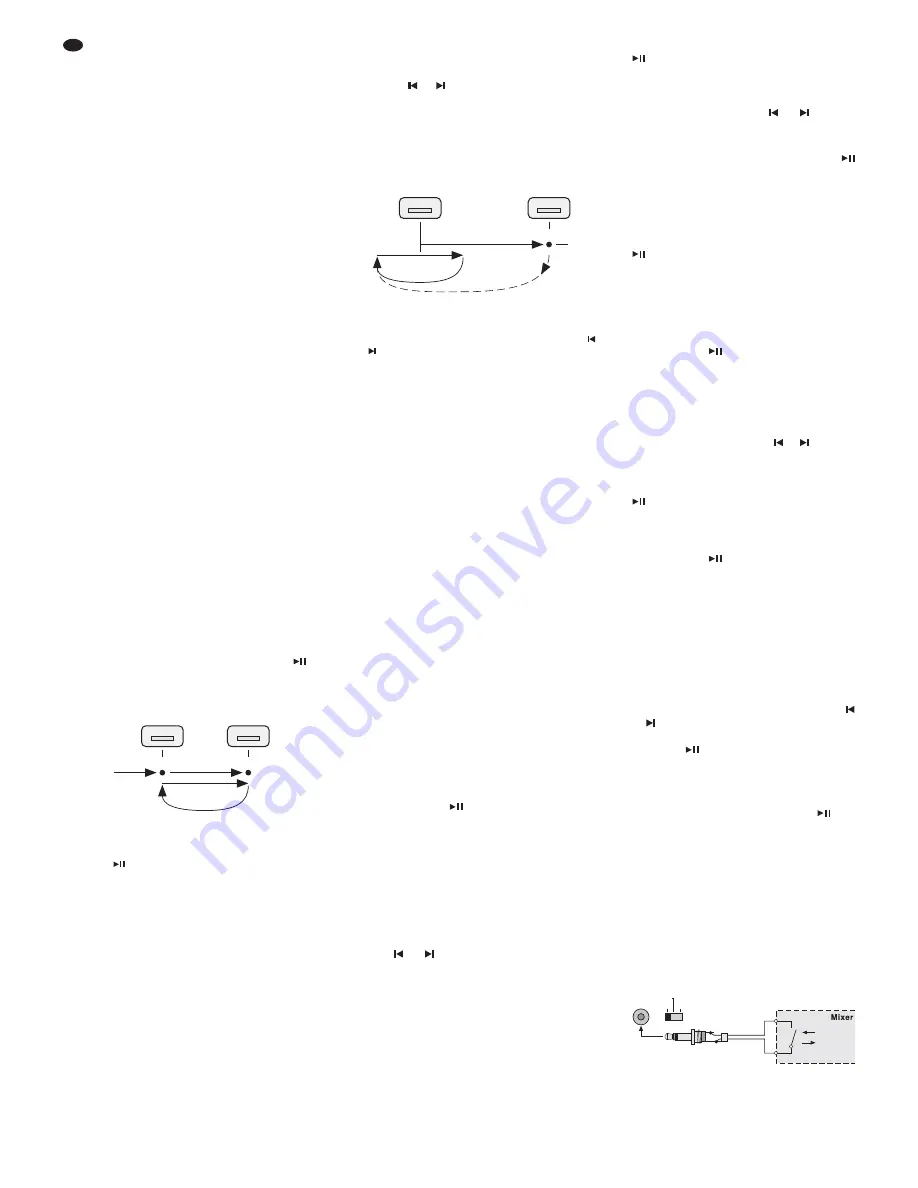
6 Fader Start
The function Start / Pause of the button
(20)
can be remote-controlled via a mixer with fader
start function. The connection to the mixer is
described in chapter 4, step 3. Adjust the sliding
switch (34) on the rear side of the player mecha-
nism to the type of fader start of the mixer:
LOCK
= control via an on / off switch
This switch position must be selected for
most mixers of the “img Stage Line” range.
By advancing the fader, a switch starting the
replay will be closed in the mixer. When the
fader is closed, the switch will open and thus
set the player unit to pause.
Fig. 8 Fader start via on / off switch
START/
PAUSE
CUE
PLAY
LOCK
TACT
Start
Pause
PLAY
c
LOOP
1.
2.
RELOOP / EXIT
RELOOP / EXIT
a
b
1.
PLAY
PLAY
LOOP
2.
A
B / EDIT
14
GB


