GB-2
Before starting up
Intended use
This tool is only intended as an electric tiller for use
in domestic and hobby gardens.
It is not designed for use in public areas, parks, sports
facilities, or in agriculture and forestry. Using the tool
for any other purpose is considered improper and
therefore not approved. The manufacturer is not liable
for any damage or injury resulting from such improper
or not approved use. The user is fully liable for any risks
associated with such use.
Double insulation
The electric tiller has double insulation. This means
that all external metal parts are insulated from the
electric power supply. This is achieved by introducing an
insulation layer between the electrical and mechanical
parts. The double insulation guarantees you the greatest
possible safety.
Overheat protection
If the tool is blocked by a foreign object or if the motor
is overloaded, the motor will be automatically switched
off by the protection device. Release the trigger level
and wait until the motor has cooled down (approx. 15
minutes), then start the tool again.
Assembly
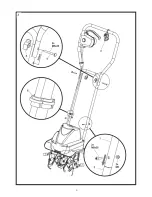
(Fig. 2 - 6)
Mounting the carrying handle
Insert the carrying handle (1) into the guide bar, lower
section (2) and fix it with two of the supplied screws
and nuts.
Guide bar, upper section
Slide the cable relief (3) onto the upper guide bar.
Connect the guide bar, upper section to the guide bar,
lower section using the supplied bolts (4) and swing nuts
(5) on both sides.
To adjust the overall height of the guide bar you can also
assemble the guide bar, upper section to the lower holes
on the guide bar, lower section.
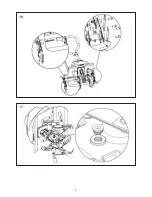
Install the 2-handsafety switch as shown in Fig. 3-6.
Use the two supplied cable clips (6) to fix the cable along
the guide bar.
Operating the electric tiller
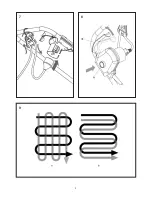
Connection to the mains supply
(Fig. 7)
Plug the tool’s connection cable into the safety switch/
plug combination and secure it with the cable relief.
The loop of the mains cable must be long enough for
the cable relief to slide from one side of the guide bar
to the other.
Switching the tool on
(Fig. 8)
• Press the safety lock button A of the switch/plug
combination and then pull the trigger level B against
the bar. The motor will start and the tines will begin to
rotate.
• Be aware that the tool may unexpectedly bounce
upward or jump forward if the tines should strike
extremely hard, packed soil, frozen ground, or buried
obstacles such as large stones, roots or stumps.
• Keep your hands, feet or any other part of your body
or clothing away from the rotating tines.
Caution! Danger of injury!
• Only guide the tool at walking pace. Do not overreach.
Keep proper footing and balance at all times.
• Be aware of the position of the extension cord during
operation. Be careful not to trip over the cord. Make
sure to guide the cord away from the tines at all
times.
• If the tool strikes a foreign body, examine the tool for
signs of damage and carry out any necessary repairs
before restarting and continuing to work.
• If the tool should start to vibrate abnormally, switch
off the motor and check for the cause, immediately.
Vibration is usually a warning sign for trouble.
• Hold the guide bar (carrying handle) and lift the tool to
move it from one place to another.
• Always switch off the tool, disconnect the plug and
wait until the application stops before carrying out
maintenance or cleaning work.
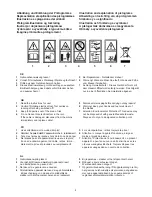
Attention! Tines do
not stop immediately after switching off.
• Use caution when cleaning or performing maintenance
work on the tool.
DANGER! Watch your fingers!
Wear protective gloves !
• It is forbidden to move or modify any of the electrical
or mechanical safety devices.
Electrical safety
• The mains voltage must correspond to the one marked
on the tool’s rating label (230V ~50Hz). Do not use
other sources of power.
• For the power supply line, the use of a protective
switch (circuit-breaker) with a nominal breaking current
in the range of 10 to 30mA is recommended. Consult a
qualified electrician.
• Never pass the running tool over the extension cable
to which it is connected, as this could cut the cable.
Mark sure that you always know where the cable is.
• Use the special cable holder (strain relief) for the
connection of the extension cable.
• Never use the tool when it is raining. Try to prevent it
from getting wet or being exposed to humidity. Do not
leave it outside overnight.
• The power supply cable should be checked regularly
and before each time it is used; make sure that the
cable is not damaged or worn out. If the cable is not
in good condition, do not use the tool; take it to an
authorized service centre instead.
• Only use extension cables that are suitable for outdoor
use. Keep it away from the cutting area, from damp,
wet or oily surfaces or surfaces with sharp edges and
also from heat and fuels.
• The mobile socket of the extension cable should be
splash proof in compliance with the requirements of
DIN 57282 and VDE 0282; the cross-section of the
wire (max. length: 75m) should be at least 1.5mm2.
Use H07RN-F harmonized cable.
Summary of Contents for EM 700
Page 2: ......
Page 5: ...3 2 ...
Page 6: ...4 4 3 5 6 ß ß ß ß ß ß ...
Page 7: ...5 8 7 9 ...
Page 8: ...10 11 6 ...
Page 9: ...7 ...
Page 47: ...DK 5 Afhjælpning af fejl ...
Page 52: ...SE 5 Felsökning ...
Page 90: ...Tel 382 502 525 382 523 009 Fax 382 521 021 E mail bonas bonas cz 382 523 010 ...
Page 91: ......
Page 95: ...KUPON D KUPON C KUPON B KUPON A ...
Page 96: ......
Page 99: ......

