background image

ENGLISH

COMPUTER SETTING

„

Signal Timing

Change to the desired signal timings listed on page 21 in COMPLIANT TIMING.

„

Windows 95/98/2000/Me/XP/Vista Plug & Play

The iiyama LCD monitor complies with DDC2B of VESA standard. The Plug & Play function runs on

Windows 95/98/2000/Me/XP/Vista by connecting the monitor to DDC2B compliant computer with

the Signal Cable supplied. Windows 95/98/2000/Me/XP Monitor Information File for iiyama monitors

may be necessary for your computer and obtained via the Internet, using the address:

http://www.iiyama.com

„

For additional information on how to download the driver for your monitor, please

access one of the internet sites noted above.

„

Monitor Drivers are not required in most cases for Macintosh or Unix operating systems.

For further information, please contact your computer dealer first for advice.

„

Procedure for turning ON the Power Switch

Turn ON the monitor first, and then the computer.

„

Touch screen driver software

Touch screen driver software and system may not start when you start your computer while

touching the screen.

Touch screen driver software may not run due to the power saving function depending on the

BIOS of your computer. In this case, set the power saving function to off.

NOTE

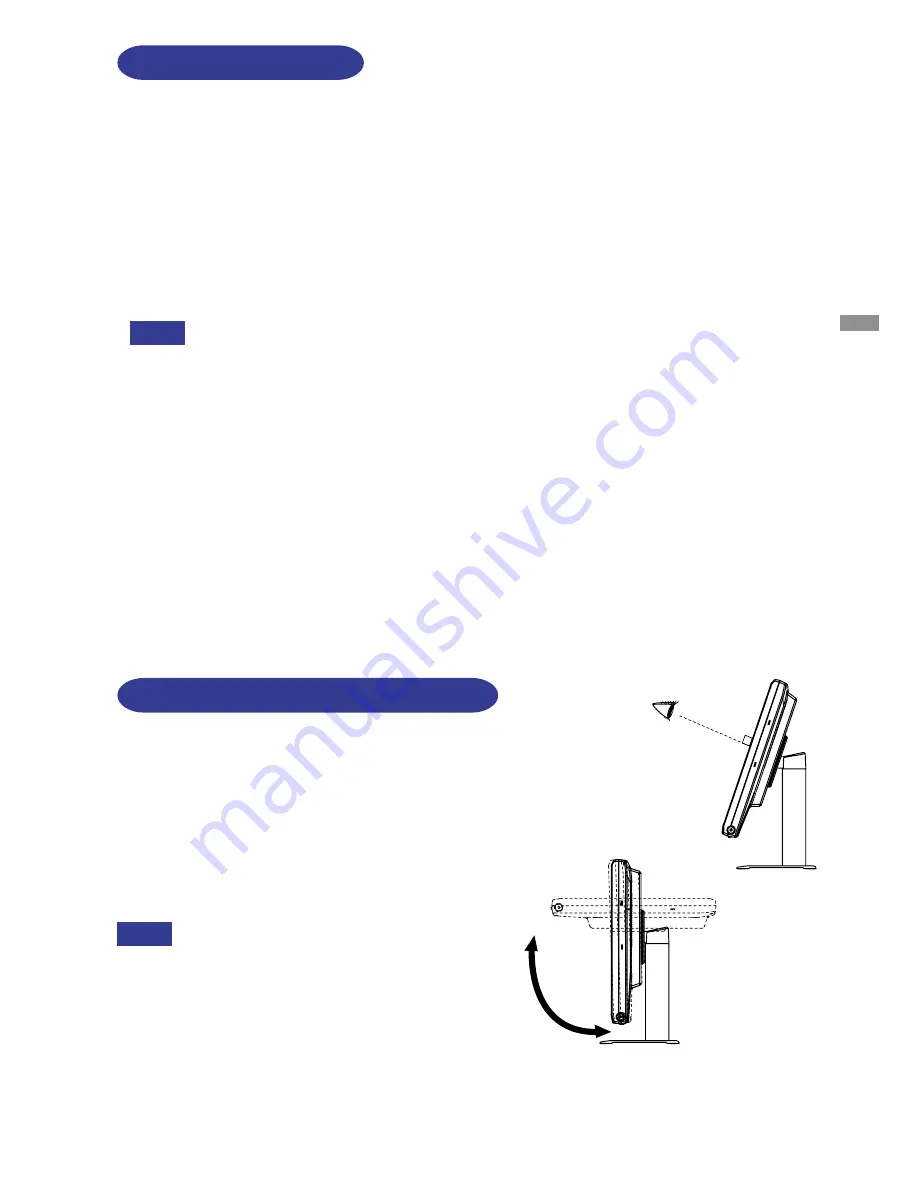
ADJUSTING THE VIEWING ANGLE

„

For optimal viewing it is recommended to look at the

full face of the monitor, then adjust the monitor’s angle

to your own preference.

„

Hold the panel so that the monitor does not topple

when you change the monitor’s angle.

„

You are able to adjust the monitor’s angle up to 90

degrees upward, 5 degrees downward.

NOTE

„

Do not touch the LCD screen when you

change the angle. It may cause damage

or break the LCD screen.

„

Careful attention is required not to catch

your fingers or hands when you change

the angle.

90˚

BEFORE YOU OPERATE THE MONITOR     8

Summary of Contents for ProLite T1530SR

Page 1: ...monitor We recommend that you take a few minutes to read carefully through this brief but comprehensive manual before installing and switching on the monitor Please keep this manual in a safe place fo...

Page 2: ...he interference by one of the following measures Reorient or relocate the receiving antenna Increase the separation between the device and receiver Connect the device into an outlet on a circuit diffe...

Page 3: ...17 SPECIFICATIONS ProLiteT1530SR 17 SPECIFICATIONS ProLiteT1730SR 18 SPECIFICATIONS ProLiteT1930SR 19 DIMENSIONS 20 COMPLIANTTIMING 21 We recommend recycling of used product Please contact your dealer...

Page 4: ...the liquid crystal and do not touch the liquid crystal with skin or cloths if LCD panel is broken and liquid crystal leaks If liquid crystal touch eyes mouth skin or cloths immediately rinse with wat...

Page 5: ...ause damage We suggest installing a cooling fan when placing the monitor into a rack DISCONNECT THE CABLES WHEN YOU MOVE THE MONITOR When you move the monitor turn off the power switch unplug the moni...

Page 6: ...removed with a cloth lightly moistened with a mild detergent solvent Then wipe the touch screen with a soft dry cloth Don t pour the detergent solvent on the touch screen CUSTOMER SERVICE CLEANING NOT...

Page 7: ...haracter Smoothing Automatic Set up Plug Play VESA DDC2B Compliant Windows 95 98 2000 Me XP Vista Compliant Power Management VESA DPMS Compliant ProLite T1530SR VESA Standard 75mm 75mm for Arm or Wall...

Page 8: ...ter Type Name LSE9901B1250 LI SHIN INTERNATIONAL ENTERPRISE CORP 2 This CD ROM contains the touch screen driver software Install the Touch Panel Driver Disk after connecting the computer to the monito...

Page 9: ...witch will turn off the power H Connector for AC Adapter DC in 1 I D Sub mini 15pin Connector D SUB J DVI D 24pin Connector DVI K Audio Connector AUDIO in L USB Cable Connector M RS 232C Cable Connect...

Page 10: ...lied with the monitor is for a standard 15 pin D Sub connector If a special cable is required please contact your local iiyama dealer or regional iiyama office For connection to Macintosh computers co...

Page 11: ...omputer dealer first for advice Procedure for turning ON the Power Switch Turn ON the monitor first and then the computer Touch screen driver software Touch screen driver software and system may not s...

Page 12: ...hase and Position are saved for each signal timing Except for these adjustments all other adjustments have only one setting which applies to all signal timings For example to correct for vertical posi...

Page 13: ...LANGUAGE Return to Menu RETURNTOMENU VOLUME Too dull Too intense Too dark Too bright Direct Too soft Too loud Adjust Clock Phase V Position and H Poshition automatically NOTE The screen becomes dark...

Page 14: ...on Button to Press Page 2 ANALOG Input 1280x1024 ANALOG EXIT SELECT Page Page CLOCK PHASE RED GREEN BLUE COLOR TEMP RESET EXIT PHASE RED GREEN COLOR TEMP RESET EXIT Too weak Too strong Too weak Too st...

Page 15: ...o Menu RETURNTOMENU VOLUME Too dull Too intense Too dark Too bright Too soft Too loud English Deutsch English German Fran ais Japanese Italiano Italian Simplified Chinese Espa ol Spanish Traditional C...

Page 16: ...position and frequency with the monitor controls rather than the computer software or utilities Perform adjustments after a warm up period of at least thirty minutes Additional adjustments may be requ...

Page 17: ...the screen repeat the adjustments from step E to readjust the Clock If the flicker or blurs still remain then set the refresh rate to 60Hz and repeat the adjustments from step C Adjust the H Position...

Page 18: ...power indicator turns to orange From Power Management Mode the image reappears in several seconds when either the keyboard or the mouse are touched again The power management feature of this product c...

Page 19: ...ator is green The signal timing of the computer is within the specification of the monitor Power indicator is orange The computer is ON The Signal Cable is properly connected If the monitor is in powe...

Page 20: ...ronmental Considerations Approvals 10 to 90 No condensation 5 to 35 C 41 to 95 F 20 to 60 C 4 to 140 F Operative temperature Storage temperature Storage humidity 20 to 80 No condensation Operative hum...

Page 21: ...onsiderations Approvals 10 to 90 No condensation 5 to 35 C 41 to 95 F 20 to 60 C 4 to 140 F Operative temperature Storage temperature Storage humidity 20 to 80 No condensation Operative humidity Touch...

Page 22: ...urce Environmental Considerations Approvals 10 to 90 No condensation 5 to 35 C 41 to 95 F 20 to 60 C 4 to 140 F Operative temperature Storage temperature Storage humidity 20 to 80 No condensation Oper...

Page 23: ...1 140 0mm 5 5 220 0mm 8 7 306 0mm 12 0 230 0mm 9 1 280 0mm 11 0 351 0mm 13 8 381 5mm 15 0 64 0mm 2 5 180 0mm 7 1 250 0mm 9 8 340 0mm 13 4 272 0mm 10 7 336 0mm 13 2 392 0mm 15 4 417 5mm 16 4 67 0mm 2 6...

Page 24: ...60 004Hz 70 069Hz 75 029Hz 60 020Hz 75 025Hz 70 087Hz VGA TEXT Video Mode VESA SVGA VGA XGA 1024 768 640 480 800 600 Horizontal Frequency 31 469kHz 37 861kHz 37 500kHz 35 156kHz 37 879kHz 48 077kHz 46...

Reviews: