


ENGLISH
44 OPERATING THE MONITOR
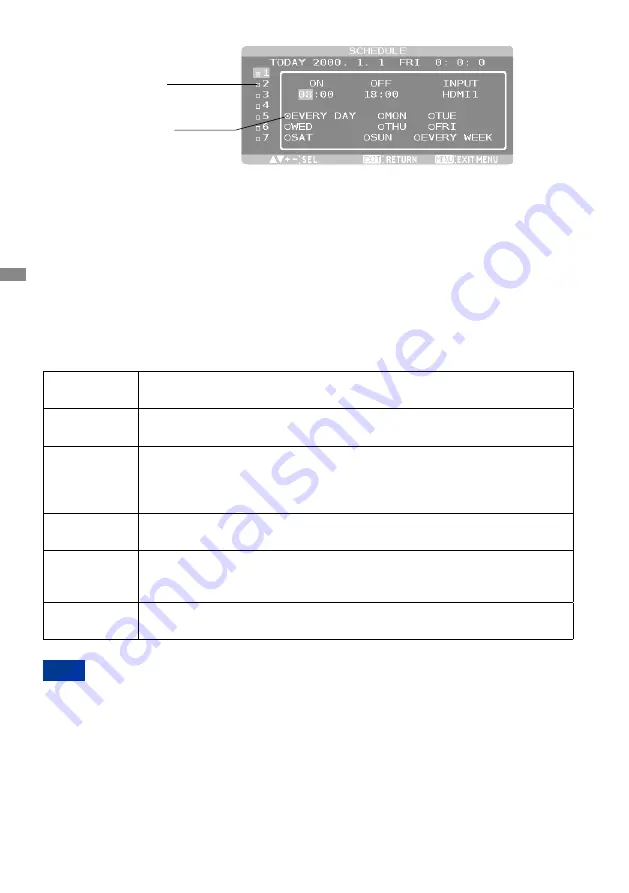
[HOW TO SET UP SCHEDULE]
Check box
Radio button
Program number selection
When the cursor is in any of the check boxes showing the program numbers 1 to 7 on the left side
of the screen, press the UP (▲) or DOWN (▼) button to move the cursor up or down to select the
program number you want to set.
To enable the selected program number, press the SET button to place a checkmark in the check
box. To disable it, clear the checkmark.
Schedule setting of each program
When the cursor is in any of the check boxes, pressing the PLUS (+) button moves the cursor into
the white frame on the right.
When the cursor is at any of the items within the white frame, pressing the PLUS (+) button moves
the cursor to the right, and MINUS (-) button to the left.
You can set the power-on/off time and video input by pressing the UP (▲) or DOWN (▼) button. In
addition, you can select or deselect the radio buttons by pressing the SET button.
ON
Set the time when the power is turned on. If you don’t want to set the power-on
time, enter “--.”
OFF
Set the time when the power is turned off. If you don’t want to set to the power-
off time, enter “--.”
INPUT
Displays the video input selected when the power is turned on. If you want to
select the video input that was selected before the power is turned on, enter “--
.” When you set the ON time and the video input, you can switch the video input
alone.
EVERY DAY
Select this option to execute the schedule every day. When you select EVERY
DAY, you cannot select any days of the week and EVERY WEEK.
MON - SUN
Select the days of the week on which you want to execute the schedule. Unless
you select EVERY WEEK, too, the selection of the days of the week is cleared
after the schedule is executed one time.
EVERY WEEK
Select this option to execute the schedule on the selected days of the week,
every week.
Schedule confirmation
To confirm the schedule, press the MENU button (remote control) or the EXIT button (back
controller) to exit the SCHEDULE menu of the OSD screen function.
If you turn off the power before exiting the SCHEDULE menu, the schedule settings may be canceled.
• Before making the schedule settings, be sure to check the current date and time using “DATE
AND TIME”.
• When you close the SCHEDULE screen, the settings are saved.
• When two or more schedules are enabled, they are executed in descending order of the program
number, and the power is turned off upon completion of the last executed schedule.
• When there are two or more schedules having the same power-on/off time, the one having the
largest program number is executed.
• You cannot set the power-on time and the power-off time to the same time.
• When OFF TIMER is ON, the schedule settings are ignored.
NOTE


