Iiyama ProLite LH5580S User Manual Download Page 32

ENGLISH

30  OPERATING THE MONITOR
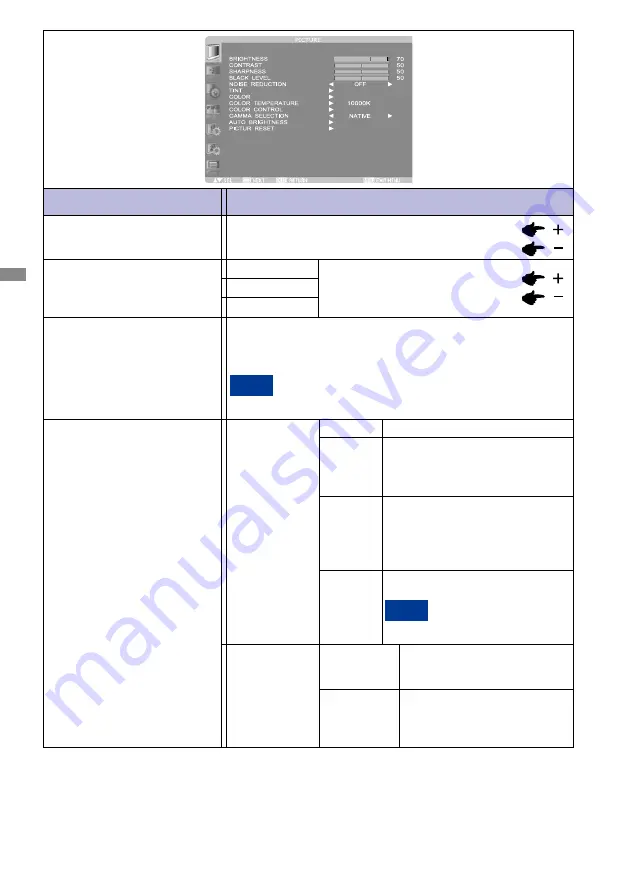
Reddish
Bluish

COLOR TEMPERATURE *

2

Too weak
Too strong

COLOR CONTROL*

2

Adjustment Item

Problem / Option                                      Button to Press

PICTURE

GAMMA SELECTION

AUTO BRIGHTNESS*

4

AUTO 
BRIGHTNESS

AUTO

LOCAL

REMOTE

OFF

CONTROL

PRIMARY

SECONDARY

Select the gamma mode.

NATIVE / S GAMMA / 2.2 / 2.4 / OPTION / PROGRAMMABLE.

PROGRAMMABLE can change the GAMMA characteristic 

curve via a computer. Contact your dealer for further details.

GAMMA is fixed to 2.2 in the sRGB picture mode. When 

PROGRAMMABLE has been selected, the setting for 

color temperature is fixed at 10,000 K (NATIVE).

NOTE

The settings of AUTO BRIGHTNESS 

are adjusted automatically. 

When you select AUTO, you 

cannot adjust any other items 

than [CONTROL] individually.

The AUTO BRIGHTNESS function 

is enabled and you can adjust 

[CONTROL] and subsequent 

items individually.

AUTO BRIGHTNESS is turned off.

The AUTO BRIGHTNESS function 

is  enabled. In addition, the monitor 

enters the intercommunication 

mode where multiple monitors are 

controlled collectively. (See page 45)

Select this setting to configure the 

monitor as Master when controlling 

multiple monitors collectively.
Select this setting to use the 

monitor alone or to configure the 

monitor as Slave when controlling 

multiple monitors collectively.

NOTE

RED

GREEN
BLUE

Summary of Contents for ProLite LH5580S

Page 1: ...sing the iiyama LCD monitor We recommend that you take a few minutes to read this comprehensive manual carefully before installing and switching on the monitor Please keep this manual in a safe place for your future reference USER MANUAL ...

Page 2: ...TROLS AND CONNECTORS MONITOR 8 INSTALLATION 10 CONTROLS AND CONNECTORS REMOTE CONTROL 17 PREPARING THE REMOTE CONTROL 18 BASIC OPERATION 19 CONNECTING YOUR MONITOR 22 COMPUTER SETTING 26 OPERATING THE MONITOR 27 ADJUSTMENT MENU CONTENTS 29 SCREEN ADJUSTMENTS 47 POWER MANAGEMENT FEATURE 50 TROUBLE SHOOTING 51 RECYCLING INFORMATION 52 APPENDIX 53 SPECIFICATIONS 53 DIMENSIONS 54 COMPLIANT TIMING 55 P...

Page 3: ...se fire electric shock or damage INSTALL THE MONITOR ON A FLAT STABLE SURFACE The monitor may cause an injury if it falls or is dropped DO NOT USE THE MONITOR NEAR WATER Do not use where water may be splashed or spilt onto the monitor as it may cause fire or electric shock OPERATE UNDER THE SPECIFIED POWER SUPPLY Be sure to operate the monitor only with the specified power supply Use of an incorre...

Page 4: ...DISCONNECT THE CABLES WHEN YOU MOVE THE MONITOR When you move the monitor turn off the power switch unplug the monitor and be sure the signal cable is disconnected If you do not disconnect them it may cause fire or electric shock UNPLUG THE MONITOR If the monitor is not in use for a long period of time it is recommended that it is left unplugged to avoid accidents HOLD THE PLUG WHEN DISCONNECTING ...

Page 5: ... the backlight replacement when the screen is dark flickering or not lighting up Never attempt to replace it by yourself Max non stop operating time and conditions 1 If a static image is displayed continuously it is recommended to disrupt it with a motion picture 2 It is recommended to periodically change the background colour and background image 3 Maximum operating time of the display is 24 hour...

Page 6: ...To protect the LCD panel do not scratch or rub the screen with a hard object Never use any of the following strong solvents These will damage the cabinet and the LCD screen Touching the cabinet with any product made from rubber or plastic for a long time may cause degeneration or loss of paint on the cabinet Thinner Benzine Abrasive cleaner Spray type cleaner Wax Acid or Alkaline solvent CABINET S...

Page 7: ...ons up to 1920 1080 High Contrast 4000 1 Brightness 450cd m2 Digital Character Smoothing Automatic Set up Stereo Speakers 2 10W Stereo Speakers Plug Play VESA DDC2B Compliant Windows XP Vista 7 8 Compliant Power Management ENERGY STAR VESA DPMS Compliant VESA Mounting Standard 400mm 400mm Compliant ...

Page 8: ...ll guarantees and warranties are void for any problems or damage caused by a power cable not supplied by iiyama CHECKING THE CONTENTS OF THE PACKAGE CAUTION For EU Power Cable Screw M4 x2 For the monitor fall prevention clampers Corner protector x4 For UK Power Cable Clamper x3 For tying cables Screw M3 x4 For the corner protectors VGA D sub Signal Cable Clamper x2 For holding the HDMI cables Opti...

Page 9: ... in an upright position and open from the top of the box before removing the top cushions Remove the carton holders Remove the top cushion and take the accessories box and the Monitor out CAUTION Moving the monitor requires at least two people If not it may drop and could result in a serious injury When moving shipping the monitor please hold by the carton holders ...

Page 10: ...he LCD monitor has an error detected by the self diagnostic function Green Red Steady Power Management Steady Red and Flash Green The LCD monitor is in the schedule standby mode Off Main Power Off Remote Sensor Remote Sensor About the Power Within 2 seconds after turning off the power using the POWER button on the wireless remote control or on the monitor or by a communication command don t turn o...

Page 11: ...15pin D SUB mini 15pin Connector RS232C IN D SUB 9pin RS232C Connector RS232C OUT D SUB 9pin RS232C Connector LAN RJ45 LAN Connector SPEAKERS OUT Jack External Speakers Connector AUDIO OUT Mini Jack Audio output Connector AUDIO IN PC Audio In Mini Jack Audio Connector VIDEO OUT BNC Video Connector VIDEO IN BNC Video Connector S VIDEO IN Mini Din 4pin S Video Connector Option Slot Option Slot Handl...

Page 12: ... the monitor is installed in the landscape position is 40 C When installing the monitor in a case or an enclosure ensure adequate ventilation to keep the temperature inside the case 40 C or lower by providing a cooling fan or ventilation holes in the case The upper limit when the monitor is in the portrait or face up position is 35 C This LCD has a temperature sensor and cooling fan If the LCD bec...

Page 13: ...monitor approximately 30 1 kg with the optional stands When using screw hooks commercially available use ring hooks not C hooks with opening The effect of the fall prevention substantially depends on the strength of brackets and base to which the fall prevention devices is attached When you cannot ensure sufficient strength provide adequate reinforcement Though the recommended fall prevention is in...

Page 14: ...amage resulting from fall of the monitor in case of earthquake or other disaster be sure to consult the bracket manufacturer for installation location To lessen the risk of falling of the monitor thread commercially available rope through the handles at the right and left of the monitor and secure the rope to the wall mount brackets or ceiling mount brackets Use rope that can bear a load 6 times t...

Page 15: ...itor 1 Remove the screws that are holding the handles 2 Attach the handles in the opposite orientation and secure them using the screws you have removed in step 1 By removing the stand guide frames you can reduce the depth of the monitor 1 Remove the screws that are holding the stand guide frames 2 Slightly move and remove the stand guide frames Retain the stand guide frames and the screws that yo...

Page 16: ...l mount spacer accessory a Screw for attaching the wall mount spacer M6 9 pcs Bracket Screw Wall mount spacer Chassis When the option slot cover or the stand guide frames touch the wall or block the heat dissipating holes in the rear of the monitor use the wall mount spacers accessories to mount the metal bracket commercially available Put the wall mount spacers 9 pcs between the metal bracket and...

Page 17: ...me of the backlight is shorter than that in the landscape position When the monitor is in the face up position be sure to set COOLING FAN to ON using SCREEN SAVER in the CONFIGURATION1 menu of the OSD screen function Installation in the portrait position The logo should be on the LEFT side when viewed from the front of the monitor This monitor doesn t have a function to rotate displayed images To ...

Page 18: ...cs Corner protector It is recommended to use the corner protectors accessories When installing the monitor hold its body firmly If you hold the monitor by the corner protectors when moving it the monitor may detaches and fall from the corner protectors causing injuries Attach the corner protectors using the accessory screws c CAUTION ...

Page 19: ... OFF Switches the PIP or POP mode on off INPUT Selects video to be displayed in the sub picture CHANGE Changes the main picture with the sub picture STILL ON OFF Switches the still picture mode on off CAPTURE Captures the new picture SIZE Selects the picture size See page 28 MENU Opens the monitor s the OSD Menu or closes the OSD Menu When the menu system is already open pressing this button will ...

Page 20: ...over as shown below Align and insert two AAA batteries according to their plus and minus ports as indicated in the remote control Replace the battery cover in the direction of the arrow and snap it back into place NOTE Replace with new batteries when the Remote Control does not work close to the monitor Use AAA dry batteries Operate the Remote Control by pointing it toward the Remote Sensor on the...

Page 21: ... turn On the monitor NOTE Even when using the power management mode or turning OFF the Power Switch the monitor will consume a small amount of electricity Disconnect the Power Cable from the power supply whenever the monitor is not in use or during the night to avoid unnecessary power consumption Remote Control Display the adjustment menu page The menu page appears on the screen when you press the...

Page 22: ...ect menu or setting or perform the adjustment by pressing the Button while the menu page is displayed on the screen Move the cursor vertically Select adjustment by pressing the Button while the menu page is displayed on the screen Remote Control Monitor Remote Control Monitor ...

Page 23: ...utton to adjust the volume of sound when the menu page is not displayed on the screen Switch the input signal This is activated when you successively press the INPUT Button on the monitor or Input Button on the Remote Control as follows Remote Control Monitor Remote Control Monitor ...

Page 24: ...rrect connection may cause serious damage to both the monitor and the computer The cable supplied with the monitor is for a standard connector If a special cable is required please contact your local iiyama dealer or regional iiyama office For connection to Macintosh computers contact your local iiyama dealer or regional iiyama office for a suitable adaptor Make sure you tighten the finger screws ...

Page 25: ...eripheral device CAUTION Turn off the power switch and unplug the monitor and peripherals before connection to avoid electric shock or damage NOTE Refer to the user manual of peripherals at the same time Ensure you have the necessary cables as required Red Red Black Black ...

Page 26: ...and a band accessory Remove the screw from the monitor Attach the clamper to the monitor using the screw you have removed in step Secure the HDMI cable and the clamper using the band The band isn t reusable The monitor comes with 2 spare bands To replace the band cut and remove the existing band and attach a new one of the same shape commercially available 2 5 mm in width and approximately 100 mm ...

Page 27: ...ower connector using the cable holder accessory Don t insert the cable holder into the power outlet socket Doing so may cause electric shock Fit both ends of the cable holder to the monitor Engage the cable holder in Parts A Secure the power connector with the cable holder 3 Secure the power cord using the clamper accessory 4 Insert the power plug into the power outlet socket Fully insert the pron...

Page 28: ...ista 7 8 by connecting the monitor to DDC2B compliant computer with the Signal Cable supplied For installation on Windows XP The monitor Information File for iiyama monitors may be necessary for your computer and obtained via the Internet using the address http www iiyama com Monitor Drivers are not required in most cases for Macintosh or Unix operating systems For further information please conta...

Page 29: ...l or INPUT Button Back Controller again Use the Buttons to make the appropriate adjustment or setting Press the EXIT Button to leave the menu and the settings you just made would be automatically saved The EXIT Button can be used to return previous menu item Any changes are automatically saved in the memory when the On Screen Display disappears Turning off the power should be avoided while using t...

Page 30: ...s DYNAMIC can be selected for video input YPbPr VIDEO and S VIDEO Picture Mode Press the PICTURE MODE button when Menu is not displayed HIGHBRIGHT The brightness is maximized STANDARD Factory default setting sRGB Suitable for color matching with sRGB compliant devices CINEMA Suitable for viewing movies sRGB can be selected for computer input HDMI1 HDMI2 DVI D D SUB and DISPLAYPORT CINEMA can be se...

Page 31: ...lectronic image noise caused by different media players is reduced Electronic image noise caused by different media players is reduced BLACK LEVEL 2 Brightness of back light is reduced TINT 2 COLOR 2 Green HUE Blue HUE Red HUE Magenta HUE Yellow HUE Cyan HUE You can set the Colours TINT Purplish Greenish NOTE If you increase the sharpness setting value too much lines may appear double In such a ca...

Page 32: ...lor temperature is fixed at 10 000 K NATIVE NOTE The settings of AUTO BRIGHTNESS are adjusted automatically When you select AUTO you cannot adjust any other items than CONTROL individually The AUTO BRIGHTNESS function is enabled and you can adjust CONTROL and subsequent items individually AUTO BRIGHTNESS is turned off The AUTO BRIGHTNESS function is enabled In addition the monitor enters the inter...

Page 33: ... The distance is 5 meters or shorter Select the following settings according to the distance between the rear of the monitor and the wall or window Select ON for normal use Select this setting when the sensor on the front panel is shielded Select ON for normal use Select this setting when the sensor on the rear panel is shielded The image saturation is adjusted depending on the ambient light SATUR...

Page 34: ...ull the screen with different magnif cations at the screen center and the screen edges Stretch the image horizontally and vertically as you desire using the CUSTOM ZOOM setting The image is displayed without being stretched or reduced The DYNAMIC mode displays images having the 16 9 aspect ratio such as those with 1920 x 1080 resolution in the same way as in the FULL mode NOTE CUSTOM ZOOM becomes ...

Page 35: ...nce AUDIO RESET Left side speaker louder Right side speaker louder Adjustment Item Problem Option Button to Press Screen FULL V RESOLUTION SCREEN RESET Only D SUB input Use this setting when AUTO SETUP and AUTO ADJUST cannot obtain the vertical resolution of the input signal Reset all the SCREEN settings to the factory defaults NO YES Return to Menu Reset all the SOUND settings to the factory defa...

Page 36: ...POP Support Screen Table 100 0 SBS ASPECT SBS FULL PIP SIZE Increase the size of the Sub screen Small Large Reduce the size of the Sub screen MIDDLE Middle the size of the Sub screen PIP AUDIO PIP AUDIO MAIN AUDIO PIP H POSITION Move the vertical position of the Sub screen PIP V POSITION SUB INPUT Select from the input signals HDMI DVI D D SUB YPbPr S VIDEO and VIDEO of the Sub screen PIP RESET Se...

Page 37: ...cal position clock clock phase and input signal level are automatically adjusted ON OFF AUTO ADJUST 1 Return to Menu The horizontal position vertical position and clock phase are automatically adjusted at the time of the timing switching SCREEN SAVER GAMMA COOLING FAN BRIGHTNESS When the sync signal of video input YPbPr S VIDEO or VIDEO is terminated the monitor will be in the sleep mode in approx...

Page 38: ...istence 10 900s When you select a time period in the MOTION setting the monitor enlarges the image and moves it horizontally and vertically The portions of the image out of the display area aren t visible To make the entire image visible all the time arrange it to fit within 90 of the screen area at the center SCREEN SAVER Select the NTSC Select the PAL Select the SECAM Select the 4 43NTSC Select ...

Page 39: ... 2 MOTION is disabled when TILING in the ADVANCED OPTION menu is active 3 Only S VIDEO and VIDEO inputs The LANGUAGE CONTROL TIME OUT MONITOR ID SCHEDULE and DATE AND TIME aren t reset NOTE NO YES Return to Menu Reset all the PICTURE SCREEN AUDIO CONFIGURATION1 CONFIGURATION2 and ADVANCED OPTION settings to the factory defaults ...

Page 40: ... set the gateway mask Set it to 255 255 255 0 for normal use When DHCP CLIENT is ON you can check the value set by the DHCP server When DHCP CLIENT is OFF set the IP address of the gateway router to externally connect the local area including the monitor When DHCP CLIENT is ON you can check the value set by the DHCP server The port number 60822 of the monitor is displayed LAN settings are reset Wh...

Page 41: ...lay shows a message when the input source is switched NOTE Select the OFF TIMER mode OFF 1 24 hours When OFF TIMER is enabled the SCHEDULE settings see page 44 will be disabled NOTE You can program the LCD display operation schedules See page 44 Adjust the current date and time for the internal clock You must set this item when using SCHEDULE After competing the setting be sure to press the SET bu...

Page 42: ... appear NOTE OFF AUTO SELECT VIDEO SELECT The target video inputs are DVI D and D SUB When the currently selected input signal is lost this function checks whether the signal is present at the other input When present the other input is automatically selected If no signal is present at both inputs for five seconds the monitor enters the sleep mode The priority of the input signal is as follows DVI...

Page 43: ...signated as PRIMARY The monitors other than the first one multi connected via RS 232C are designated as SECONDARY All the remote control operations are disabled When you hold down the DISPLAY button on the remote control for at least 5 seconds the NORMAL mode is activated NOTE TILING is a function to divide or enlarge images and display them across multiple screens You can divide an input video up...

Page 44: ...ed primarily when input comes from a computer Select HDMI HD when the source device is a video device FULL LIMITED Select LIMITED when displaying the signal that uses 16 to 235 levels of 256 levels for each of R G and B This mode is used primarily when input comes from a video device HDMI HD HDMI PC Select HDMI PC when the source device is a PC DVI MODE Select DVI HD when the source device is a vi...

Page 45: ...D YPbPr DISPLAYPORT S VIDEO and VIDEO inputs 3 This adjustment doesn t work when D SUB input 4 It works on interlace signals only The 1 upstream ports and distribute the signal to 2 downstream ports The HDMI MODE are DVI MODE aren t reset NOTE NO YES Return to Menu Reset all the ADVANCED OPTION RESET settings to the factory defaults NOTE This function can not change EXTERNAL ...

Page 46: ... selected before the power is turned on enter When you set the ON time and the video input you can switch the video input alone EVERY DAY Select this option to execute the schedule every day When you select EVERY DAY you cannot select any days of the week and EVERY WEEK MON SUN Select the days of the week on which you want to execute the schedule Unless you select EVERY WEEK too the selection of t...

Page 47: ...tor LOCAL PRIMARY Slave monitors REMOTE SECONDARY To use a computer to control the monitors When using a computer to control the monitors you must prepare an application software program for control by yourself Brightness of all the monitors can be controlled centrally using a computer if the customer create a control application to remotely read the value from two brightness sensors of any monito...

Page 48: ...he ID number of the monitor you want to control using the button on the remote controller The ID of the monitor you want to control is displayed at the upper left of its screen By selecting ALL you can control all the multi connected monitors 4 Direct the remote controller at the remote control signal sensor of the PRIMARY monitor OSD appears on the monitor having the ID number you selected When t...

Page 49: ...this case manual adjustments are required There are two ways to adjust the screen One way is automatic adjustment for Position Clock and Phase The other way is performing each adjustment manually Perform the Auto Adjust first when the monitor is connected to a new computer or resolution is changed If the screen has a flicker or blur or the picture does not fit in the display area after performing ...

Page 50: ... picture may flicker during the Clock H V Position adjustment In case the picture frame is bigger or smaller than the data display area after the Clock adjustment repeat steps from 2 Stretch the right side of the picture frame to the right edge of the display area by adjusting the Clock Adjust the Auto Adjustment Adjust the image manually by following procedure below when the screen has a flicker ...

Page 51: ...the refresh rate of computer to low 60Hz and repeat steps from again Adjust the H Position after the Phase adjustment if the horizontal position moves during the adjustment Adjust the Brightness and Color to get the desired picture after you complete the Clock and Phase adjustments Put back your favorite wallpaper Adjust the Phase to correct horizontal wavy noise flicker or blur in the zebra patte...

Page 52: ...tion to less than 1W The screen becomes dark From Power Management Mode the image reappears in several seconds when either the keyboard or the mouse are touched again The power management feature of this product complies with power saving requirement of ENERGY STAR and VESA DPMS When activated it automatically reduces unnecessary power consumption of the monitor when your computer is not in use To...

Page 53: ...e monitor The power voltage is within the specification of the monitor The signal timing of the computer is within the specification of the monitor No sound The audio equipment computer etc is ON The Audio Cable is properly connected The Volume is turned up The Mute is OFF The audio output level of the audio equipment is within the specification of the monitor The sound is too loud or too quiet Th...

Page 54: ...ck the remote control s batteries status Check if the batteries are inserted correctly Check if the remote control is pointing at the monitor s remote sensor SCHEDULE OFF TIMER function i s n o t w o r k i n g properly The SCHEDULE function will be disabled when the OFF TIMER is set If the OFF TIMER function is enabled and the power to the LCD display is turned off if the power supply is interrupt...

Page 55: ...209 6mm W 680 4mm H 47 6 W 26 8 H Power Source 100 240V 50 60Hz 1 8A 0 8A Environmental Considerations Approvals CB CE EAC TÜV Bauart ENERGY STAR Audio equipment are not connected NOTE Brightness Contrast ratio 450cd m2 Typical 4000 1 Typical Analog 0 7Vp p Standard 75Ω Positive Digital DVI Digital Visual Interface Standard Rev 1 0 compliance Digital HDMI DisplayPort Input Video Signal Input Audio...

Page 56: ...splay 2012 MDT552S MDT701S J98 PD model IO label IO LABEL USB HDMI dwg Xref D D1 Mitsubishi public display 2012 MDT552S MDT701S J98 PD model IO label Side IO LABEL dwg 4xM6 SCREW HOLE VESA MOUNT 1214 0mm 47 8 1247 0mm 49 1 359 0mm 10 2 685 0mm 27 0 718 0mm 28 3 28 0mm 1 1 44 5mm 1 7 200 0mm 7 9 52 0mm 2 1 67 5mm 2 6 520 0mm 20 5 66 5mm 2 6 617 5mm 24 3 1166 5mm 45 9 ...

Page 57: ...119 000 1920x1080 Recommend 67 158 59 963 148 500 IBM 720x400 31 470 70 080 28 320 MAC 1920x1080 67 625 60 110 160 000 SD NTSC 15 734 59 940 13 500 4 43NTSC 15 734 59 940 13 500 PAL 15 625 50 000 13 500 PAL 60 15 734 59 940 13 500 SECAM 15 625 50 000 13 500 480i 60Hz 15 734 59 940 13 500 576i 50Hz 15 625 50 000 13 500 480p 60Hz 31 469 59 940 27 000 576p 50Hz 31 250 50 000 27 000 HD 720p 50Hz 37 50...

Page 58: ...4A21 Sub Main HDMI1 HDMI2 DVI D D SUB YPbPr VIDEO HDMI1 HDMI2 DVI D D SUB The following table shows the combinations of signal inputs with which the PIP and POP modes function However these modes do not function when the screen size is CUSTOM or REAL ...

Reviews: