background image

ENGLISH

A

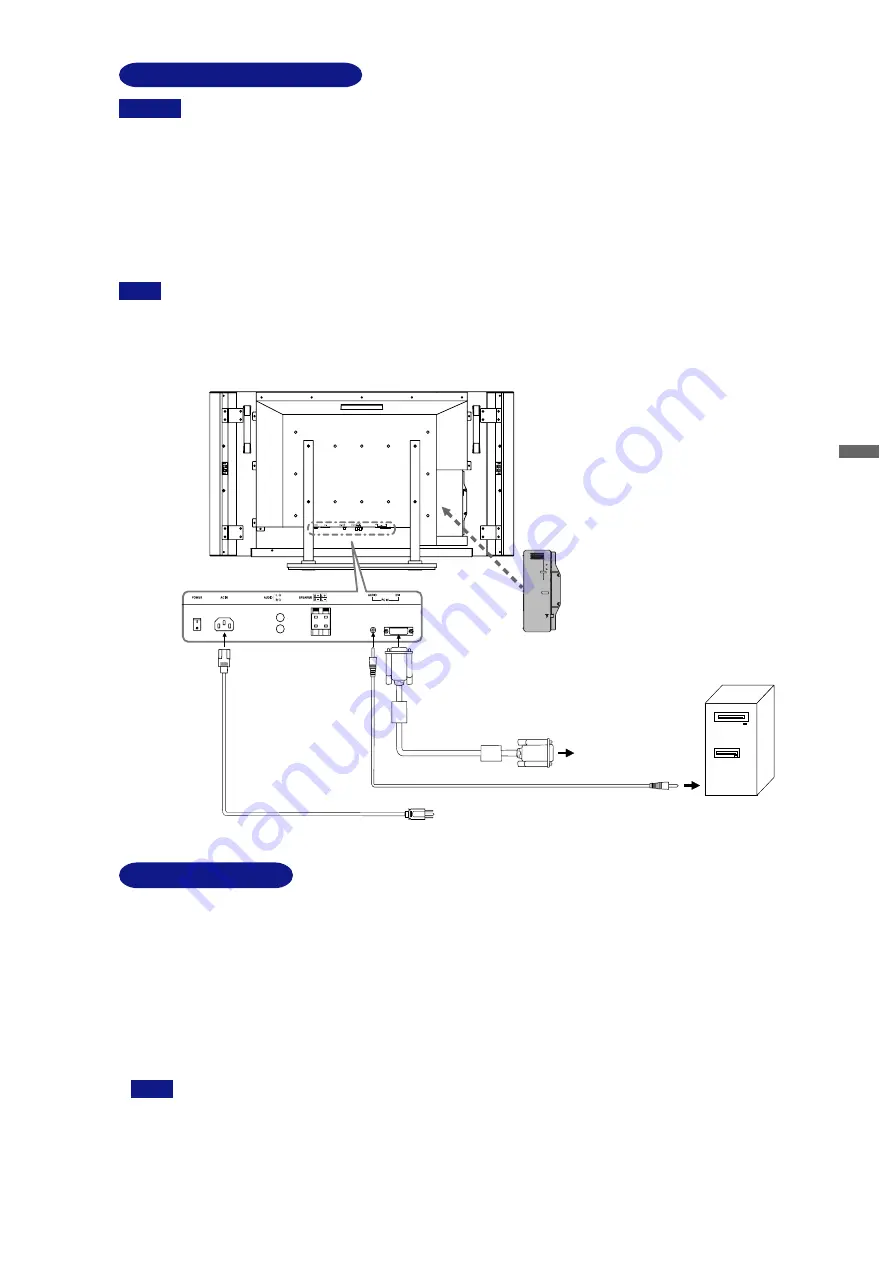
Ensure that both the computer and the monitor are switched off.

B

Connect the computer to the monitor with the signal cable. (See page 16 for CONNECTOR PIN ASSIGNMENT.)

C

Connect the monitor to the audio equipment with the Audio Cable for computer when using the audio features.

D

Connect the Power Cable to the monitor first and then to the power supply.

n

For connection to Macintosh computers, an adapter may be needed. Please contact your dealer for this.

n

Make sure you tighten the finger screws at each end of the signal cable.

[Example of Connection]

CAUTION

NOTE

The  signal  cables  used  for  connecting  the  computer  and  monitor  may  vary  with  the  type  of  computer  used. An  incorrect

connection may cause serious damage to both the monitor and the computer.

Turn off the power switch and unplug the monitor and peripherals before connection to avoid electric shock or damage.

n

n

CONNECTING YOUR MONITOR

BEFORE YOU OPERATE THE MONITOR      7

COMPUTER SETTING

n

Signal Timing

Change to the desired signal timings listed on page 16 in COMPLIANT TIMING, after you confirm that the picture appears normally.

n

Windows 95/98/2000/Me/XP Plug & Play

The  iiyama  LCD  monitor  complies  with  DDC2B  of  VESA  standard.  The  Plug  &  Play  function  runs  on  Windows  95/98/2000/Me/XP  by

connecting the monitor to DDC2B compliant computer with the Signal Cable supplied. Windows 95/98/2000/Me/XP Monitor Information File

for iiyama monitors may be necessary for your computer and obtained via the Internet, using the address:

http://www.iiyama.com  (U.S.A.)

http://www.iiyama.co.uk  (U.K.)

NOTE

n

For additional information on how to download the driver for your monitor, please access one of the internet sites noted

above.

n

Monitor  Drivers  are  not  required  in  most  cases  for  Macintosh  or  Unix  operating  systems.  For  further  information,  please

contact  your  computer  dealer  first  for  advice.

Power Cable (Accessory)

Computer

DVI-A Signal Cable DV69 (Accessory) or 
DVI-D Signal Cable DV66 (Accessory)

Audio Cable AD27 for computer (Accessory)

to

D-Sub connector of computer 

or 

DVI connector of computer

Tuner / Video Adapter
OTA3-2PS or OTA3-2PSB
(Optional)

AV-1

AV-1

VIDEO

VIDEO

R

L

AUDIO

AUDIO

AV-2

AV-2

S-VIDEO

S-VIDEO

Back

All manuals and user guides at all-guides.com

Summary of Contents for ProLite L323W

Page 1: ... that you take a few minutes to read carefully through this brief but comprehensive manual before installing and switching on the monitor Please keep this manual in a safe place for your future reference ENGLISH All manuals and user guides at all guides com a l l g u i d e s c o m ...

Page 2: ... residential environment This device generates uses and can radiate radio frequency energy and if not installed and used in accordance with the instructions may cause harmful interference to radio communications However there is no guarantee that interference will not occur in a particular installation If you determine the device does cause harmful interference to radio or television reception thi...

Page 3: ...OUS POSITION The monitor may topple and cause injury if not suitably located Please also ensure that you do not place any heavy objects on the monitor and that all cables are routed such that children may not pull the cables and possibly cause injury MAINTAIN GOOD VENTILATION Ventilation slots are provided to keep the monitor from overheating Covering the slots may cause fire To allow adequate air...

Page 4: ...orescent light used in the LCD monitor may have to be periodically replaced For the warranty coverage on this component please check with local iiyama service center If you have to return your unit for service and the original packaging has been discarded please contact your dealer or iiyama service center for advice or replacement packaging n n WARNING If you drop any materials or liquids such as...

Page 5: ...Cable 2 n Cable clamp for safety cable 2 n Screw for cable clamp 2 n User Manual CHECKING THE CONTENTS OF THE PACKAGE CAUTION All guarantees and warranties are void for any problems or damage caused by a power cable not supplied by iiyama Optional parts as below are available for your LCD monitor Please contact your local iiyama dealer or regional iiyama office for more details OPTIONAL PARTS Tune...

Page 6: ... and Phase automatically by pressing for one second or more when the menu page is not displayed Front G Speakers H Power Indicator Blue Normal operation Orange Power Management The monitor enters into power management mode which reduces the power consumption to less than 5W when receiving no horizontal and or vertical sync signal I Remote Sensor Front 4 BEFORE YOU OPERATE THE MONITOR n For best re...

Page 7: ...erminal L Optional Tuner Video Adapter Slot M DVI I 29pin Connector DVI N Audio Connector for computer AUDIO O External Speaker Output Terminal SPEAKER P Audio Output Connector AUDIO R L Q AC Connector AC IN R Main Power Switch POWER All manuals and user guides at all guides com ...

Page 8: ...rminal When connect the Speaker Cable conform the color of the Speaker Cable and Speaker Terminal If the cables are connected incorrectly the sound quality will be reduced 6 BEFORE YOU OPERATE THE MONITOR Back Speaker Bracket Speaker Speaker Cable NOTE NOTE Front Bass reflex port n n n n A Environmental temperature and humidity for installation Please be sure that an environmental temperature and ...

Page 9: ...ngs listed on page 16 in COMPLIANT TIMING after you confirm that the picture appears normally n Windows 95 98 2000 Me XP Plug Play The iiyama LCD monitor complies with DDC2B of VESA standard The Plug Play function runs on Windows 95 98 2000 Me XP by connecting the monitor to DDC2B compliant computer with the Signal Cable supplied Windows 95 98 2000 Me XP Monitor Information File for iiyama monitor...

Page 10: ...justment scale appears after you press the Menu Button Use the Buttons to change the vertical position settings The vertical position of the overall display should be changing accordingly while you are doing this C Press the Menu Button again Use the Buttons to make the appropriate adjustment or setting Adjustments for Position Clock and Phase are saved for each signal timing Except for these adju...

Page 11: ...oo high To correct flickering text or lines 1 Adjust the Brightness when you are using the monitor in a dark room and feel the screen is too bright 2 Available for PC Analog input only See page 12 for SCREEN ADJUSTMENTS OPERATING THE MONITOR 9 Off On Sound Control Adjustment Item Problem Option Button to Press Treble Bass Surround Too weak Too strong Too weak Too strong Surround sound effect is tu...

Page 12: ... may not be uniform when inputting stripe pattern signal or the like Mode 1 Mode 2 Off Brightness of back light is reduced by 20 Normal Brightness of back light is reduced by 40 No Yes Factory preset data is restored Return to the adjustment item line Language English English Deutsch German Français French Nederlands Dutch Svenska Swedish Italiano Italian 10 OPERATING THE MONITOR WXGA Mode Off On ...

Page 13: ...n is displayed at minimum size Sub screen is displayed at normal size Sub screen is displayed at maximum size AV 1 AV 2 Display a TV picture in the sub screen Display a AV 1 picture in the sub screen Display a AV 2 picture in the sub screen PIP 5 Off On PIP function is turned off PIP function is turned on Sub screen is too far to the left Sub screen is too far to the right V Position Sub screen is...

Page 14: ...ments may be required after the Auto Set up depending on the resolution or signal timing n The Auto Set up may not work correctly when displaying the picture other than the screen adjustment pattern In this case manual adjustments are required There are two ways to adjust the screen One way is automatic adjustment for Clock Phase and Position The other way is performing each adjustment manually Pe...

Page 15: ...tor turns to orange From Power Management Mode the image reappears in several seconds when either the keyboard or the mouse are touched again The power management feature of this product complies with every power saving requirement of ENERGY STAR and VESA DPMS When activated it automatically reduces unnecessary power consumption of the monitor when your computer is not in use To use the feature th...

Page 16: ... different switch the input signal o o If the monitor is in power management mode touch the keyboard or the mouse The screen is not synchronized o The Signal Cable is properly connected o The signal timing of the computer is within the specification of the monitor B o The signal timing of the computer is within the specification of the monitor o The video output level of the computer is within the...

Page 17: ...t mode 5W maximum 3 Power Consumption 2 Brightness Contrast ratio 500cd m2 Typical 600 1 Typical Input Audio Connector ø 3 5mm stereo mini jack Input Audio Signal 0 5Vrms maximum Speakers 7W 2 Stereo 100 230VAC 50 60Hz 2 3 1 0A SPECIFICATIONS APPENDIX A Environmental Considerations Approvals 1 2 Available only when OTA3 2PS or OTA3 2PSB is installed in the monitor 3 When AV equipment or antenna is...

Page 18: ...nstalling OTA3 2PS or OTA3 2PSB in the monitor 2 See page 10 for WXGA Mode 3 Digital input is not compliant ProLite L323W 978mm 38 5 560mm 22 0 483mm 19 414mm 16 3 530mm 20 9 690mm 27 2 136mm 5 4 300mm 11 8 778mm 30 6 NOTE COMPLIANT TIMING Vertical Frequency 59 940Hz 72 809Hz 75 000Hz 60 317Hz 72 188Hz 75 000Hz 60 004Hz 70 069Hz 75 029Hz 56 000Hz 60 000Hz 70 087Hz 66 667Hz 74 500Hz 74 720Hz VGA TE...

Page 19: ...reen Upper half stretch Lower half stretch NOTE REMOTE CONTROL CAUTION Do not use any other batteries other than those specified in this manual for the Remote Control Do not insert old and new batteries together in the Remote Control Make sure that the terminals match the and indications in the battery compartment Burst batteries or the electrolyte from these batteries may cause stains fire or inj...

Page 20: ...off the monitor automatically after selected period of time when antenna is connected This is switched when you successively press the button as follows 30min 60min 120min 0min Off J DISP Following information is displayed on the screen n Computer connection Input signal timing n Antenna connection Channel number Sound setting K 1 2 This is switched when you successively press the button as follow...

Page 21: ...utton on the monitor or the Remote Control to select a TV channel when the menu page is not displayed on the screen Select adjustment by pressing the Channel Select Button while the menu page is displayed on the screen Monitor Press the Down Up Channel Select Button Remote Control Press the Ch Channel Select Button When antenna is connected You can select only the channels set to Skip Off at Chann...

Page 22: ... monitor You can select only the program number which you set the SKIP function Off NOTE n Switch the input signal This is switched when you successively press the Input Button on the monitor as follows PC ANALOG PC DIGITAL TV AV 1 AV 2 Monitor Press the Input Button Remote Control Press the Input Signal Select Button n Display the adjustment menu page The menu page appears on the screen when you ...

Page 23: ...nd Contrast so that the picture is displayed naturally in VIDEO input mode Too dark Too bright Too dull Too intense To adjust picture quality Too weak Too strong Purplish Greenish ADJUSTMENT MENU CONTENTS APPENDIX B 21 Sound Control TV AV 1 AV 2 Off On Adjustment Item Problem Option Button to Press Treble Bass Surround Too weak Too strong Too weak Too strong Surround effect is turned off To simula...

Page 24: ...ure lacks right and left when selecting Mode 1 Mode 1 Mode 2 Off Brightness of back light is reduced by 20 Normal Brightness of back light is reduced by 40 English English No Yes Factory preset data is restored Return to the adjustment item line Function 1 TV AV 1 AV 2 Standard Movie Normal Suitable for a dark screen such as movie Game Suitable for Games Video Mode 3 Mode 3 Displays the picture in...

Page 25: ...h a movie natural without shakiness Off Enhancer is turned off On To enhance the picture outline NOTE Noise may be noticeable depending on the picture displayed Off Noise Reducer is turned off On To reduce the noise of picture NOTE Whole screen may be blurred depending on the picture displayed APPENDIX B 23 All manuals and user guides at all guides com ...

Page 26: ...ound System of the received broadcasting station No Yes Return to the line of the adjustment items Select the receivable channels automatically Store Cable n Some channels are not selected automatically depending on the signal condition n Select Store Cable when the broadcasting frequency is different from the one listed on the Table for receivable channels e g Cable TV In this case it takes appro...

Page 27: ...ng the button again SUBPAGE Switch between SUBPAGE mode and NORMAL mode Display S on the upper left of the screen by switching to SUBPAGE mode Enter SUBPAGE number by using the number button on the remote control Switch between LIST mode and FLOF TOP mode LIST RED GREEN YELLOW CYAN Select the items on the lower part of the screen in LIST FLOF or TOP mode n LIST mode Color button can store the cert...

Page 28: ... 25 447 25 455 25 463 25 F2 F3 F4 F5 F6 F7 F8 F9 F10 S21 S22 S23 S24 S25 S26 S27 S28 S29 S30 S31 S32 S33 S34 S35 S36 S37 S38 S39 S40 S41 E21 E22 E23 E24 E25 E26 E27 E28 E29 E30 E31 E32 E33 E34 E35 E36 E37 E38 E39 E40 E41 E42 E43 E44 E45 E46 E47 E48 E49 E50 E51 E52 E53 E54 E55 E56 E57 E58 E59 E60 E61 E62 E63 E64 E65 E66 E67 E68 E69 C1 C2 C3 C4 C5 C6 C7 C8 C9 C10 C11 C12 C13 C14 C15 C16 116 75 128 7...

Page 29: ...ENGLISH All manuals and user guides at all guides com ...

Page 30: ...ENGLISH All manuals and user guides at all guides com ...

Page 31: ...ENGLISH All manuals and user guides at all guides com a l l g u i d e s c o m ...

Page 32: ...IIYAMA CORPORATION 710 1 Kitaowaribe Nagano shi 381 0014 Japan Part No 870Z238B02 This manual is printed on recycled paper All manuals and user guides at all guides com ...

Reviews: