background image

ENGLISH

ENGLISH

13   OPERATING THE MONITOR

No

Lockout is canceled.

Japanese

Adjustment Item

Problem / Option                                             Button to Press

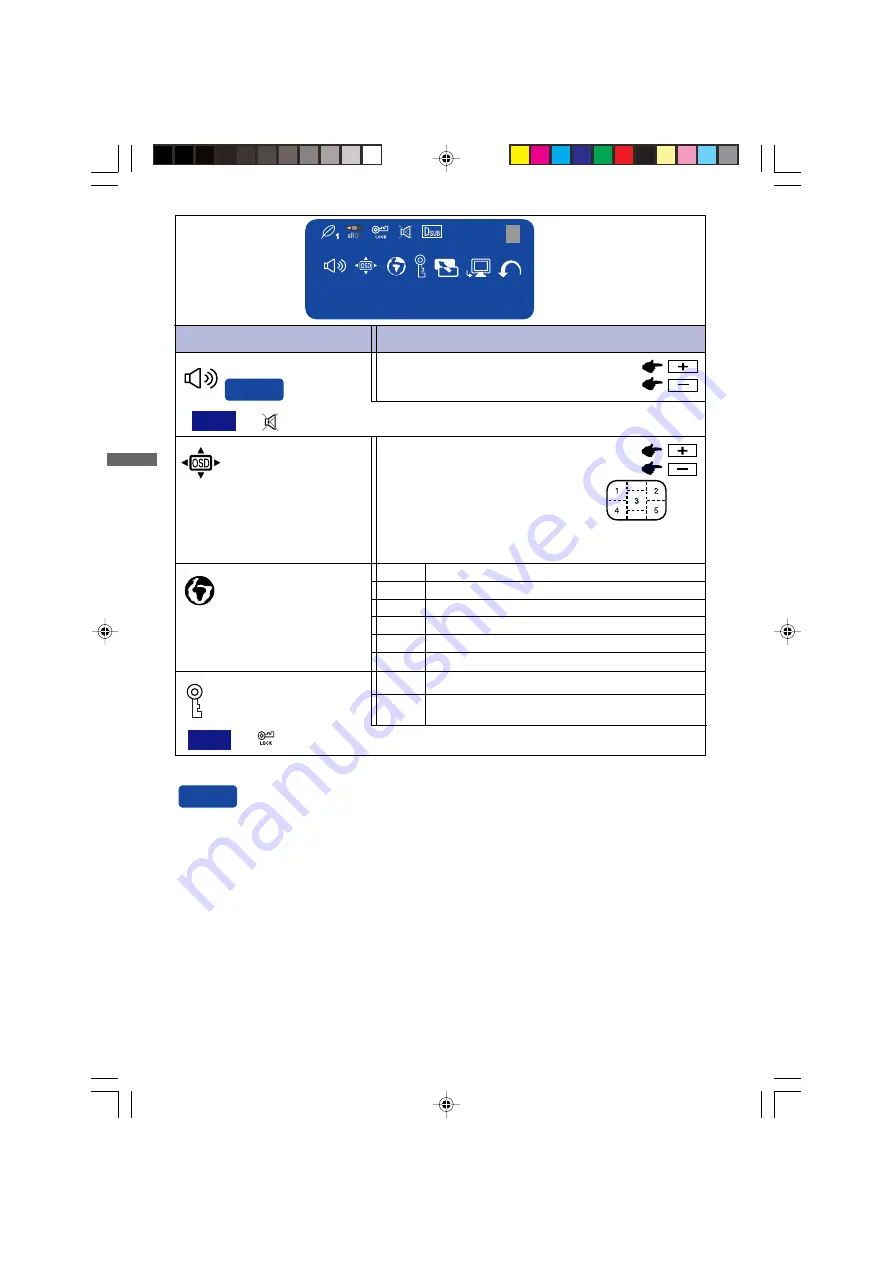
OSD Position

1 2 3 4 5

You can move the OSD display area
to any one of the following 5 positions
within the overall display:

Language

English
German
French

Spanish

Italian

Press the + Button to move the OSD in numerical order. Press
the – Button to move the OSD in reverse numerical order.

Menu : 3

Too soft
Too loud

Volume

Direct

Lockout

All adjustment items except this
function are locked out.

Ye s

NOTE

.     is displayed while Mute is active.

Ity

Eng
Dth
Fns

Epl
Jpn

NOTE

.     is displayed while Lockout is active.

1280 × 1024

M e n u : 3

H: 80.0 KHz  V: 75 Hz

Direct

You can skip the Menu pages and display an adjustment scale directly by using the

following  button  operations.

  Volume: When OSD menu is off, holding the + button or – button for 1-2 seconds.
  Mute: When OSD menu is off, holding the Auto / EXIT button for 1-2 seconds will switch

               the Mute function.

  Input: When OSD menu is off, holding OPQ / INPUT button for 1-2 seconds will switch the
            Input signal.

PLE485S-e.p65

2004/09/14, 17:26

18

Summary of Contents for ProLite E435S

Page 1: ...IANO ESPAÑOL Thank you very much for choosing the iiyama LCD monitor We recommend that you take a few minutes to read carefully through this brief but comprehensive manual before installing and switching on the monitor Please keep this manual in a safe place for your future reference PLE485S e p65 2004 09 14 17 25 1 ...

Page 2: ...al computers The labelling scheme was developed as a joint effort by the TCO The Swedish Confederation of Professional Employees Svenska Naturskyddsforeningen The Swedish Society for Nature Conservation and Statens Energimyndighet The Swedish National Energy Administration Approval requirements cover a wide range of issues environment ergonomics usability emission of electric and magnetic fields e...

Page 3: ...em and is toxic in high doses The relevant TCO 99 requirement states that batteries the colour generating layers of display screens and the electrical or electronics components must not contain any cadmium Mercury Mercury is sometimes found in batteries relays and switches It damages the nervous system and is toxic in high doses The relevant TCO 99 requirement states that batteries may not contain...

Page 4: ...g antenna Increase the separation between the device and receiver Connect the device into an outlet on a circuit different from that to which the receiver is connected Consult the dealer or an experienced radio or TV technician for help To meet the FCC requirements you should use a signal cable with ferrite core at both ends CAUTION Changes or modifications not expressly approved by IIYAMA could v...

Page 5: ...IONALPARTS 6 INSTALLATION OF STAND 6 CONTROLSANDCONNECTORS 7 CONNECTINGYOURMONITOR 8 COMPUTER SETTING 9 ADJUSTINGTHE VIEWINGANGLE 9 OPERATING THE MONITOR 10 ADJUSTMENT MENUCONTENTS 11 SCREEN ADJUSTMENTS 15 POWER MANAGEMENT FEATURE 18 TROUBLESHOOTING 19 APPENDIX 21 SPECIFICATIONS 21 DIMENSIONS 22 COMPLIANT TIMING 22 CONNECTORPIN ASSIGNMENT 23 TABLE OF CONTENTS PLE485S e p65 2004 09 14 17 25 5 ...

Page 6: ...ric shock or damage INSTALL THE MONITOR ON A FLAT STABLE SURFACE The monitor may cause an injury if it falls or is dropped DO NOT USE THE MONITOR NEAR WATER Do not use where water may be splashed or spilt onto the monitor as it may cause fire or electric shock OPERATE UNDER THE SPECIFIED POWER SUPPLY Be sure to operate the monitor only with the specified power supply Use of an incorrect voltage wi...

Page 7: ...ating the monitor on its back side upside down or on a carpet or any other soft material may also cause damage DISCONNECT THE CABLES WHEN YOU MOVE THE MONITOR When you move the monitor turn off the power switch unplug the monitor and be sure the signal cable is disconnected If you do not disconnect them it may cause fire or electric shock UNPLUG THE MONITOR If the monitor is not in use for a long ...

Page 8: ...ing at the screen continuously can cause eye strain 3 Economy 1 Reduces brightness and power consumption more than Text mode 4 Economy 2 Reduces brightness and power consumption more than Economy 1 OPQ Optimize Picture Quality Function You can change the screen to 4 levels of brightness depending on usage See page 14 ADJUSTMENT MENU CONTENTS OPQ Mode to set up OPQ NOTE Reducing the brightness can ...

Page 9: ...lly replaced For the warranty coverage on this component please check with local iiyama service center If you have to return your unit for service and the original packaging has been discarded please contact your dealer or iiyama service center for advice or replacement packaging WARNING If you drop any materials or liquids such as water into the monitor when cleaning unplug the power cable immedi...

Page 10: ... Compliant Power Management ENERGY STAR and VESA DPMS Compliant Ergonomic Design TCO 99 and MPR 3 3 3 3 3 Approved VESA Mounting Standard 100mm 100mm Compliant The following accessories are included in your package Check to see if they are enclosed with the monitor If anything is missing or damaged please contact your local iiyama dealer or regional iiyama office Power Cable AC Adapter D Sub Signa...

Page 11: ...trong impact to the monitor It may cause damage Unplug the monitor before installation to avoid electric shock or damage Install Remove Push the hooks in the direction of the arrows and pull the Stand away from the post Hold the monitor and push the post down into the Stand BEFORE YOU OPERATE THE MONITOR 6 Remove Push and pull up the upside VESA Mount Hole VESA Mount Hole is coverd with the hinge ...

Page 12: ...h the Mute function C OPQ Input Button OPQ INPUT When OSD menu is off holding for 1 2 seconds will switch the Input signal D Brightness Button E Contrast Button When OSD menu is off holding the or button for 1 2 seconds will swich the Volume function F Menu Button G Speakers H Connector for AC Adapter DC IN I Audio Connector AUDIO IN J DVI D 24 pin Connector DVI D K D sub mini 15pin Connector D SU...

Page 13: ...nd then to the power supply NOTE The signal cables used for connecting the computer and monitor may vary with the type of computer used An incorrect connection may cause serious damage to both the monitor and the computer The cable supplied with the monitor is for a standard 15 pin D Sub connector If a special cable is required please contact your local iiyama dealer or regional iiyama office For ...

Page 14: ...advice For additional information on how to download the driver for your touch screen monitor please access the internet site noted above For optimal viewing it is recommended to look at the full face of the monitor Hold the stand so that the monitor does not topple when you change the monitor s angle You are able to adjust the monitor s angle up to 30 degrees upward 5 degress downward In order to...

Page 15: ...r you press the Menu Button Use the Buttons to change the vertical position settings The vertical position of the overall display should be changing accordingly while you are doing this C C C C C Use the Buttons to make the appropriate adjustment or setting Adjustments for Clock Phase and Position are saved for each signal timing Except for these adjustments all other adjustments have only one set...

Page 16: ...Brightness Press the Brightness Button when the Menu is not displayed Contrast Press the Contrast Button when the Menu is not displayed To correct flickering text or lines Direct Direct Direct 1 Adjust the Brightness when you are using the monitor in a dark room and feel the screen is too bright 2 See page 15 for SCREENADJUSTMENTS SWITCHING BRIGHTNESS CONTRAST ADJUSTMENT To switch between Brightne...

Page 17: ...utton when the Menu is not displayed 1 NOTE sRGB is an international standard which defines and unifies the difference of color appearance between equipment You can not adjust the Gamma in sRGB mode because those settings are locked Off Normal Mode1 High contrast Dark Gamma 3 Mode2 Color 3 6500K Color 2 7500K sRGB You can skip the Menu pages and display an adjustment scale directly by using the fo...

Page 18: ...irect Lockout All adjustment items except this function are locked out Yes NOTE is displayed while Mute is active Ity Eng Dth Fns Epl Jpn NOTE is displayed while Lockout is active 1280 1024 Menu 3 H 80 0 KHz V 75 Hz Direct You can skip the Menu pages and display an adjustment scale directly by using the following button operations Volume When OSD menu is off holding the button or button for 1 2 se...

Page 19: ...king with text NOTE Change from Text Mode to Economy Modes when viewing the screen for long periods You can adjust directly by using the following button operation OPQ Mode Press the OPQ Button Direct OPERATING THE MONITOR 14 Adjustment Item Problem Option Button to Press Return to Menu Highlight Menu 3 again No Yes Return to Menu Factory preset data is restored Reset Signal Select D SUB Select th...

Page 20: ...required Zebra pattern Color bar Picture frame There are two ways to adjust the screen One way is automatic adjustment for Clock Phase and Position The other way is performing each adjustment manually Perform the Auto Set up first when the monitor is connected to a new computer or resolution is changed If the screen has a flicker or blur or the picture does not fit in the display area after perfor...

Page 21: ...icture frame will move to the left edge of the display area 2 Stretch the right side of the picture frame to the right edge of the display area by adjusting the Clock NOTE When the left side of the picture frame moves apart from the left edge of the display area during the Clock adjustment adjust steps 1 and 2 Another way to make the Clock adjustment is to correct the vertical wavy lines in the ze...

Page 22: ... repeat steps from C again Adjust the H Position after the Phase adjustment if the horizontal position moves during the adjustment H H H H H Adjust the Brightness and Color Temp to get the desired picture after you complete the Clock and Phase adjustments Put back your favorite wallpaper G G G G G Adjust the Phase to correct horizontal wavy noise flicker or blur in the zebra pattern 17 OPERATING T...

Page 23: ...han 3W The screen becomes dark and the power indicator turns to orange From Power Management Mode the image reappears in several seconds when either the keyboard or the mouse are touched again The power management feature of this product complies with every power saving requirement of ENERGY STAR and VESA DPMS When activated it automatically reduces unnecessary power consumption of the monitor whe...

Page 24: ... timing of the computer is within the specification of the monitor Power indicator is orange If the monitor is in power management mode touch the keyboard or the mouse The screen is not synchronized The Signal Cable is properly connected The signal timing of the computer is within the specification of the monitor B The signal timing of the computer is within the specification of the monitor The vi...

Page 25: ...ation of the monitor F The audio equipment computer etc is ON The Volume is turned up The Mute is OFF The sound is too loud or too quiet G The audio output level of the audio equipment is within the specification of the monitor A strange noise is heard H The Audio Cable is properly connected TROUBLE SHOOTING 20 PLE485S e p65 2004 09 14 17 26 25 ...

Page 26: ...0VAC 50 60Hz 1 8A Output 19VDC 3 42A Model name UP06511190 Maker name POTRANS Monitor 19VDC 3 1A Environmental Considerations Approvals TCO 99 CE TÜV GS MPR3 prEN50279 ISO 13406 2 FCC B UL C UL VCCI B Tilt Angle 20 to 55 No condensation 5 to 35 C 41 to 95 F 20 to 55 C 4 to 135 F Operative temperature Storage temperature Humidity 20 to under 50 C 4 to under 122 F Humidity 50 to 60 C 122 to 140 F 20...

Page 27: ...Hz 80 000MHz VGA TEXT VESA Macintosh SVGA VGA XGA 1024 768 640 480 800 600 Horizontal Frequency 31 469kHz 37 500kHz 37 861kHz 35 156kHz 37 879kHz 46 875kHz 48 077kHz 48 363kHz 56 476kHz 60 023kHz 67 500kHz 63 981kHz 79 976kHz 31 469kHz 35 000kHz 49 725kHz 60 150kHz 720 400 Video Mode SXGA 1152 864 1280 1024 Vertical Frequency 59 940Hz 75 000Hz 72 809Hz 56 250Hz 60 317Hz 75 000Hz 72 188Hz 60 004Hz ...

Page 28: ...und NC NC NC 23 APPENDIX 3 8 1 2 4 5 6 7 9 10 11 12 15 20 13 14 16 17 18 19 21 22 23 24 Pin Input Signal Input Signal Pin T M D S Data 2 T M D S Data 2 T M D S Data 2 Ground Clock line SCL Data line SDA T M D S Data 1 T M D S Data 1 T M D S Data 1 Ground Ground Hot Plug Detect T M D S Data 0 T M D S Data 0 T M D S Data 0 Ground T M D S Clock Ground T M D S Clock T M D S Clock Compliant to VESA DDC...

Reviews: