background image

Nap mode lets you set an alarm separate from the Alarm 1 and Alarm 2 settings. The nap wake to source by default is the 
buzzer alarm, but if an iPhone/iPod is docked (no other source is playing), that will act as the alarm source. If you are 
listening to the radio or aux-in source, it will be muted and the buzzer will sound at the selected wake time.
1. Press and release the 

Nap Button

 located on top of the unit as needed to adjust the nap timer for 5, 10, 15, 20, 30, 45, 

60, 90 or 120 minutes or OFF. 

2. To cancel nap mode, press and release the 

Nap Button

 until OFF is displayed. To turn off the nap alarm once it sounds, 

press and release the     

Button.

7

6

Nap Operation

Dimmer Operation

During normal operation, press and release the 

Snooze/Dimmer Button

 to control the brightness of the LCD display.

Charging a Device with the USB Port

A USB port is located on the back of the unit for playing and charging devices while the unit is connected to AC power.  

Connect one end of a compatible USB cable (not included) into the standard USB port on the unit and the other end into 
the device you wish to charge. Some devices require proprietary USB charging ports or cables. Monitor the charging 
status of your device. If the device does not charge, you will need to use the charger that came with your device..

We recommend the use of alkaline batteries for longer life.

The unit comes with 2 AA back-up batteries included with the instructions to provide continuous 
alarm operation and clock settings in the event of a power failure. Install these batteries 
before setting up the unit. When the Battery Low Icon on the display is flashing, it is time to 
replace the back-up batteries. 

1. If replacing batteries, please make sure the AC adaptor is connected, otherwise all settings 

may be lost during battery replacement.

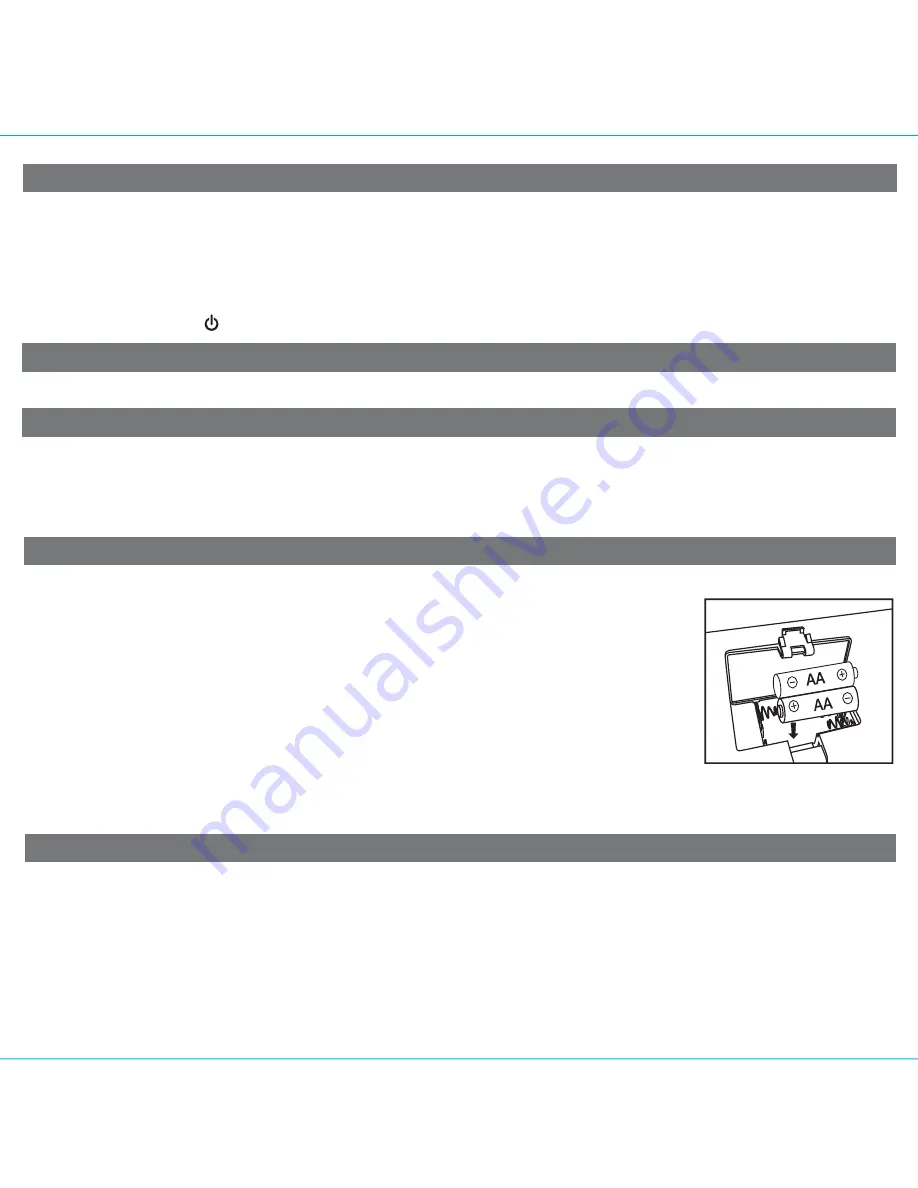
2. Open the battery compartment cover located on the bottom of the unit. 

3. Insert 2 AA batteries, checking that the polarity (+ and – ends of the battery) matches the 

drawing  near the battery compartment. Close the compartment door.

Note: 

Make sure you dispose of batteries properly (see your local regulations).

Installing and Replacing Backup Batteries

Battery Warning

For models that require more than one battery 

•  Do not mix with used or other battery types/brands 
•  Replace all batteries at the same time 
•  Do not open batteries 
•  Do not dispose of in fire

•  Do not heat above 75ºC (167ºF) 
•  Do not expose contents to water 
•  Do not charge or recharge 
•  Do not install backwards

Summary of Contents for iDL91

Page 1: ...adio with Lightning Dock and USB Port Questions For latest instructions visit www ihome com support iDL91 IB_US version Size 178 x 178 mm 16 pages Printing color Black Mat l 90gsm book paper May 16 2013 6 download QR code reader app and scan ...

Page 2: ...ject to the following two conditions 1 This device may not cause harmful interference and 2 this device must accept any interference received including interference that may cause undesired operation This equipment complies with the limits for a Class B digital device as specified in Part 15 of FCC Rules These limits provide reasonable protection against radio and TV interference in a residential ...

Page 3: ...e Dimmer Button Alarm 1 Button Lower Raise volume Button Mode Button EQ Button Alarm Reset Power Button Set Button Skip Search FWD REV Lightning Dock Play Pause Button Alarm 2 Button Rear Panel Top Panel USB Dock Play Pause Button Clock Button Presets Button Nap Button Sleep Button iHome App Indicator 6 Rubberized backrest Lightning 8 pin Connector for iPad iPhone iPod mode eq nap bedtime wakeup s...

Page 4: ...one or iPod will charge while docked Press the Dock Button on the unit to play your iPad iPhone or iPod 2 docking your iPad iPhone iPod 3 time sync 4 Radio Dock your iPad iPhone or iPod in the Lightning Dock or connect to the USB Dock The time will automatically update to the time on your device Extend FM wire antenna fully for best reception Press and release the Mode Button as needed to select F...

Page 5: ...so sync by connecting an iPad iPhone or iPod to the USB port 2 The unit will now autosync every time a capable iPhone iPod or iPad is docked and at 2AM each day To manually time sync at any time to a docked device press and release the Clock Button NOTE iPhone time is automatically updated to the correct time via cell phone towers The time on your iPad or iPod is accurate only to the time on the c...

Page 6: ... USB select USB to wake to an iPad iPhone or iPod connected to the USB port As with waking to the Lightning Dock you can wake to either the last track played Normal Wake or to a custom playlist choose Playlist Wake as detailed above For wake to radio after selecting Radio as the wake to source press and release the Alarm Button and then press and release the or Button to select a radio station or ...

Page 7: ... video mode you may see the locked slider on the iPad iPhone iPod display If so you will need to unlock your iPad iPhone iPod 3 Press the Dock Button or the USB Button on the unit on the unit to pause play press again to resume play 4 Press the or Button on the unit to go to the next or previous track Press and hold while track is playing for high speed forward or reverse music search of the curre...

Page 8: ...world use different FM radio frequency steps and ranges You will need to select the one that matches the standards in your region USA EUROPE JAPAN AUSTRALIA or CHINA The default setting is USA if you live in the USA you may skip this section 1 Make sure the unit is OFF not playing in any mode Press and hold the Mode Button for about 5 seconds until Radio xxx appears in the lower part of display Pr...

Page 9: ...ry USB charging ports or cables Monitor the charging status of your device If the device does not charge you will need to use the charger that came with your device We recommend the use of alkaline batteries for longer life The unit comes with 2 AA back up batteries included with the instructions to provide continuous alarm operation and clock settings in the event of a power failure Install these...

Page 10: ...ned only as recommended See the Maintenance section of this manual for cleaning instructions 7 Objects and Liquid Entry Care should be taken so that objects do not fall and liquids are not spilled into any openings or vents located on the product 8 Attachments Do not use attachments not recommended by the product manufacturer 9 Lightning and Power Surge Protection Unplug the unit from the wall soc...

Page 11: ...od is working properly before docking into the unit Please refer to your iPad iPhone iPod manual for details See above for software upgrade information You may need to reset your iPad iPhone iPod Refer to your iPad iPhone or iPod user guide for details on how to perform a reset Using 1st or 2nd generation iPod iPod Shuffle or other devices This system cannot control those iPod models or other devi...

Page 12: ... treble is too high the 3D effect may not sound as good Custom snooze time not set Alarm not working Trouble docking device to Lightning dock AM PM time alarm time not set correctly When setting clock or alarm time take note of the AM PM indicators Alarm time or source selected for alarm 2 not alarm 1 or vice versa Alarm schedule setting is not correct Device is in a case that prevents proper dock...

Page 13: ...r repaired by unauthorized persons ii cracked or broken cabinets or units damaged by excessive heat iii damage to digital media players CD s or tape cassettes if applicable iv the cost of shipping this product to the Factory Service Center and its return to the owner This warranty is valid only in the United States of America and does not extend to owners of the product other than to the original ...

Reviews: