background image


12 

I

ntegrated Home Automated Solutions Pty Ltd ABN 51 620 461 609


SMART Scenes 

The  SMART  Scenes  is  where  you'll  be  able  to  add,  create  &  edit  all  of  your  home’s  SMART  scenes 
functions. SMART Scene functions form part of the automation of your home, and it assists with adding 
the  IQ  to  your  home.  Its  how  all  your  nowe  products  will  come  together  to  understand  your  home’s 
automation requirements. It's all about creating a secure peace of mind, that’s convenient and functional.  

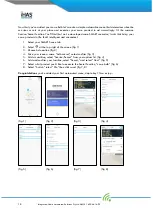
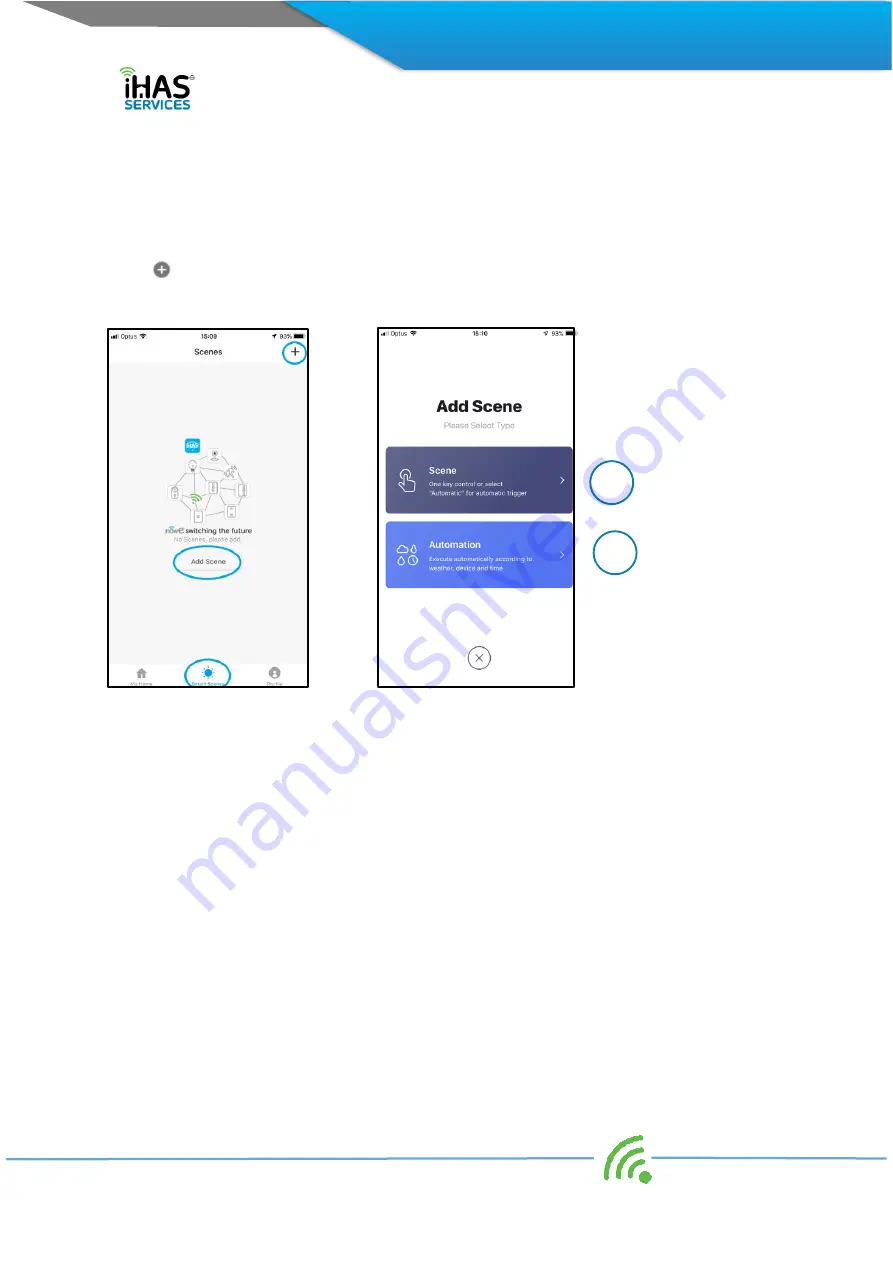
Select 

 to add scenes.  


(fig 1)   


(fig 2) 


You’ll have the following two options Scene and Automation. These two functions will  be the primary 
drive in creating your home’s SMART automation conveniences. (fig 2) 

a.


Automation – includes the following automation. 

i.


Temperature 

ii.


Humidity 

iii.


Weather 

iv.


Air Quality 

v.


Sunrise/Sunset 

vi.


Schedule 

vii.


Devices 

b.


Scenes  

– adds the function of automatic triggers.  


Note: For detailed examples and explanation of the SMART Scenes and their functions, please refer to 
SMART Scenario setup on page 16 of this user manual. 


Summary of Contents for SMART nowe CCT70E

Page 1: ...tant and Google Home Works with Amazon Alexa Dimmable via software app Adjustable colour warm 2700K Cool 6500K light SMART Scene control with other nowe products Group Bulb control Sharing family feature Google and Google Home are trademarks of Google LLC Amazon Alexa and all related logos are trademarks of Amazon com Inc or its affiliates 2 year limited Hardware Warranty ...

Page 2: ...g adding 14 Editing 14 Device Control 15 SMART SCENARIO SETUP 17 Automation 17 Scenes 19 MY PROFILE APP CONFIGURATION GESTURE CONTROL 20 Profile 20 My Profile 20 Gesture password locking 21 Home Management 22 Settings 23 Trouble shooting Failure to pair Password retrieval 23 Failing to pair pairing in AP Mode 23 Password Retrieval 25 Voice assistant automation setup guide 25 Google Home Google Ass...

Page 3: ...20 461 609 SPECIFICATIONS 27 nowe CCT70E LED bulb Spec s 27 WARRANTY 27 INTRODUCTION Dear Customer A BIG THANK YOU for choosing our nowe products Welcome to the family and to switching the future enjoy Regards George Mendes CEO Director iHAS Services nowe ...

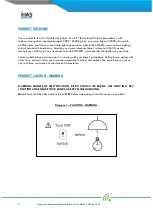
Page 4: ...r 3G 4G access through your iHAS app You can choose to switch ON OFF and even dim the lighting of your home The nowe Bulb plays a massive part in assisting with your home s automation Setting Scene actions with other nowe products allow you to create automation functions and options The nowe Bulb now gives you real time real peace of mind control convenience PRODUCT CAUTION WARNING WARNING DANGER ...

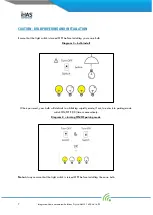
Page 5: ...inking rapidly It means that it s ready to be connected to your Wi Fi network through your iHAS app Diagram 2 attaching flashing If your Bulb doesn t default to blinking rapidly when installed by switching it ON OFF 3X times consecutively your nowe Bulb will enter into pairing mode ready to be connected to your Wi Fi network through your iHAS app Diagram 3 3X ...

Page 6: ...20 461 609 EASY SETUP Diagram 4 iHAS app download setup DOWNLOAD YOUR iHAS APP AND GETTING STARTED Simply scan QR codes above to download the latest iHAS app for Android or iOS The iHAS app can also be downloaded directly via the Google Play or Apple Store ...

Page 7: ...tch is turned OFF before installing your nowe Bulb Diagram 3 bulb install When powered your bulb will default to a blinking rapidly mode if not to enter into pairing mode switch ON OFF 3X times consecutively Diagram 4 turning ON OF pairing mode Note Always ensure that the light switch is turned OFF before installing the nowe bulb ...

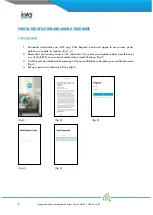
Page 8: ...e to our privacy policy before you re able to register fig 1 2 2 Ensure that your country code is 61 Australia 61 enter your mobile number less the zero e g 412345678 or your email address then select Continue fig 3 3 You ll be sent an authentication message with your verification code enter your verification code fig 4 4 Set up a password then select Done fig 5 fig 1 fig 2 fig 3 fig 4 fig 5 ...

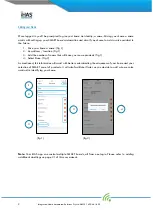
Page 9: ... An address location fig 1 3 Add the number of rooms that will have your nowe products fig 1 4 Select Done fig 2 As mentioned this information will assist with better understanding the uniqueness of your home and your selection of SMART nowe IoT products It will also facilitate if later on you decide to add a home voice assistant in identifying your home fig 1 fig 2 Note Your iHAS app can control ...

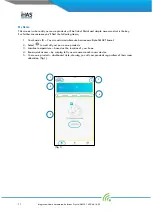
Page 10: ...t all the essential features into one quick and convenient dashboard style screen We ve included things like the weather temperature including outside air quality and humidity for added functionality Quick action toggle buttons common function features with simple and clarity as our primary focus fig 1 On the bottom of your dashboard screen you ll see three tabs My House SMART Scenes and Profile T...

Page 11: ...e you ll find the following items 1 Your home s ID You can add and alternate between multiple SMART home s 2 Select to add all your new nowe products 3 Location temperature based on the location of your home 4 Room quick access by swiping left you can access each rooms device 5 Your nowe product dashboard style showing you all your products regardless of their room allocation fig 1 fig 1 1 2 3 4 5...

Page 12: ...creating a secure peace of mind that s convenient and functional Select to add scenes fig 1 fig 2 You ll have the following two options Scene and Automation These two functions will be the primary drive in creating your home s SMART automation conveniences fig 2 a Automation includes the following automation i Temperature ii Humidity iii Weather iv Air Quality v Sunrise Sunset vi Schedule vii Devi...

Page 13: ...ime zone edit login details log out of account 2 Home Management Add edit the details of your home 3 Message Centre Receive device notification alerts 4 Scan QR Code Scanning QR product codes for manuals 5 Feedback Getting in touch with feedback 6 Settings Configuration and user preference fig 1 fig 1 Note For more details on profile setup and app configuration please refer to My Profile setup on ...

Page 14: ...dded your nowe Bulb simple hey Now enjoy Note If the Bulb isn t blinking rapidly enter it back into pairing mode by switching ON OFF your Bulb 3X times consecutively then select Confirm Bulb blinks rapidly Note Failing to connect please refer to the Troubleshooting Failing to connect on page 24 of this user manual Also please check your internet connection then check your Wi Fi router it could mea...

Page 15: ...our iHAS app So you will also need to change the device name with your assistants listing for it to know which product you re referencing Device Control Now that you ve added your nowe Bulb you ll find that we ve developed a few convenient ways that you can quickly and directly access the Bulb and its functions 1 ON OFF straight from the dashboard screen fig 1 2 Shortcut Screens from your dashboar...

Page 16: ...family members Or select Create Group for Simultaneously controlling selected items with one touch fig 4 5 Voice control Via a SMART home assistant Google Home Assistant or Amazon Alex fig 5 6 Device info select from the Bulb s main screen for information relating to Bulb s info Virtual ID IP address Mac address Device firmware version and updates Remove Device fig 1 fig 2 fig 3 fig 4 fig 5 fig 6 ...

Page 17: ...d when it s executed You also have the option of adding more than one conditions to measure the automation of tasks functions If you choose multiple conditions you ll still have the option of the automation being performed with only one condition being satisfied or you can elect to have all conditions met before performing the task function Pretty cool An example let s start with our most common c...

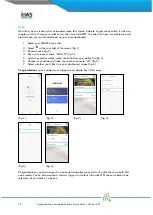
Page 18: ...e that s intelligent and convenient 1 Select your SMART Scene tab 2 Select at the top right of the screen fig 1 3 Choose Automation fig 2 4 Give your scene a name bulb sunset select confirm fig 3 5 Add a condition select Sunrise Sunset from your options list fig 4 6 Add and confirm your location select Sunset and select Next fig 5 7 Select what product you d like to execute the Sunset function now...

Page 19: ...een fig 1 3 Choose Scene fig 2 4 Give your scene a name bulb off fig 3 5 Add an execution action select the bulb from your option list fig 4 6 Choose what action you d like your bulb to execute off fig 5 7 Select whether you d like it on your dashboard screen fig 6 Congratulations you ve added your trigger scene simple hey Now enjoy fig 1 fig 2 fig 3 fig 4 fig 5 fig 6 Congratulations you ve manage...

Page 20: ... and feel of home automation 1 My Profile 2 Home Management 3 Settings My Profile In the Profile tab is where you ll be able to customise your iHAS app settings and profile ID requirements 1 Tap set name at the very top of the screen 2 Input your name add your name and even an image fig 2 3 Account will either be your mobile number or email details depending which you use to login 4 Region it will...

Page 21: ...gesture password locking function It will add an extra level of added security in the event of your mobile device being left unattended Then no one will be able to access your SMART home s automation 1 Click on Profile tab 2 Tap on set your name fig 1 3 Select Gesture password fig 2 4 Add and confirm your gesture selection fig 3 5 Done fig 1 fig 2 fig 3 ...

Page 22: ... ve called your current home Green Home and also would like to add your additional home your holiday house Brown Home 1 Select your Profile icon 2 Select Home Management fig 1 3 Select Add Home fig2 4 Give your home a name location fig 3 5 Select the room configuration fig 3 6 Select Done Now go back to the dashboard screen in the top left select from the drop down menu which home you d like to co...

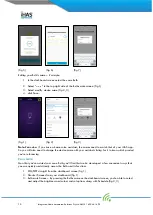
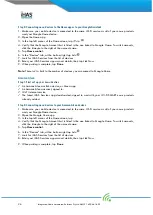
Page 23: ... development 1 Select the Profile tab 2 Select Settings fig 1 3 Sound fig 2 4 Push notifications fig 2 5 Integration fig 3 6 About fig 4 7 Clear Cache fig 1 fig 2 fig 3 fig 4 Trouble shooting Failure to pair Password retrieval Failing to pair pairing in AP Mode 1 Ensure your Bulb is switched ON and in pairing mode with the light blinking rapidly Note if your Bulb isn t in pairing mode blinking rap...

Page 24: ...ord and select Confirm fig 5 5 A Connect phone to the device s Wi Fi screen will follow On your Mobile device s Wi Fi select your Bulb s AP name which will look something like nowe XXXX then return to your iHAS app fig 6 6 A Connecting Now screen will run until 100 followed by a Device Successfully Added screen fig 7 8 Congratulations you ve added your nowe Bulb Enjoy fig 1 fig 2 fig 3 fig 4 fig 5...

Page 25: ... to input your verification You would have received either an SMS message or an email with your verification code input the 6 digit number and you ll be prompted to set a new password then select Done fig 3 4 fig 1 fig 2 fig 3 fig 4 Voice assistant automation setup guide Google Home Google Assistant Step 1 First set up your nowe devices A Google Home device or a mobile phone with the Google Assist...

Page 26: ...the number of devices you can connect to Google Home Amazon Alexa Step 1 First set up your nowe devices An Amazon Alexa or Echo device or Alexa app An Amazon Alexa account signed in Wi Fi internet service The latest iHAS Services app downloaded signed in and with your Wi Fi SMART nowe products already added Step 2 Connecting nowe devices to your Amazon Alexa devices 1 Make sure your mobile device ...

Page 27: ...t to not offer a refund or an exchange coupon In addition to your Australian Consumer Law Guarantees and any rights under the Australian Consumer Law iHAS Services warrants this product against defects from purchase for a period of 24 months During the warranty period iHAS Services will at its election replace or repair products that are defective The product is only subject to the warranty in cir...

Reviews: