Page 46
E2D400 Series Panel PC
NOTE:
When purchasing the cabinet/rack installation bracket, make sure it is
compatible with both the E2D400 series flat panel PC and the rack/cabinet
into which the E2D400 series is installed.
Step 1:
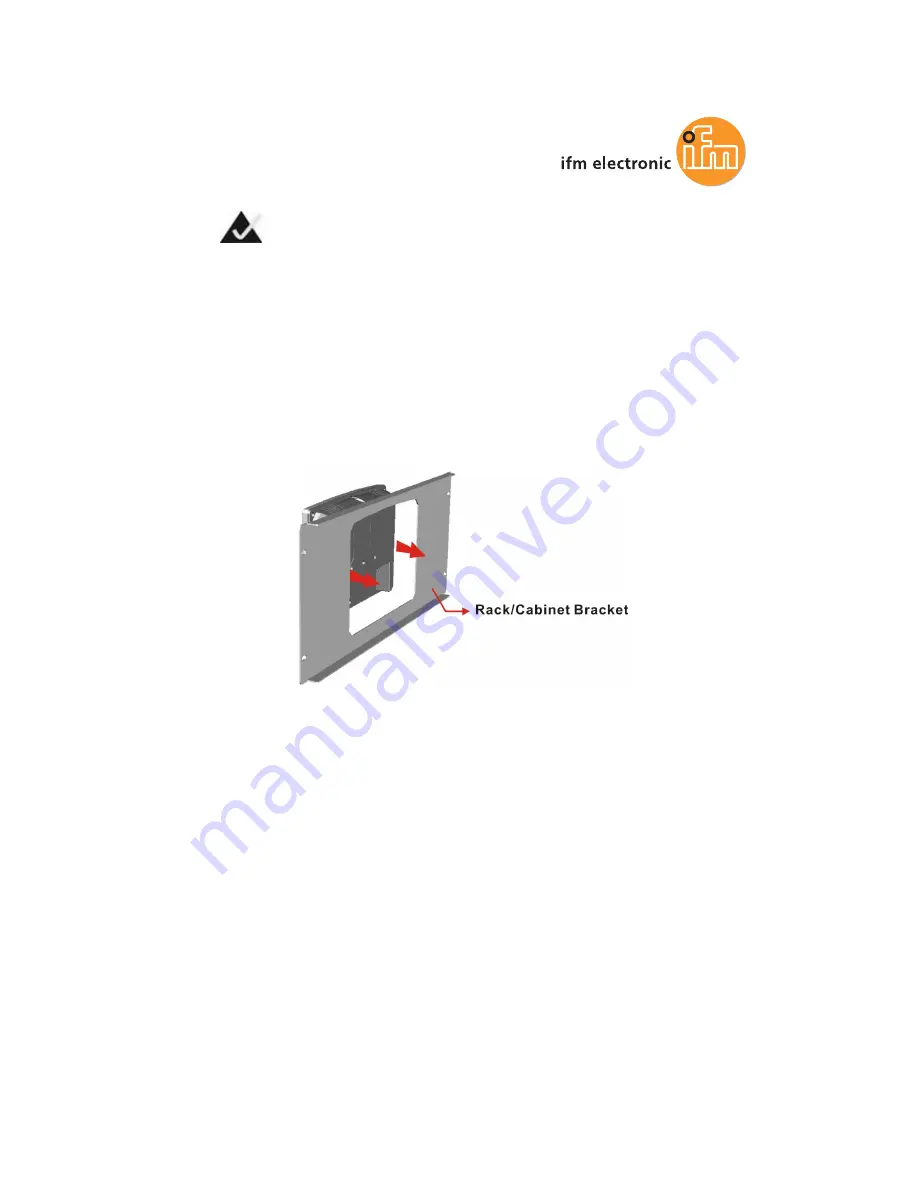
Slide the rear chassis of the E2D400 series flat panel PC through the
rack/cabinet bracket until the aluminum frame is flush against the front of the
bracket (
Figure 4-17
).
Figure 4-17: The Rack/Cabinet Bracket
Step 2:
Insert the rack mounting clamps into the pre-formed holes along the edges of
the flat panel PC, behind the ABS/PC plastic frame. There are a total of 6 rack
mounting clamps for E2D400.
Step 3:
Tighten the screws that pass through the rack mounting clamps until the plastic
caps at the front of all the screws are firmly secured to the bracket (
Figure 4-18
).
Summary of Contents for E2D400 Series
Page 1: ...E2D400 Series Panel PC Page I MODEL User Manual Touch Panel PC E2D400 E2D400 00 01 2013...
Page 10: ......
Page 11: ...E2D400 Series Panel PC Page 1 1 Introduction Chapter 1...
Page 19: ...E2D400 Series Panel PC Page 9 2 Detailed Specifications Chapter 2...
Page 29: ...E2D400 Series Panel PC Page 19 Figure 2 10 PIFA Antenna and Wireless Module...
Page 30: ...Page 20 E2D400 Series Panel PC 3 Unpacking Chapter 3...
Page 34: ...Page 24 E2D400 Series Panel PC 4 Installation Chapter 4...
Page 61: ...E2D400 Series Panel PC Page 51 5 System Maintenance Chapter 5...
Page 68: ...Page 58 E2D400 Series Panel PC 6 AMI BIOS Setup Chapter 6...
Page 111: ...E2D400 Series Panel PC Page 101 7 Software Drivers Chapter 7...
Page 141: ...E2D400 Series Panel PC Page 131 A System Specifications Appendix A...
Page 146: ...Page 136 E2D400 Series Panel PC B Safety Precautions Appendix B...
Page 150: ...Page 140 E2D400 Series Panel PC C BIOS Configuration Options Appendix C...
Page 154: ...Page 144 E2D400 Series Panel PC D Watchdog Timer Appendix D...
Page 157: ...E2D400 Series Panel PC Page 147 E Hazardous Materials Disclosure Appendix E...


