background image


TANK -820-H61 E mbedded S ys tem 

P age 48 


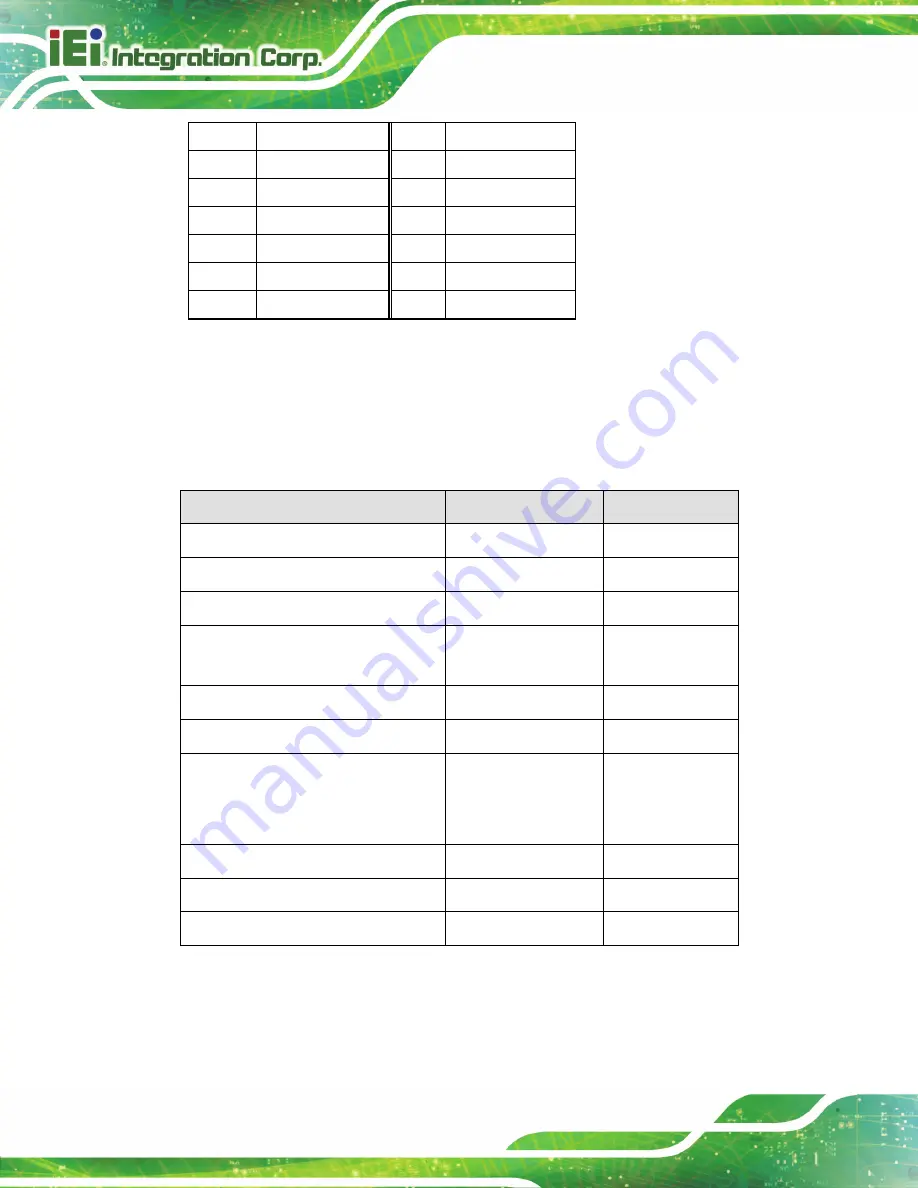
LPC_AD3 

LPC_AD2 

+V3.3S 

10 

LPC_AD1 

11 

LPC_AD0 

12 

GND 

13 

SMBCLK_MAIN 

14 

SMBDATA_MAIN 

15 

+V3.3A 

16 

INT_SERIRQ 

17 

GND 

18 

PM_CLKRUN# 

19 

PM_SUS_STAT# 

20 

SIO_DRQ#0 

Table 4-12: TPM Connector Pinouts (TPM1) 

4.3


E xternal Interface P anel C onnectors  

The table below shows a list of the external interface panel  connectors on the system 
motherboard. Pinouts of these connectors can be found in the following sections. 

C onnector 

T ype 

L abel 

Audio jack (mic, line-out) 

Audio jack 

JAUDIO1 

DIO connector 

DB-9 

DIO1 

DVI connector 

24-pin female 

DVI_1 

Ethernet and USB2.0 connectors 

RJ-45, USB 2.0 port  USBLAN1, 

USBLAN2 

Power connector 

4-pin DC jack 

PWR2 

Power connector 

3-pin terminal block 

PWR1 

RS-232 serial port connectors 

DB-9 

COM1,COM2, 
COM3,COM4, 

COM7,COM8 

RS-422/485 serial port connectors 

Dual RJ-45 

COM5, COM6 

USB 3.0 connectors 

USB 3.0 port 

USB3_12 

VGA connector 

DB-15 

VGA1 

Table 4-13: Rear Panel Connectors 

Summary of Contents for TANK-820-H61 Series

Page 1: ...age i Us er Manual MODE L TANK 820 H61 S eries E mbedded S ys tem with 2nd Generation Intel Core des ktop proces s or VGA DVI I Two Gigabit E thernet Four US B 2 0 Two US B 3 0 R S 232 422 485 R oHS Compliant R ev 2 08 27 December 2017 ...

Page 2: ... Port Connector COM5 COM6 26 May 2015 2 05 Update P N of System Fan 16 December 2014 2 04 Update Section 3 7 10 RJ 45 RS 422 485 Serial Ports 27 December 2013 2 03 Update BIOS version Updated Section 3 4 System Fan Installation 16 July 2013 2 02 Update Section 1 4 Technical Specifications Operating Temperature 20 C 55 C 19 June 2013 2 01 Update Section 1 2 Model Variations 22 May 2013 2 00 Change ...

Page 3: ...mages arising out of the use or inability to use the product or documentation even if advised of the possibility of such damages This document contains proprietary information protected by copyright All rights are reserved No part of this manual may be reproduced by any mechanical electronic or other means in any form without prior written permission of the manufacturer TR ADE MAR K S All register...

Page 4: ...AUTION Cautionary messages should be heeded to help reduce the chance of losing data or damaging the product NOTE These messages inform the reader of essential but non critical information These messages should be read carefully as any directions or instructions contained therein can help avoid making mistakes HOT S UR FACE This symbol indicates a hot surface that should not be touched without tak...

Page 5: ...NPACKING PRECAUTIONS 13 2 3 UNPACKING CHECKLIST 14 3 INSTALLATION 17 3 1 INSTALLATION PRECAUTIONS 18 3 2 CF CARD INSTALLATION 18 3 3 HARD DISK DRIVE HDD INSTALLATION 20 3 4 SYSTEM FAN INSTALLATION 22 3 5 MOUNTING THE SYSTEM WITH MOUNTING BRACKETS 23 3 6 FOOT PAD INSTALLATION 24 3 7 EXTERNAL PERIPHERAL INTERFACE CONNECTORS 25 3 7 1 ACC Mode Selection 26 3 7 2 AT ATX Power Mode Selection 26 3 7 3 Au...

Page 6: ... 9 2 2 Shutdown 41 4 SYSTEM MOTHERBOARD 42 4 1 OVERVIEW 43 4 1 1 Layout 43 4 2 INTERNAL PERIPHERAL CONNECTORS 44 4 2 1 Battery Connector BAT1 45 4 2 2 BIOS Programming Connector SPI2 45 4 2 3 CPU Fan Connector CPU_FAN1 45 4 2 4 EC Debug Connector CN4 45 4 2 5 EC Programming Connector JSPI1 46 4 2 6 LED Connector J2 46 4 2 7 PCH Fan Connector PCH_FAN 46 4 2 8 SATA 3Gb s Drive Connectors SATA1 47 4 ...

Page 7: ... Serial Port Connectors COM5 53 4 3 15 RS 422 485 Serial Port Connectors COM6 53 4 3 16 USB 3 0 Connectors USB3_12 53 4 3 17 VGA Connector VGA1 54 4 4 JUMPER SETTINGS 54 4 4 1 Clear CMOS Setup J_CMOS2 54 5 BIOS 55 5 1 INTRODUCTION 56 5 1 1 Starting Setup 56 5 1 2 Using Setup 56 5 1 3 Getting Help 57 5 1 4 Unable to Reboot after Configuration Changes 57 5 1 5 BIOS Menu Bar 57 5 2 MAIN 59 5 3 ADVANC...

Page 8: ...gs 83 5 3 12 iEi Feature 86 5 4 CHIPSET 87 5 4 1 PCH IO Configuration 88 5 4 2 System Agent SA Configuration 89 5 4 2 1 Graphics Configuration 89 5 5 BOOT 91 5 6 SECURITY 93 5 7 EXIT 94 A REGULATORY COMPLIANCE 96 B SAFETY PRECAUTIONS 102 B 1 SAFETY PRECAUTIONS 103 B 1 1 General Safety Precautions 103 B 1 2 Anti static Precautions 103 B 1 3 Product Disposal 104 B 2 MAINTENANCE AND CLEANING PRECAUTI...

Page 9: ...re 3 6 HDD Installation 21 Figure 3 7 HDD Retention Screws 22 Figure 3 8 System Fan Installation 23 Figure 3 9 Mounting Bracket Retention Screws 24 Figure 3 10 Foot Pad Installation 25 Figure 3 11 ACC Mode Switch 26 Figure 3 12 AT ATX Power Mode Switch 27 Figure 3 13 Audio Connector 27 Figure 3 14 DIO Connector 28 Figure 3 15 DVI Connector 29 Figure 3 16 LAN Connection 30 Figure 3 17 RJ 45 Etherne...

Page 10: ...36 Figure 3 27 VGA Connector 36 Figure 3 28 Power Button 37 Figure 3 29 Power Connectors 38 Figure 3 30 ACC On AT Mode 39 Figure 3 31 ACC On ATX Mode 39 Figure 3 32 ACC On Shutdown 40 Figure 3 33 ACC Off AT Mode 40 Figure 3 34 ACC Off ATX Mode 41 Figure 3 35 ACC Off Shutdown 41 Figure 4 1 System Motherboard Front 43 Figure 4 2 System Motherboard Rear 44 ...

Page 11: ...CPU_FAN1 45 Table 4 5 EC Debug Connector Pinouts CN4 46 Table 4 6 EC Programming Connector Pinouts JSPI1 46 Table 4 7 LED Connector Pinouts J2 46 Table 4 8 PCH Fan Connector Pinouts PCH_FAN 46 Table 4 9 SATA 3Gb s Drive Connectors Pinouts SATA1 47 Table 4 10 SATA Power Connector Pinouts CN1 47 Table 4 11 SMBus Connector Pinouts CN3 47 Table 4 12 TPM Connector Pinouts TPM1 48 Table 4 13 Rear Panel ...

Page 12: ...S 232 Serial Port Connector Pinouts COM7 52 Table 4 26 RS 232 Serial Port Connector Pinouts COM8 53 Table 4 27 RS 422 485 Serial Port Connectors Pinouts COM5 53 Table 4 28 RS 422 485 Serial Port Connectors Pinouts COM6 53 Table 4 29 USB 3 0 Connectors Pinouts USB3_12 54 Table 4 30 VGA Connector Pinouts VGA1 54 Table 4 31 Jumper 54 Table 4 32 Clear CMOS Setup Jumper Settings J_CMOS2 54 Table 5 1 BI...

Page 13: ...ndary Super IO Configuration 69 BIOS Menu 12 Serial Port n Configuration Menu 70 BIOS Menu 13 F81866 Super IO Configuration 72 BIOS Menu 14 Serial Port n Configuration Menu 72 BIOS Menu 15 Hardware Health Configuration 78 BIOS Menu 16 FAN Configuration 79 BIOS Menu 17 Serial Port Console Redirection 83 BIOS Menu 18 Console Redirection Settings 84 BIOS Menu 19 iEi Feature 86 BIOS Menu 20 Chipset 87...

Page 14: ...TANK 820 H61 E mbedded S ys tem Page 1 Chapter 1 1 Introduction ...

Page 15: ...emperature environments It is powered by the 2nd Generation Intel Core low power desktop processor uses the Intel H61 chipset and has 2 0 GB of DDR3 memory on board The TANK 820 H61 series includes one VGA port one DVI I port two GbE LAN ports four USB 2 0 ports two USB 3 0 ports six RS 232 connectors and two RS 422 485 connectors ...

Page 16: ...e i3 2xxT TANK 820 H61 P 2G 1P2E R10 Intel Pentium G6xxT Table 1 1 TANK 820 H61 Model Variations 1 3 Features The TANK 820 H61 features are listed below 2nd Generation Intel Core low power desktop processors for TANK 820 On board 2GB DDR3 memory and one DDR3 SO DIMM slot system max 10GB Redundant dual wild range DC power support 9 24 VDC Flexible PCI PCIe expansion slots satisfy customized require...

Page 17: ...l ports RJ 45 US B Interfaces 4 x USB 2 0 ports on front side 2 x USB 3 0 ports on rear side Dis play 1 x VGA port 2048 x 1536 75Hz 1 x DVI I port 1920 x 1080 60Hz Audio Connector 1 x Line out port 1 x Mic in port Digital I O 1 x DB 9 port on rear side Interior E xpans ions Either one PCIe x8 via PCIe x16 slot and two PCI or one PCIe x1 via PCIe x4 slot one PCIe x8 via PCIe x16 slot and one PCI LE...

Page 18: ...cal Operating Temperature 20 C 60 C with air flow S torage Temperature 30 C 80 C Humidity 5 95 non condensing Mounting Desktop wall mount Color Black C Silver Chas s is Cons truction Extruded Aluminum Alloy Phys ical Dimens ions 133 mm x 206 mm x 269 mm W x H x D Operating S hock Half sine wave shock 5G 11ms 3 axis Operating Vibration Meet MIL STD 810F 514 5C 2 with SSD Weight Net Gros s 4 2 Kg 6 ...

Page 19: ...re 1 2 TANK 820 H61 Front Panel Connectors and buttons on the front panel include the following 1 x 4 pin power DC jack for 9 V 24 V power input 1 x Power terminal block for 9 V 24 V power input 1 x Mic in port pink 1 x Line out port green 4 x RS 232 serial ports DB 9 2 x RS 422 485 serial ports RJ 45 2 x Gigabit Ethernet ports RJ 45 ...

Page 20: ...x VGA port 1 X DVI I port 1 x To Ground 3 x Expansion slots 1 x ACC mode switch 1 x AT ATX mode switch 1 6 R ear Panel The rear panel of the TANK 820 H61 has the following features Figure 1 2 Figure 1 3 TANK 820 H61 Rear Panel Connectors on the front panel include the following 1 x DIO connector 2 x RS 232 serial ports DB 9 with isolation 2 x USB 3 0 ports ...

Page 21: ...the AT ATX power mode switch ATX Power Mode The current power mode status is ATX mode Controlled by the AT ATX power mode switch Power 1 Breathing orange Standby mode Power 2 Solid blue Power on mode HDD Shows HDD status CPU Temperature Alert BLUE CPU temperature is normal RED CPU temperature is too high Table 1 3 LED Indicators Description WAR NING The CPU Temperature Alert LED turns red when the...

Page 22: ...2P1E Figure 1 6 HPE 3S7 1P2E The supported signals of the backplane slots are listed below B ackplane S lot S ignal HPE 3S 6 2P1E PCI PCI PCIe x16 PCIe x8 HPE 3S 7 1P2E PCI PCI PCIe x4 PCIe x1 PCIe x16 PCIe x8 Table 1 4 Supported Signals The rated voltage and current of the backplanes are listed below R ated Voltage R ated Current 5 V 7 A ...

Page 23: ... expansion cards is 45 W The power of the selected expansion cards can not exceed the max power 45 W otherwise the system may be unstable NOTE When using an expansion card with high power consumption it is recommended to install an external power supply to the 12V power input connector on the backplane The two types of backplane support standard PCI PCIe cards with maximum dimensions WxL 110 x 230...

Page 24: ...TANK 820 H61 E mbedded S ys tem Page 11 1 9 Dimens ions The physical dimensions are shown below Figure 1 7 Physical Dimensions millimeters ...

Page 25: ...TANK 820 H61 E mbedded S ys tem Page 12 Chapter 2 2 Unpacking ...

Page 26: ...atic wristband Wearing a simple anti static wristband can help to prevent ESD from damaging the board Self grounding Before handling the board touch any grounded conducting material During the time the board is handled frequently touch any conducting materials that are connected to the ground Use an anti static pad When configuring the TANK 820 H61 place it on an antic static pad This reduces the ...

Page 27: ...e TANK 820 H61 from or contact an IEI sales representative directly To contact an IEI sales representative please send an email to sales iei com tw The TANK 820 H61 is shipped with the following components Quantity Item and Part Number Image S tandard 1 TANK 820 H61 1 Power Adapter P N 63000 FSP120AAB RS 1 Power Cord P N 32702 000401 100 RS 1 Power Transfer Cord P N 32702 000300 100 RS 4 Mounting ...

Page 28: ...S 4 HDD Screws P N 44043 030051 RS 4 Rubber Foot Pad Screws P N 44033 040061 RS 4 Rubber Foot Pads P N 46015 006300 RS 2 RJ 45 to DB 9 COM Port Cable P N 32005 000200 200 RS 1 Pluggable DC in Terminal Block P N 33502 000007 RS 1 One Key Recovery CD P N 7B000 000724 RS 1 User Manual and Driver CD 4 Fan Screws P N 44003 030151 RS ...

Page 29: ...or R20 Version support CPU card 1 02 version above System Fan 40mmx40mmx10mm P N 19FR124010BL 000006 RS For R21 Version support CPU card 1 02 version above OS Win CE 6 0 128MB CF Card P N TANKCF 820 H61 CE060 128M R10 OS Win XPE 4GB CF Card P N TANKCF 820 H61 XPE 4G R10 OS Linux 2GB CF Card P N TANKCF 820 H61 LNX 2G R10 OS Win 7 Embedded 4GB CF Card P N TANKCF 820 H61 WES7E 4G R10 ...

Page 30: ...TANK 820 H61 E mbedded S ys tem Page 17 Chapter 3 3 Ins tallation ...

Page 31: ...ined and qualified personnel Maintenance upgrades or repairs may only be carried out by qualified personnel who are familiar with the associated dangers Air Circulation Make sure there is sufficient air circulation when installing the TANK 820 H61 The TANK 820 H61 s cooling vents must not be obstructed by any objects Blocking the vents can cause overheating of the TANK 820 H61 Leave at least 5 cm ...

Page 32: ...S ys tem Page 19 Figure 3 1 CF Card Socket S tep 2 Open the CF card socket cover Figure 3 2 Figure 3 2 CF Card Socket Cover S tep 3 Correctly align the CF card with the socket and insert the CF card into the socket Figure 3 3 ...

Page 33: ... 3 3 Hard Dis k Drive HDD Ins tallation To install the hard drive please follow the steps below S tep 1 Remove the two retention screws on the rear panel and loosen the two thumbscrews on the front panel slide the cover inwards and then lift the cover up gently Figure 3 4 Figure 3 4 Unscrew the Cover ...

Page 34: ...r cables connected to the TANK 820 H61 and then put the cover on a flat surface Figure 3 5 Figure 3 5 Remove the Cover from TANK 820 H61 S tep 3 Attach the HDD to the HDD bracket and then slide the HDD to connect the HDD to the SATA connector Figure 3 6 Figure 3 6 HDD Installation ...

Page 35: ...tion To install the optional system fan please follow the steps below S tep 1 Remove the two retention screws on the rear panel and loosen the two thumbscrews on the front panel slide the cover inwards and then lift the cover up gently Figure 3 4 S tep 2 Unplug the SATA signal and power cables connected to the TANK 820 H61 and then place the cover on a flat surface Figure 3 5 S tep 3 Attach the sy...

Page 36: ... H61 S tep 6 Reinstall the cover 3 5 Mounting the S ys tem with Mounting B rackets To mount the embedded system onto a wall or some other surface using the two mounting brackets please follow the steps below S tep 1 Turn the embedded system to the left side panel S tep 2 Align the two retention screw holes in each bracket with the corresponding retention screw holes on the bottom surface or the le...

Page 37: ... mounting surface S tep 6 Insert four retention screws two in each bracket to secure the system to the wall 3 6 Foot Pad Ins tallation The TANK 820 H61 is shipped with four foot pads To install the foot pads follow the instructions below S tep 1 Turn the TANK 820 H61 to the left side panel S tep 2 Locate the four retention screw holes for the food pad in the bottom surface S tep 3 Align the hole o...

Page 38: ... Interface Connectors The TANK 820 H61 has the following connectors Detailed descriptions of the connectors can be found in the subsections below ACC mode switch AT ATX power mode switch Audio CompactFlash Type II DIO DVI I Ethernet Power button Power DC jack Power terminal block Reset button RS 232 ...

Page 39: ... The setting can be made through the ACC mode switch on the external peripheral interface panel as shown below Figure 3 11 ACC Mode Switch 3 7 2 AT ATX Power Mode S election The TANK 820 H61 supports AT and ATX power modes The setting can be made through the AT ATX power mode switch on the external peripheral interface panel as shown below ...

Page 40: ... port Green Connects to a headphone or a speaker With multi channel configurations this port can also connect to front speakers Microphone Pink Connects a microphone Figure 3 13 Audio Connector 3 7 4 CompactFlas h Type II The TANK 820 H61 has one CF Type II socket The location of the socket is shown in Figure 1 2 To install the CF card refer to Section 3 2 ...

Page 41: ...igital display devices To connect a digital display device to the TANK 820 H61 please follow the instructions below S tep 1 Locate the DVI connector The location of the DVI connector is shown in Chapter 1 S tep 2 Align the DVI connector Align the male DVI connector on the digital display device cable with the female DVI connector on the external peripheral interface S tep 3 Insert the DVI connecto...

Page 42: ...ghtening the two retention screws on either side of the connector 3 7 7 LAN Connectors The LAN connectors allow connection to an external network S tep 1 Locate the RJ 45 connectors The locations of the RJ 45 connectors are shown in Figure 1 2 S tep 2 Align the connectors Align the RJ 45 connector on the LAN cable with one of the RJ 45 connectors on the TANK 820 H61 See Figure 3 16 ...

Page 43: ...ernet Connector The RJ 45 Ethernet connector has two status LEDs one green and one yellow The green LED indicates activity on the port and the yellow LED indicates the port is linked See Table 3 1 Activity Link LED Speed LED STATUS DESCRIPTION STATUS DESCRIPTION Off No link Off 10 Mbps connection Yellow Linked Green 100 Mbps connection Blinking TX RX activity Orange 1 Gbps connection Table 3 1 RJ ...

Page 44: ... The power connector connects to the 9 V 24 V DC power adapter Figure 3 19 Power Input Connector 3 7 10 R J 45 R S 422 485 S erial Ports RS 422 485 serial port devices can be attached to the RJ 45 RS 422 485 serial ports on the rear panel S tep 1 Locate the RJ 45 RS 422 RS485 connectors The locations of the RJ 45 RS 422 RS 485 connectors are shown in Figure 1 2 S tep 2 Insert the RJ 45 connector I...

Page 45: ...B 9 COM port cable S tep 4 Secure the connector Secure the serial device connector to the external interface by tightening the two retention screws on either side of the connector Figure 3 21 RJ 45 RS 422 485 Serial Port Connector Pin Description RS 422 Description RS 485 1 N A N A 2 TXD422 TXD485 3 N A N A 4 TXD422 TXD485 5 GND GND 6 RXD422 N A 7 N A N A 8 RXD422 N A Table 3 2 RJ 45 RS 422 485 Se...

Page 46: ...A N A 9 N A N A Table 3 3 DB 9 Connector Pinouts 3 7 11 R S 232 S erial Port Connectors RS 232 serial port devices can be attached to the DB 9 ports on the rear panel S tep 1 Locate the DB 9 connector The locations of the DB 9 connectors are shown in Figure 1 2 S tep 2 Insert the serial connector Insert the DB 9 connector of a serial device into the DB 9 connector on the external peripheral interf...

Page 47: ...wo retention screws on either side of the connector Figure 3 24 DB 9 RS 232 Serial Port Connector 3 7 12 US B Connectors The USB ports are for connecting USB peripheral devices to the system S tep 1 Locate the USB connectors The locations of the USB connectors are shown in Figure 1 2 S tep 2 Align the connectors Align the USB device connector with one of the connectors See Figure 3 25 ...

Page 48: ...VGA video input S tep 1 Locate the female DB 15 connector The location of the female DB 15 connector is shown in Figure 1 2 S tep 2 Align the VGA connector Align the male DB 15 connector on the VGA screen cable with the female DB 15 connector on the external peripheral interface S tep 3 Insert the VGA connector Once the connectors are properly aligned with insert the male connector from the VGA sc...

Page 49: ...nterface by tightening the two retention screws on either side of the connector Figure 3 27 VGA Connector 3 8 Powering On Off the S ys tem WARNING Make sure a power supply with the correct input voltage is being fed into the system Incorrect voltages applied to the system may cause damage to the internal electronic components and may also cause injury to the user ...

Page 50: ...simultaneously connected to two power sources When both power connectors are connected to power sources prior to use the corresponding power supply which with higher voltage There are two power connectors on the rear panel Power 1 connector is a 3 pin terminal block that supports ACC On signal Power 2 connector is a DIN connector that can directly connect to a power adapter The supported power inp...

Page 51: ...LED Indicators Description 3 9 1 ACC ON NOTE In ACC On mode the Power 1 connector must connect to ACC on signal to be able to control the system power The ACC On mode is designed for vehicle applications 3 9 1 1 B oot up When both power connectors are connected to power source with over 9 V power input the two power LEDs on the front panel remain off until the ACC ON signal jump from ...

Page 52: ...er mode to control the system The following flow diagrams show the boot up process and the LED status in AT and ATX power modes Figure 3 30 ACC On AT Mode Figure 3 31 ACC On ATX Mode 3 9 1 2 S hutdown The system will shutdown in the following situations Power 1 9 V and Power 2 9 V ACC ON signal jump from high to low Press Power button for 6 seconds The following flow diagram shows the system shutd...

Page 53: ...1 is in the ACC Off mode the system does not require an external ACC on signal 3 9 2 1 B oot up When both power connectors are connected to power source with over 9 V power input the Power 1 LED blinks breathing orange and the Power 2 LED shows off The user can choose to use AT power mode or ATX power mode to control the system The following flow diagrams show the boot up process and the LED statu...

Page 54: ...em will shutdown in the following situations Power 1 9 V and Power 2 9 V Press Power buttons for 6 seconds The following flow diagram shows the system shutdown process and the LED statuses Figure 3 35 ACC Off Shutdown NOTE The power LED turns off when the power cable is unplugged from the system ...

Page 55: ...TANK 820 H61 E mbedded S ys tem Page 42 4 S ys tem Motherboard Chapter 4 ...

Page 56: ...s all the jumpers and connectors of the system motherboard 4 1 1 Layout The figures below show all the connectors and jumpers of the system motherboard The Pin 1 locations of the on board connectors are also indicated in the diagram below Figure 4 1 System Motherboard Front ...

Page 57: ...ollowing sections Connector Type Label Battery connector 2 pin wafer BAT1 BIOS programming connector 6 pin wafer SPI2 CompactFlash Type II socket CompactFlash Type II socket CF1 CPU fan connector 4 pin wafer CPU_FAN1 DDR3 SO DIMM slot DDR3 SO DIMM slot DIMM1 EC debug connector 18 pin header CN4 EC programming connector 6 pin wafer JSPI1 LED connector 12 pin header J2 PCH fan connector 3 pin wafer ...

Page 58: ...CRIPTION PIN NO DESCRIPTION 1 SPI_VCC 2 SPI_CS 0_CN 3 SPI_SO0_CN 4 SPI_CLK0_CN 5 SPI_SI0_CN 6 GND Table 4 3 BIOS Programming Connector Pinouts SPI2 4 2 3 CPU Fan Connector CPU_FAN1 PIN NO DESCRIPTION PIN NO DESCRIPTION 1 GND 2 VCC 3 FANPWM1 4 FANIN1 Table 4 4 CPU Fan Connector Pinouts CPU_FAN1 4 2 4 E C Debug Connector CN4 PIN NO DESCRIPTION PIN NO DESCRIPTION 1 EC_EPP_STB 2 EC_EPP_AFD 3 EC_EPP_PD...

Page 59: ...IPTION PIN NO DESCRIPTION 1 V3 3A_EC_CONN 2 FSCE _S 3 FMISO_S 4 FSCK_S 5 FMOSI_S 6 GND Table 4 6 EC Programming Connector Pinouts JSPI1 4 2 6 LE D Connector J 2 PIN NO DESCRIPTION PIN NO DESCRIPTION 1 VCC3_IO 2 ISBAT_ORANGE 3 ICPU_LED02 4 V3 3A_EC_IO 5 ICPU_LED01 6 IDISKLED 7 IPWRLED02 8 IATX_LED 9 IPWRLED01 10 IAT_LED 11 IRST_PD 12 IMPWR_ORANGE Table 4 7 LED Connector Pinouts J2 4 2 7 PCH Fan Con...

Page 60: ...GND 12 S ATA20_PRX_C_DTX_N3 13 SATA20_PRX_C_DTX_P3 14 GND Table 4 9 SATA 3Gb s Drive Connectors Pinouts SATA1 4 2 9 S ATA Power Connector CN1 4 2 10 S MB us Connector CN3 PIN NO DESCRIPTION PIN NO DESCRIPTION 1 GND 2 SMBDATA_MAIN 3 SMBCLK_MAIN 4 V5S Table 4 11 SMBus Connector Pinouts CN3 4 2 11 TPM Connector TPM1 PIN NO DESCRIPTION PIN NO DESCRIPTION 1 TPMPCLK 2 GND 3 LPC_FRAME 4 NC 5 BUF_PLT_RST ...

Page 61: ...m motherboard Pinouts of these connectors can be found in the following sections Connector Type Label Audio jack mic line out Audio jack JAUDIO1 DIO connector DB 9 DIO1 DVI connector 24 pin female DVI_1 Ethernet and USB2 0 connectors RJ 45 USB 2 0 port USBLAN1 USBLAN2 Power connector 4 pin DC jack PWR2 Power connector 3 pin terminal block PWR1 RS 232 serial port connectors DB 9 COM1 COM2 COM3 COM4...

Page 62: ... PIN NO DESCRIPTION PIN NO DESCRIPTION 1 DIN1 2 DOUT1 3 DIN2 4 DOUT2 5 DIN3 6 DOUT3 7 DIN4 8 DOUT4 9 VCC5 Table 4 15 DIO connector Pinouts DIO1 4 3 3 DVI Connector DVI_1 PIN NO DESCRIPTION PIN NO DESCRIPTION 1 DVI_TMDS_C_DATA2 2 DVI_TMDS_C_DATA2 3 GND 4 NC 5 NC 6 DVI_VGA_DDC_SCLK 7 DVI_VGA_DDC_SDATA 8 VSYNC 2 9 DVI_TMDS_C_DATA1 10 DVI_TMDS_C_DATA1 11 GND 12 NC 13 NC 14 VCC 15 GND 16 DVI_HPD 17 DVI...

Page 63: ...P 8 ILAN1_MDI3 P 9 ILAN1_MDI3 P 1 0 GND P 11 ILAN1_LINK100 P 12 ILAN1_LINK1000 P 13 ILAN1_ACT 1 P 14 ILAN1_P 1 IUSBV1L 2 IDATA0_N 3 IDATA0_P 4 GND 5 IUSBV1L 6 IDATA1_N 7 IDATA1_P 8 GND Table 4 17 Ethernet and USB2 0 Connectors Pinouts USBLAN1 4 3 5 E thernet and US B 2 0 Connectors US B LAN2 PIN NO DESCRIPTION PIN NO DESCRIPTION P1 NC P2 ILAN2_MDI0 P 3 ILAN2_MDI0 P 4 ILAN2_MDI1 P 5 ILAN2_MDI1 P 6 ...

Page 64: ...onnector Pinouts PWR2 4 3 7 Power Connector PWR 1 PIN NO DESCRIPTION PIN NO DESCRIPTION 1 ACCON 2 VCC 3 GND Table 4 20 Power Connector Pinouts PWR1 4 3 8 R S 232 S erial Port Connector COM1 PIN NO DESCRIPTION PIN NO DESCRIPTION 1 INDCD1 2 INRX1 3 INTX1 4 INDTR1 5 GND 6 INDSR1 7 INRTS1 8 INCTS1 9 INRI1 Table 4 21 RS 232 Serial Port Connector Pinouts COM1 4 3 9 R S 232 S erial Port Connector COM2 PI...

Page 65: ...NCTS3 9 INRI3 Table 4 23 RS 232 Serial Port Connector Pinouts COM3 4 3 11 R S 232 S erial Port Connector COM4 PIN NO DESCRIPTION PIN NO DESCRIPTION 1 INDCD4 2 INRX4 3 INTX4 4 INDTR4 5 GND 6 INDSR4 7 INRTS4 8 INCTS4 9 INRI4 Table 4 24 RS 232 Serial Port Connector Pinouts COM4 4 3 12 R S 232 S erial Port Connector COM7 PIN NO DESCRIPTION PIN NO DESCRIPTION 1 NDCD7 2 NSIN7 3 NSOUT7 4 NDTR7 5 GND 6 ND...

Page 66: ...N A1 N A A2 ITXD5485 A3 N A A4 ITXD5485 A5 N A A6 IRXD5485 A7 N A A8 IRXD5485 Table 4 27 RS 422 485 Serial Port Connectors Pinouts COM5 4 3 15 R S 422 485 S erial Port Connectors COM6 PIN NO DESCRIPTION PIN NO DESCRIPTION B1 N A B2 ITXD6485 B3 N A B4 ITXD6485 B5 N A B6 IRXD6485 B7 N A B8 IRXD6485 Table 4 28 RS 422 485 Serial Port Connectors Pinouts COM6 4 3 16 US B 3 0 Connectors US B 3_12 PIN NO ...

Page 67: ... 2 CRT_GREEN 3 CRT_BLUE 4 NC 5 GND 6 GND 7 GND 8 GND 9 CRT_VCC 10 CRT_PLUG 11 NC 12 CRT_DDC_DATA 13 CRT_HSYNC 14 CRT_VSYNC 15 CRT_DDC_CLK Table 4 30 VGA Connector Pinouts VGA1 4 4 J umper S ettings The jumpers on the system motherboard are listed in Table 4 31 Connector Type Label Clear CMOS setup 3 pin header J_CMOS2 Table 4 31 Jumper 4 4 1 Clear CMOS S etup J _CMOS 2 Pin Description Short 1 2 Ke...

Page 68: ...TANK 820 H61 E mbedded S ys tem Page 55 Chapter 5 5 B IOS ...

Page 69: ...ys 1 Press the DEL or F2 key as soon as the system is turned on or 2 Press the DEL or F2 key when the Press DEL or F2 to enter SETUP message appears on the screen If the message disappears before the DEL or F2 key is pressed restart the computer and try again 5 1 2 Us ing S etup Use the arrow keys to highlight items press ENTER to select use the PageUp and PageDown keys to change entries press F1 ...

Page 70: ...IOS Navigation Keys 5 1 3 Getting Help When F1 is pressed a small help window describing the appropriate keys to use and the possible selections for the highlighted item appears To exit the Help Window press ESC or the F1 key again 5 1 4 Unable to R eboot after Configuration Changes If the computer cannot boot after changes to the system configuration is made CMOS defaults Use the jumper described...

Page 71: ...dded S ys tem Page 58 Save Exit Selects exit options and loads default settings The following sections completely describe the configuration options found in the menu items at the top of the BIOS screen and listed above ...

Page 72: ...code Revision 7 GT Info GT2 900 MHz IGFX VBIOS Version 2137 Memory RC Version 1 2 0 0 Total Memory 2048 MB DDR3 1333 Memory Frequency 1333 MHz PCH Information Name CougarPoint Stepping 05 B3 TXT Capability of Platform PCH Unsupported LAN PHY Revision N A ME FW Version 8 0 3 1427 ME Firmware SKU 1 5MB SPI Clock Frequency DOFR Support Supported Read Status Clock Frequnecy 33 MHz Write Status Clock F...

Page 73: ...ate option to set the system date Manually enter the day month and year S ys tem Time xx xx xx Use the System Time option to set the system time Manually enter the hours minutes and seconds 5 3 Advanced Use the Advanced menu BIOS Menu 2 to configure the CPU and peripheral devices through the following sub menus WAR NING Setting the wrong values in the sections below may cause the system to malfunc...

Page 74: ...l Help F2 Previous Values F3 Optimized Defaults F4 Save Exit ESC Exit Version 2 14 1219 Copyright C 2011 American Megatrends Inc BIOS Menu 2 Advanced 5 3 1 ACPI S ettings The ACPI Settings menu BIOS Menu 3 configures the Advanced Configuration and Power Interface ACPI options Aptio Setup Utility Copyright C 2011 American Megatrends Inc Advanced ACPI Settings ACPI Sleep State S1 CPU Stop Clock Sele...

Page 75: ...r to the RAM is maintained The computer returns slower to a working state but more power is saved 5 3 2 R TC Wake S ettings The RTC Wake Settings menu BIOS Menu 4 configures RTC wake event Aptio Setup Utility Copyright C 2011 American Megatrends Inc Advanced Wake system with Fixed Time Disabled Enable or disable System wake on alarm event When enabled System will wake on the date hr min sec specif...

Page 76: ...cannot generate a wake event Enabled If selected the following appears with values that can be selected Wake up every day Wake up date Wake up hour Wake up minute Wake up second After setting the alarm the computer turns itself on from a suspend state when the alarm goes off 5 3 3 Trus ted Computing Use the Trusted Computing menu BIOS Menu 5 to configure settings related to the Trusted Computing G...

Page 77: ...een Select Item EnterSelect Change Opt F1 General Help F2 Previous Values F3 Optimized Defaults F4 Save Exit ESC Exit Version 2 14 1219 Copyright C 2011 American Megatrends Inc BIOS Menu 5 TPM Configuration S ecurity Device S upport Dis able Use the Security Device Support option to configure support for the security device Disable DEFAULT Security device support is disabled Enable Security device...

Page 78: ...tion to enable or disable the Intel Hyper Threading Technology Disabled Disables the Intel Hyper Threading Technology Enabled DEFAULT Enables the Intel Hyper Threading Technology Intel Virtualization Technology Dis abled Use the Intel Virtualization Technology option to enable or disable virtualization on the system When combined with third party software Intel Virtualization technology allows sev...

Page 79: ...7 CPU Configuration The CPU Configuration menu BIOS Menu 7 lists the following CPU details Processor Type Lists the brand name of the CPU being used CPU Signature Lists the CPU signature value Microcode Patch Lists the microcode patch being used Max CPU Speed Lists the maximum CPU processing speed Min CPU Speed Lists the minimum CPU processing speed CPU Speed Lists the CPU processing speed Process...

Page 80: ...ection IDE Serial ATA Port 1 Empty Enable or disable SATA Device Select Screen Select Item EnterSelect Change Opt F1 General Help F2 Previous Values F3 Optimized Defaults F4 Save Exit ESC Exit Version 2 14 1219 Copyright C 2011 American Megatrends Inc BIOS Menu 8 IDE Configuration S ATA Controller s E nabled Use the SATA Controller s option to configure the serial ATA controller Enabled DEFAULT En...

Page 81: ...Megatrends Inc BIOS Menu 9 Intel TXT LT Configuration 5 3 7 US B Configuration Use the USB Configuration menu BIOS Menu 10 to read USB configuration information and configure the USB settings Aptio Setup Utility Copyright C 2011 American Megatrends Inc Advanced USB Configuration USB Devices 1 Keyboard Legacy USB Support Enabled Enables Legacy USB support AUTO option disables legacy support if no U...

Page 82: ...ed DEFAULT Legacy USB support enabled Disabled Legacy USB support disabled Auto Legacy USB support disabled if no USB devices are connected 5 3 8 F81216 S econdary S uper IO Configuration Use the F81216 Secondary Super IO Configuration menu BIOS Menu 11 to set or change the configurations for the serial ports Aptio Setup Utility Copyright C 2011 American Megatrends Inc Advanced F81216 Secondary Su...

Page 83: ...vious Values F3 Optimized Defaults F4 Save Exit ESC Exit Version 2 14 1219 Copyright C 2011 American Megatrends Inc BIOS Menu 12 Serial Port n Configuration Menu 5 3 8 1 1 S erial Port 7 Configuration S erial Port E nabled Use the Serial Port option to enable or disable the serial port Disabled Disable the serial port Enabled DEFAULT Enable the serial port Change S ettings Auto Use the Change Sett...

Page 84: ...isabled Disable the serial port Enabled DEFAULT Enable the serial port Change S ettings Auto Use the Change Settings option to change the serial port IO port address and interrupt address Auto DEFAULT The serial port IO port address and interrupt address are automatically detected IO 2C8h IRQ 11 Serial Port I O port address is 2C8h and the interrupt address is IRQ11 IO 2C0h IRQ 10 11 Serial Port I...

Page 85: ...ange Opt F1 General Help F2 Previous Values F3 Optimized Defaults F4 Save Exit ESC Exit Version 2 14 1219 Copyright C 2011 American Megatrends Inc BIOS Menu 13 F81866 Super IO Configuration 5 3 9 1 S erial Port n Configuration Use the Serial Port n Configuration menu BIOS Menu 14 to configure the serial port n Aptio Setup Utility Copyright C 2011 American Megatrends Inc Advanced Serial Port n Conf...

Page 86: ...ss and interrupt address are automatically detected IO 3F8h IRQ 4 Serial Port I O port address is 3F8h and the interrupt address is IRQ4 IO 3F8h IRQ 3 4 Serial Port I O port address is 3F8h and the interrupt address is IRQ3 4 IO 2F8h IRQ 3 4 Serial Port I O port address is 2F8h and the interrupt address is IRQ3 4 Device Mode R S 232 The Device Mode shows Serial Port 1 provides RS 232 communication...

Page 87: ...upt address is IRQ3 4 IO 2F8h IRQ 3 4 Serial Port I O port address is 2F8h and the interrupt address is IRQ3 4 Device Mode R S 232 The Device Mode shows Serial Port 2 provides RS 232 communications 5 3 9 1 3 S erial Port 3 Configuration S erial Port E nabled Use the Serial Port option to enable or disable the serial port Disabled Disable the serial port Enabled DEFAULT Enable the serial port Chang...

Page 88: ...S erial Port E nabled Use the Serial Port option to enable or disable the serial port Disabled Disable the serial port Enabled DEFAULT Enable the serial port Change S ettings Auto Use the Change Settings option to change the serial port IO port address and interrupt address Auto DEFAULT The serial port IO port address and interrupt address are automatically detected IO 2E8h IRQ 10 Serial Port I O ...

Page 89: ...the Change Settings option to change the serial port IO port address and interrupt address Auto DEFAULT The serial port IO port address and interrupt address are automatically detected IO 2D0h IRQ 10 Serial Port I O port address is 2D0h and the interrupt address is IRQ10 IO 2D0h IRQ 10 11 Serial Port I O port address is 2D0h and the interrupt address is IRQ10 11 IO 2D8h IRQ 10 11 Serial Port I O p...

Page 90: ...ial port IO port address and interrupt address Auto DEFAULT The serial port IO port address and interrupt address are automatically detected IO 2D8h IRQ 10 Serial Port I O port address is 2D8h and the interrupt address is IRQ10 IO 2D0h IRQ 10 11 Serial Port I O port address is 2D0h and the interrupt address is IRQ10 11 IO 2D8h IRQ 10 11 Serial Port I O port address is 2D8h and the interrupt addres...

Page 91: ...ct Screen Select Item EnterSelect Change Opt F1 General Help F2 Previous Values F3 Optimized Defaults F4 Save Exit ESC Exit Version 2 14 1219 Copyright C 2011 American Megatrends Inc BIOS Menu 15 Hardware Health Configuration PC Health S tatus The following system parameters and values are shown The system parameters that are monitored are System Temperatures o CPU Temperature o System Temperature...

Page 92: ...Screen Select Item EnterSelect Change Opt F1 General Help F2 Previous Values F3 Optimized Defaults F4 Save Exit ESC Exit Version 2 14 1219 Copyright C 2011 American Megatrends Inc BIOS Menu 16 FAN Configuration S mart Fan control Auto PWM Mode Use the Smart Fan control BIOS option to configure the CPU Smart Fan Full Mode Fan is on all the time Manual PWM Mode The fan spins at the speed set in the ...

Page 93: ...fan to rotate at full speed only when the CPU is at a very high temperature and therefore cause the system to be damaged The Temperature of Start option can only be set if the Smart Fan control option is set to Auto PWM Mode Use the Temperature of Start option to set the CPU temperature at which the cooling fan starts to rotate using the starting pulse width modulation PWM specified in the Start P...

Page 94: ...o select the linear rate at which the PWM mode increases with respect to an increase in temperature A list of available options is shown below 0 1 2 4 8 16 S ys tem S mart Fan control Auto Duty C ycle Mode Use the System Smart Fan control BIOS option to configure the System Smart Fan Manual Duty Mode The fan spins at the speed set in the manual setting Auto Duty Cycle Mode DEFAULT The fan adjusts ...

Page 95: ...rature Use the or key to change the Third Boundary Temperature value Enter a decimal number between 1 and 100 Fourth B oundary Temperature Use the or key to change the Fourth Boundary Temperature value Enter a decimal number between 1 and 100 5 3 11 S erial Port Cons ole R edirection The Serial Port Console Redirection menu BIOS Menu 17 allows the console redirection options to be configured Conso...

Page 96: ...sole Redirection Disabled Console Redirection Settings Console Redirection Enable or Disable Select Screen Select Item EnterSelect Change Opt F1 General Help F2 Previous Values F3 Optimized Defaults F4 Save Exit ESC Exit Version 2 14 1219 Copyright C 2011 American Megatrends Inc BIOS Menu 17 Serial Port Console Redirection Cons ole R edirection Dis abled Use Console Redirection option to enable or...

Page 97: ... F1 General Help F2 Previous Values F3 Optimized Defaults F4 Save Exit ESC Exit Version 2 14 1219 Copyright C 2011 American Megatrends Inc BIOS Menu 18 Console Redirection Settings Terminal Type ANS I Use the Terminal Type option to specify the remote terminal type VT100 The target terminal type is VT100 VT100 The target terminal type is VT100 VT UTF8 The target terminal type is VT UTF8 ANSI DEFAU...

Page 98: ... No parity bit is sent with the data bits Even The parity bit is 0 if the number of ones in the data bits is even Odd The parity bit is 0 if the number of ones in the data bits is odd Mark The parity bit is always 1 This option does not provide error detection Space The parity bit is always 0 This option does not provide error detection S top B its 1 Use the Stop Bits option to specify the number ...

Page 99: ... min when OS crashes Please install Auto Recovery API service before enabling this function Select Screen Select Item EnterSelect Change Opt F1 General Help F2 Previous Values F3 Optimized Defaults F4 Save Exit ESC Exit Version 2 14 1219 Copyright C 2011 American Megatrends Inc BIOS Menu 19 iEi Feature Auto R ecovery Function Dis abled Use Auto Recovery Function option to enable or disable the aut...

Page 100: ...et BIOS menu may cause the system to malfunction Aptio Setup Utility Copyright C 2011 American Megatrends Inc Main Advanced Chipset Boot Security Save Exit PCH IO Configuration System Agent SA Configuration PCH Parameters Select Screen Select Item EnterSelect Change Opt F1 General Help F2 Previous Values F3 Optimized Defaults F4 Save Exit ESC Exit Version 2 14 1219 Copyright C 2011 American Megatr...

Page 101: ... Exit ESC Exit Version 2 14 1219 Copyright C 2011 American Megatrends Inc BIOS Menu 21 PCH IO Configuration High Definition Audio Controller E nabled Use the High Definition Audio Controller BIOS option to enable or disable the High Definition Audio controller Disabled The onboard High Definition Audio controller is disabled Enabled DEFAULT The onboard High Definition Audio controller automaticall...

Page 102: ...ct which of IGFX PEG PCI Graphics device should be Primary Display Or select SG for Switchable Gfx Select Screen Select Item EnterSelect F1 General Help F2 Previous Values F3 Optimized Defaults F4 Save ESC Exit Version 2 14 1219 Copyright C 2011 American Megatrends Inc BIOS Menu 22 System Agent SA Configuration Primary Dis play Auto Use the Primary Display option to select the display device used ...

Page 103: ...ght C 2011 American Megatrends Inc BIOS Menu 23 Graphics Configuration DVMT Pre Allocated 256MB Use the DVMT Pre Allocated option to set the amount of system memory allocated to the integrated graphics processor when the system boots The system memory allocated can then only be used as graphics memory and is no longer available to applications or the operating system Configuration options are list...

Page 104: ...et Boot Security Save Exit Boot Configuration Bootup NumLock State On Quiet Boot Enabled Launch PXE OpROM Disabled Option ROM Messages Force BIOS UEFI Boot Disabled Boot Option Priorities Select the keyboard NumLock state Select Screen Select Item EnterSelect Change Opt F1 General Help F2 Previous Values F3 Optimized Defaults F4 Save Exit ESC Exit Version 2 14 1219 Copyright C 2011 American Megatr...

Page 105: ...ft hand corner of the 10 key pad The Number Lock LED on the keyboard lights up when the Number Lock is engaged Quiet B oot E nabled Use the Quiet Boot BIOS option to select the screen display when the system boots Disabled Normal POST messages displayed Enabled DEFAULT OEM Logo displayed instead of POST messages Launch PXE OpR OM Dis abled Use the Launch PXE OpROM option to enable or disable boot ...

Page 106: ... only limits access to Setup and is only asked for when entering Setup If ONLY the User s password is set then this is a power on password and must be entered to boot or enter Setup In Setup the User will have Administrator rights The password length must be Minimum length 3 Maximum length 20 Administrator Password User Password Set Administrator Password Select Screen Select Item EnterSelect Chan...

Page 107: ...t Item EnterSelect Change Opt F1 General Help F2 Previous Values F3 Optimized Defaults F4 Save Exit ESC Exit Version 2 14 1219 Copyright C 2011 American Megatrends Inc BIOS Menu 26 Exit S ave Changes and R es et Use the Save Changes and Reset option to save the changes made to the BIOS options and reset the system Dis card Changes and R es et Use the Discard Changes and Reset option to exit the sy...

Page 108: ...Page 95 S ave as Us er Defaults Use the Save as User Defaults option to save the changes done so far as user defaults R es tore Us er Defaults Use the Restore User Defaults option to restore the user defaults to all the setup options ...

Page 109: ...TANK 820 H61 E mbedded S ys tem Page 96 Appendix A A R egulatory Compliance ...

Page 110: ...ions of Directive 2014 53 EU Български Bulgarian IEI Integration Corp декларира че този оборудване е в съответствие със съществените изисквания и другите приложими правила на Директива 2014 53 EU Česky Czech IEI Integration Corp tímto prohlašuje že tento zařízení je ve shodě se základními požadavky a dalšími příslušnými ustanoveními směrnice 2014 53 EU Dansk Danish IEI Integration Corp erklærer he...

Page 111: ... un citiem ar to saistītajiem noteikumiem Direktīvas 2014 53 EU Lietuvių Lithuanian IEI Integration Corp deklaruoja kad šis įranga atitinka esminius reikalavimus ir kitas 2014 53 EU Direktyvos nuostatas Nederlands Dutch IEI Integration Corp dat het toestel toestel in overeenstemming is met de essentiële eisen en de andere relevante bepalingen van richtlijn 2014 53 EU Malti Maltese IEI Integration ...

Page 112: ...ločili direktive 2014 53 EU Slovensky Slovak IEI Integration Corp týmto vyhlasuje že zariadenia spĺňa základné požiadavky a všetky príslušné ustanovenia Smernice 2014 53 EU Suomi Finnish IEI Integration Corp vakuuttaa täten että laitteet on direktiivin 2014 53 EU oleellisten vaatimusten ja sitä koskevien direktiivin muiden ehtojen mukainen Svenska Swedish IEI Integration Corp förklarar att denna u...

Page 113: ...e interference at his own expense Federal Communication Commission Interference Statement This equipment has been assembled with components that comply with the limits for a Class B digital device pursuant to Part 15 of the FCC Rules These limits are designed to provide reasonable protection against harmful interference in a residential installation This equipment generates uses and can radiate ra...

Page 114: ...ironmentally Friendly Use Period EFUP This is an estimate of the number of years that these substances would not leak out or undergo abrupt change This product may contain replaceable sub assemblies components which have a shorter EFUP such as batteries and lamps These components will be separately marked ...

Page 115: ...TANK 820 H61 E mbedded S ys tem Page 102 Appendix B B S afety Precautions ...

Page 116: ...e system Do not apply voltage levels that exceed the specified voltage range Doing so may cause fire and or an electrical shock Electric shocks can occur if opened while still powered on Do not drop or insert any objects into the ventilation openings If considerable amounts of dust water or fluids enter the system turn off the power supply immediately unplug the power cord and contact the system v...

Page 117: ...ti static pad When configuring or working with an electrical component place it on an antic static pad This reduces the possibility of ESD damage Only handle the edges of the electrical component When handling the electrical component hold the electrical component by its edges B 1 3 Product Dis pos al CAUTION Risk of explosion if battery is replaced by and incorrect type Only certified engineers s...

Page 118: ...nce and Cleaning Prior to cleaning any part or component of the TANK 820 H61 please read the details below The interior of the TANK 820 H61 does not require cleaning Keep fluids away from the TANK 820 H61 interior Be cautious of all small removable components when vacuuming the TANK 820 H61 Turn the TANK 820 H61 off before cleaning the TANK 820 H61 Never drop any objects or liquids through the ope...

Page 119: ...amage the plastic parts Vacuum cleaner Using a vacuum specifically designed for computers is one of the best methods of cleaning the TANK 820 H61 Dust and dirt can restrict the airflow in the TANK 820 H61 and cause its circuitry to corrode Cotton swabs Cotton swaps moistened with rubbing alcohol or water are excellent tools for wiping hard to reach areas Foam swabs Whenever possible it is best to ...

Page 120: ...TANK 820 H61 E mbedded S ys tem Page 107 Appendix C C Hazardous Materials Dis clos ure ...

Page 121: ...nd lamps These components will be separately marked Please refer to the following table Part Name Toxic or Hazardous Substances and Elements Lead Pb Mercury Hg Cadmium Cd Hexavalent Chromium CR VI Polybrominated Biphenyls PBB Polybrominated Diphenyl Ethers PBDE Housing O O O O O O Display O O O O O O Printed Circuit Board O O O O O O Metal Fasteners O O O O O O Cable Assembly O O O O O O Fan Assem...

Page 122: ... 像是电池或灯管 这些元 件将会单独标示出来 部件名称 有毒有害物质或元素 铅 Pb 汞 Hg 镉 Cd 六价铬 CR VI 多溴联苯 PB B 多溴二苯 醚 PB DE 壳体 O O O O O O 显示 O O O O O O 印刷电路板 O O O O O O 金属螺帽 O O O O O O 电缆组装 O O O O O O 风扇组装 O O O O O O 电力供应组装 O O O O O O 电池 O O O O O O O 表示该有毒有害物质在该部件所有物质材料中的含量均在 SJ T 11363 2006 现由 GB T 26572 2011 取代 标准规定的限量要求以下 X 表示该有毒有害物质至少在该部件的某一均质材料中的含量超出 SJ T 11363 2006 现由 GB T 26572 2011 取代 标准规定的限量要求 ...

Reviews: